A smartphone is the most used piece of technology in our daily life. It has become that companion in our life without which, we might struggle to pass a day. Moreover, with the extensive usage of smartphones, it has also become the epicenter of our personal data and information. Our smartphones store images, videos, chats, applications, payment info, etc. that are very important to carry out our daily life. Now, if we store so much important data on our smartphones then, we should always create a backup of the data, that would help us get back our data in case our smartphones are lost, stolen or a bug in the firmware has been wiped the data off.
And if you are also worried about your data and want to create a backup of your Android device, then you are at the right place as in this place, we will give you a complete guide and 4 methods using which you will be able to back up the entire data of your Android device. This guide is not specifically for any particular smartphone but, can be used for any smartphone or tablet or any device running Android as its OS. So, that being said, let us get straight into the article itself:

Page Contents
Why Backing Up Is Important?
There shouldn’t be any questions in your mind on why backing up your data is important. It is pretty simple because we use our smartphones the most in our day-to-day life and it stores all the data be it, images, videos, payment info, text, messages, etc. all in one place. Moreover, if you are not careful with it then, you might lose all of your personal data. Besides, backing up the data is more important in cases where your Android device is lost or stolen. In fact, it is very important that you regularly take a backup of your phone in the following scenario, mentioned below:
- Theft
- Software failure
- Malware attack
- Accidental loss of data
- Switching over to a new phone
How to Backup your Android Device:
Below are the four methods that you can follow to backup your phone.
First Method: Using Cloud Service:
You can make use of any cloud services but, the most convenient and probably the most easily accessible cloud storage that you can use on your Android device is Google Drive. Below are the steps to take a backup of cloud services:
- Head over to Settings.
- Once you are inside the Settings menu tap on Accounts.
- Now tap on Google under Accounts and choose your Google email address that you want to back up into.
- Then select the files that your wish to backup.
- Tap on More and press Sync now.
- That’s it!
Second Method: Using Third-Party Apps:
Now there are several third-party apps that let you backup your phone easily and more quickly. Some of the apps that you can use to back up the data are:
- My Backup Pro: With the help of this app, you can backup all of your device’s data on your SD Card and on a USB drive using OTG. You can also take cloud backup as well. This app also allows you to schedule automatic backups as well. Moreover, with the help of this app, you can backup files like Applications, Photos, Music, Videos, Contacts, Call log, Browser Bookmarks, SMS (text messages), MMS (message attachments), Calendar, System Settings, Dictionary, Music Playlists, APNs, Home Screens (Some devices), Alarms (Some devices), and more. However, there are some more features that you can get after rooting your phone.
[googleplay url=”https://play.google.com/store/apps/details?id=com.rerware.android.MyBackupPro”] - Super Backup & Restore: With this app, you can backup applications, contacts, text messages, call history, bookmarks, calendars to your SD card, Gmail, or Google Drive. Moreover, with the help of this app, you can easily share any app with your friends by one tap, schedule automatic updates, backup SMS, contacts, and other files.
[googleplay url=”https://play.google.com/store/apps/details?id=com.idea.backup.smscontacts”] - App Backup & Restore: This app is probably the most popular and easiest backup application that is available on the Play Store. I have personally used this app for quite some time and it gives your all the features that let you back up all of your Android device’s data. In fact, this app can also act as APK Extractor, Installer, Assistant, Sharer, Editor, etc as well.
[googleplay url=”https://play.google.com/store/apps/details?id=mobi.usage.appbackup”]
To know more about other apps that let you take a complete backup of your phone without any root access, you can read our previous post on Top 10 Apps to Backup Your Android Phone Without Root.
Third: On Rooted Device:
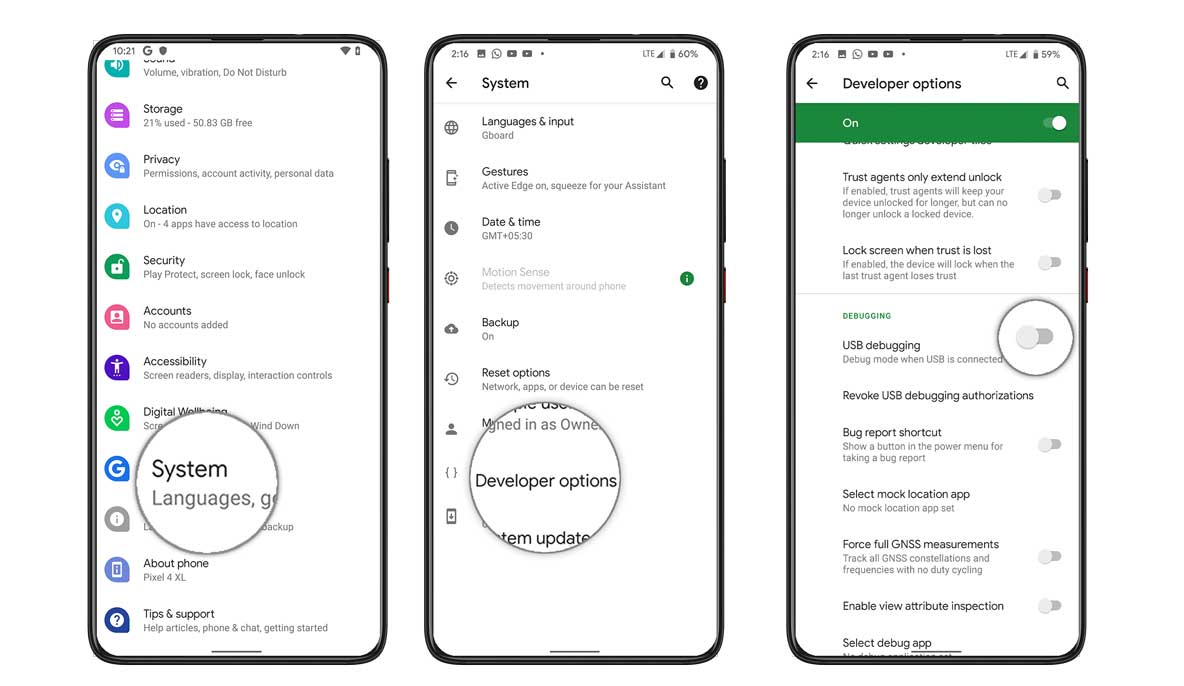
- Make sure that you have enabled USB Debugging on your phone under Developer Option.
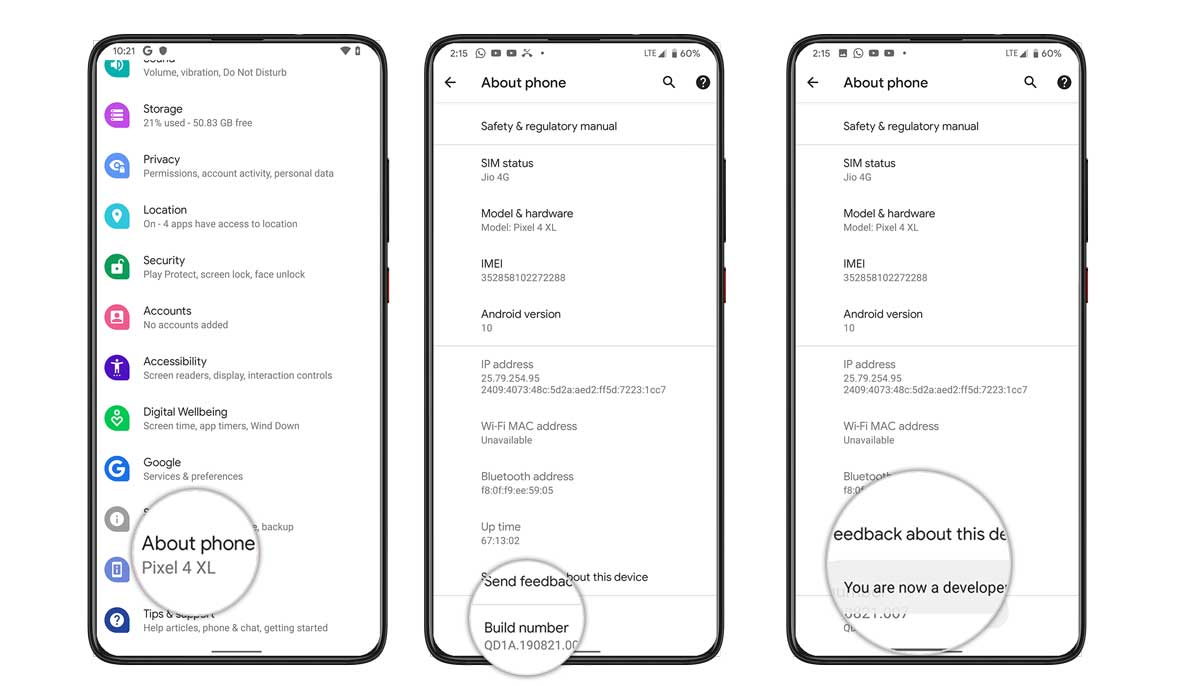
– Go to Settings>>About Phone>>tap on the Build Number 7 times till you see a toast message “You are now a developer”.
– Under the Developer Options, you need to enable USB Debugging. To do that again head to the Settings>>Developer Options>>enable USB Debugging toggle.
- Now connect your phone to the PC using the USB Cable.
- Agree the USB Debugging prompt on your phone.

- Now download and extract the contents of ADB and Fastboot tools on your PC.
- Open a command prompt on the same folder and type the following:
adb backup –all
- The above command will take a backup of your app’s data and system data.
- You can also enter the below command to take a backup of your data on the SD Card.
adb backup –shared
- Once the commands are executed, you will be prompted to provide an encryption password. Then tap on Backup my data to take the complete backup.
Fourth: Using Computer:
- Just connect your Android device to the PC.
- Then check the notification bar on your phone and select Transfer files.
- Boom! start copying the files that you wish to store in your PC and paste it in the desired location.
So, there you have it from my side in this post. I hope you guys liked this post and were able to back up the data on your Android device. Let us know in the comments below if you come across any issues while following the above-mentioned posts. Until the next post…Cheers!

Deference to op , some superb selective information .
Thanks for the information.
I want update my phone
Sir mujhe Android version 11update nahi mila hai phone me dubara bhajo
Sir mujhe Android version 11update nahi mila hai phone me dubara bhajo
Realmi Android 9 Pic