Call of Duty: Modern Warfare 2 (MW2) is one of the best-in-class first-person shooter games that has a separate fanbase. It’s a successor to the first edition of Modern Warfare which was a great hit. We already know that Call of Duty games are prone to crashes, bugs, errors, in-game graphical glitches, and more. Well, Modern Warfare 2 Failed to Start Matchmaking Error Code 25509 is also one of them and unfortunate players are literally getting affected by this error.
As per several reports in forums, whenever COD MWII players try to get into the game or proceed to the matchmaking screen, they receive the specific error message that says “Failed to start matchmaking, please retry the operation. Error code: 25509.” To be precise, this particular error message appears whenever there is a server connectivity issue due to potential reasons at your end or if somehow the game server becomes unresponsive. But there is nothing to worry.

Page Contents
- Fix: Modern Warfare 2 Failed To Start Matchmaking Error Code 25509
- 1. Restart the PC or Xbox Device
- 2. Run Modern Warfare 2 as an Administrator
- 3. Verify and Repair the Game Files
- 4. Check for MWII Updates
- 5. Check Your Internet Connection
- 6. Update the Network Driver
- 7. Disable Antivirus Protection
- 8. Turn Off Windows Firewall
- 9. Don’t Use VPN
- 10. Power Cycle the Wi-Fi Router
- 11. Check the Activision Server Status
- 12. Reinstall COD Modern Warfare II
Fix: Modern Warfare 2 Failed To Start Matchmaking Error Code 25509
This 25509 error code occurs on both PC and Xbox platforms due to multiple reasons. Such as a poor internet connection, conflicts with the networking device, networking driver glitch, an outdated game patch version, corrupted or missing game files, antivirus or firewall blocking, VPN-related issues, server downtime, corrupted game installation, and more. So, if you’re experiencing this error, make sure to check out all the workarounds mentioned below that help. Now, without further ado, let’s jump into it.
1. Restart the PC or Xbox Device
It’s highly recommended to simply restart your PC or the Xbox console to check if the system glitch and cache data issue gets cleared or not.
2. Run Modern Warfare 2 as an Administrator
Ensure to run the MWII.exe app as an administrator on the PC by following the steps below to ensure there is no issue with the system permission while running programs.
- Go to the installed game directory.
- Right-click on the COD MWII.exe application file on your PC.
- Click on Properties > Click on the Compatibility tab.

- Click on the Run this program as an administrator checkbox to enable it.
- Once done, click on Apply and then OK to save changes.
3. Verify and Repair the Game Files
Sometimes corrupted or missing game files on the PC might also trouble you a lot while launching the title. It’s always better to verify and repair the game files by following the steps below on your PC to avoid errors.
Battle.net:
- Open Battle.net > Click on Modern Warfare II.
- Select the Cog icon beside the Play button.
- Now, select Scan and Repair > Wait for the repair to complete.
Steam:
- Open Steam > Go to Library.
- Right-click on Modern Warfare II in your library.
- Go to Settings and select Properties.
- Click on Local Files and select Verify integrity of game files.
- Wait for the process to complete.
4. Check for MWII Updates
It’s always recommended to check for the Call of Duty Modern Warfare II game update on your PC manually by following the steps below. An outdated game patch version might trigger several issues with the game launching or server connectivity in most cases.
Battle.net:
- Open the Battle.net launcher.
- Select Modern Warfare II on the Battle.net client.
- Click on the cog icon next to the game.
- Select Check for Updates.
- If an update is available, just download and install the update.
Steam:
- Open the Steam client > Go to Library.
- Right-click on Modern Warfare II > Select Properties.
- Then click on Updates > From Automatic Updates, make sure to select Only update this game when I launch it.
- Now, launch Modern Warfare II and wait for it to download whenever available.
- Go back to the Updates section and select High Priority – Always auto-update this game before others (if you want).
For Xbox:
- Go to Call of Duty Modern Warfare 2 on the Xbox dashboard.
- Hit the Start button and select Manage Game and Add-ons.
- Now, you’ll check if there is an update available or not.
- If available, select Update All.
- Once done, re-launch the game.
5. Check Your Internet Connection
You can also check the internet connection at your end whether it’s working fine or not. A slow or unstable network connectivity can trigger several issues. In some cases, too many devices are connected to the same network which can also reduce the data speed. If you’re using Wi-Fi, try using an ethernet connection for better stability. Otherwise, try using a different connection instead.
6. Update the Network Driver
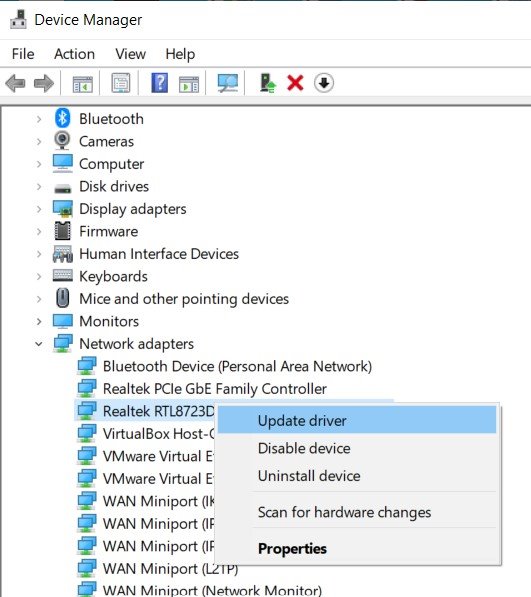
It may also be possible that somehow your networking driver becomes outdated for a while and that’s why you’re encountering issues with the server connectivity. To do this:
- Press the Win+X keys to open the Quick Link Menu.
- Select Device Manager > Double-click on Network adapters.
- Now, right-click on the active network adapter.

- Select Update driver > Choose Search automatically for drivers.
- If there is an update available, it’ll automatically download and install the update.
- Once done, you can restart your computer to apply changes.
7. Disable Antivirus Protection
You can also try turning off the Windows Defender antivirus protection on your PC to ensure there is no antivirus software blocking the game files from running properly.
- Press the Win+I keys to open Windows Settings.
- Click on Update & Security > Click on Windows Security from the left pane.
- Now, click on the Open Windows Security button.
- Go to Virus & Threat Protection > Click on Manage Settings.
- Next, you’ll need to Turn Off the Real-time Protection toggle.
- If prompted, click on Yes to proceed further.
In case, you’re using any other third-party antivirus program on your PC then just turn off the real-time protection feature.
8. Turn Off Windows Firewall
Windows Firewall basically prevents unauthorized ongoing connections from the PC to online servers. You can try turning it off temporarily to check for the issue again.
- Open the Start Menu > Type Windows Firewall and click on Windows Defender Firewall from the search result.

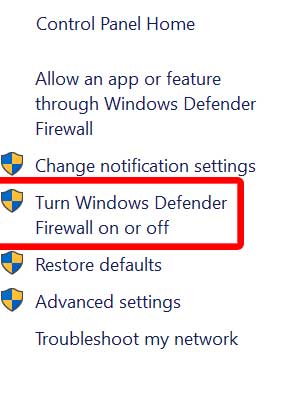
- Now, click on Turn Windows Defender Firewall on or off from the left pane.

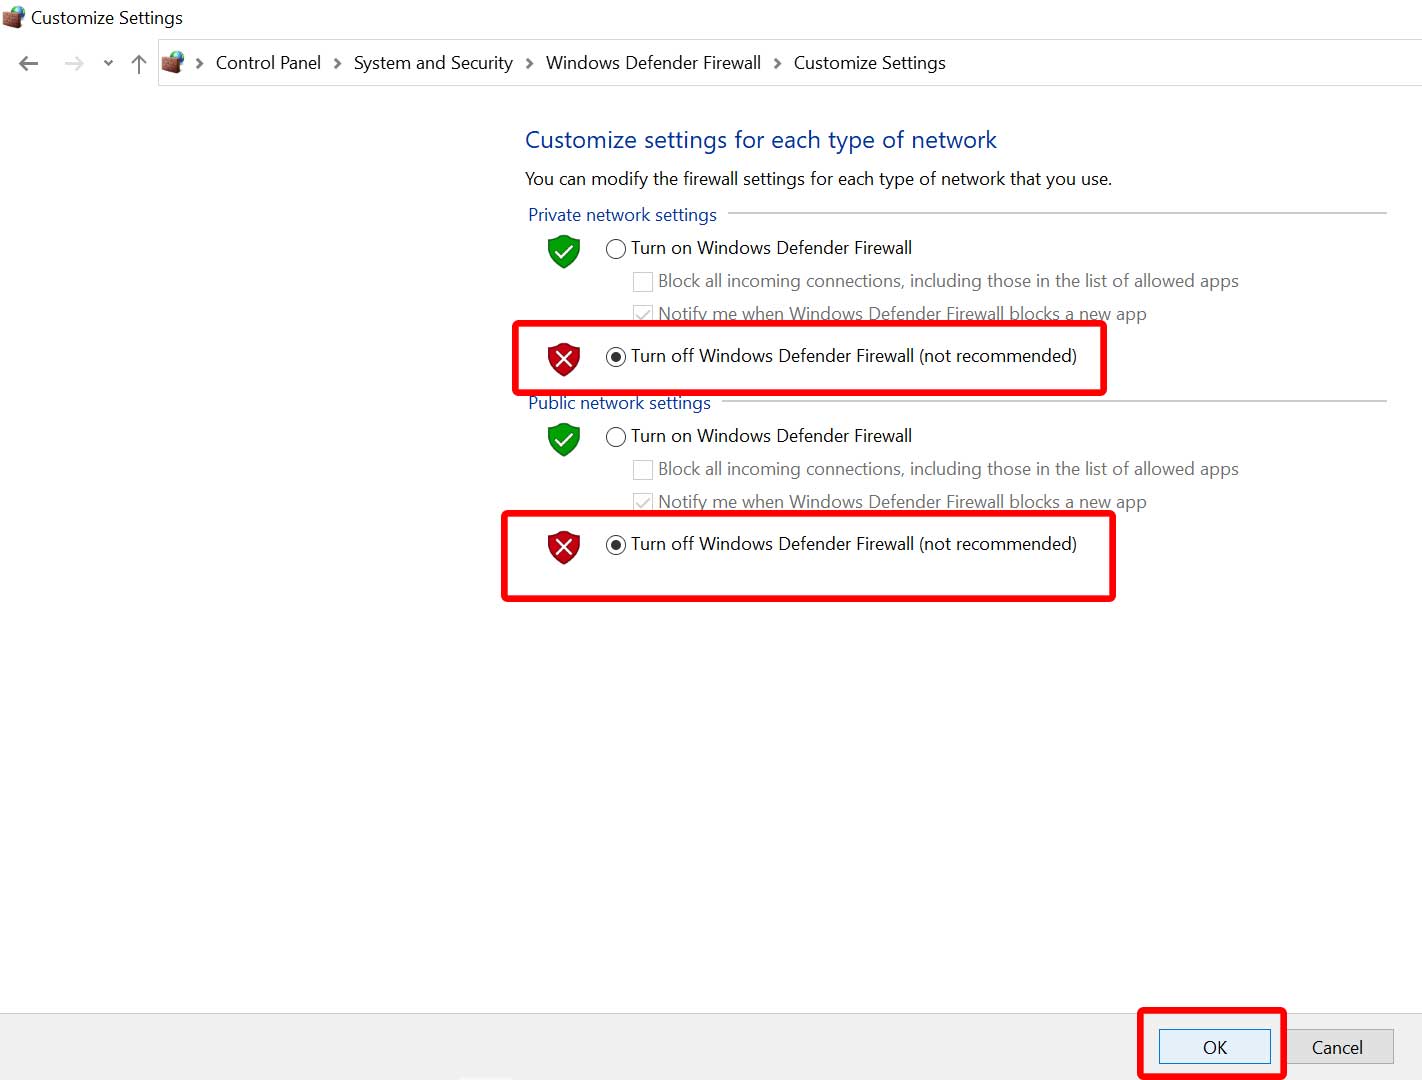
- Make sure to turn off all the Private, Domain, and Public Network Settings options.
- Finally, click on OK to save changes.
9. Don’t Use VPN
Try skipping to use a VPN or Proxy server at your end to check if the server connectivity or matchmaking error happening further. VPNs generally offer better connectivity to the geo-restricted content or games but sometimes it may increase the ping delay and latency which eventually ruins the matchmaking process.
10. Power Cycle the Wi-Fi Router
We’ll also recommend you perform a power cycle to your Wi-Fi router by following the steps below to easily clear networking glitches or temporary cache issues.
- Just Power Off the Wi-Fi router.
- Once the LED indicator stops blinking, unplug the power cable from the power source.
- Now, wait for around 30 seconds, and then plug back the power cable in.
- Then Power On the router and check for the issue again.
11. Check the Activision Server Status
You can also check for Activision Online Services here to ensure whether there is an issue with the server or not. Sometimes issues with the server downtime or outage might trouble you to get into the game servers or join the matchmaking smoothly. You’re good to go if the online status is active or operational for all platforms. Otherwise, you can wait for a couple of hours and try again. Just select the drop-down menu and choose Call of Duty: Modern Warfare II.
12. Reinstall COD Modern Warfare II
If none of the methods worked for you then make sure to uninstall and reinstall the COD: MW2 game on the gaming device by following the steps below. Sometimes it can be better to reinstall the game to clear out any potential glitches or game file installation issues.
For Battle.net:
- Open the Battle.net client.
- Select Call of Duty: Modern Warfare II from the left panel.
- Choose the Options menu on the left side.
- Click on Uninstall Game > If prompted, confirm the uninstallation process.
- Once done, close the Battle.net launcher, and reboot the PC.
- Then open the Battle.net launcher again > Start installing COD: MW2.
- Click on the Options menu > Select Modify Install.
- Select the mode that you want to install and select Confirm.
- Finally, select Start Install > Wait for it to complete.
- You’re good to go. Enjoy!
For Steam:
- Open the Steam client on your PC.
- Go to Library > Right-click on COD MW2.
- Select Uninstall > Click on Delete to confirm.
- Wait for the uninstallation process to complete > Exit the Steam client.
- Now, open the File Explorer application.
- Copy-paste C:\Program Files (x86)\Steam\steamapps\common on the address bar and hit Enter to search for the location.
- Go to the COD MW2 folder > Simply Delete the folder completely.
- Reboot the PC to apply changes > Open Steam Store and Reinstall the COD MW2 game again.
For Xbox:
- Press the Xbox button on the controller to open the Guide menu.
- Select My Games and Apps > Hit See All > Choose Games.
- Then select the Ready to Install tab > Select Queue.
- Select the MWII game that you’re trying to reinstall.
- Now, press the Menu button on your controller.
- Select Manage Game & add-ons or Manage App.
- Choose MWII > Select Uninstall all.
- Select Uninstall All to confirm the task.
- Wait for the uninstallation process to complete.
- Reboot the system to apply changes.
- Press the Xbox button on the controller to open the Guide menu again.
- Hit My Games and Apps > Select See All> Go to Games.
- Select the Ready to Install tab > Hit Install for MWII.
- Wait for the installation process and then restart the console.
That’s it, guys. We assume this guide was helpful to you. For further queries, you can comment below.
