Call of Duty: Modern Warfare III (2023) is prone to bugs and errors since it has been live for the pre-order. Recently, several players have encountered the COD Modern Warfare 3 Error Code 0x00001337 on the PC version while launching the game. Startup crashes or issues might occur in most cases due to multiple potential reasons that we can’t deny. Now, if you’re also one of the victims to experience the same 0x00001337 error code then you can check out this guide.
Generally, the Error Code 0x00001337 in COD MWIII 2023 occurs while getting into the game. Talking about the multiple reasons, it seems that in-game overlays running in the background, an outdated game patch version, corrupted or missing game files, an outdated graphics driver, incompatible graphics settings in the game, not using the dedicated graphics card, issues with the startup apps, and more can be crucial. So, you can try resolving this issue manually.

Page Contents
- What is Modern Warfare 3 Error Code 0x00001337 and How to Fix?
- 1. Restart the PC
- 2. Run Modern Warfare 3 as an Administrator
- 3. Check for Modern Warfare 3 Updates
- 4. Verify and Repair the Game Files
- 5. Disable Overlay Apps
- 6. Check for Graphics Driver Updates
- 7. Use the Dedicated Graphics Card
- 8. Disable Integrated Graphics
- 9. Turn Off Razer Applications
- 10. Close Background Tasks
- 11. Perform a Clean Boot
- 12. Disable GeForce Experience Optimization
- 13. Disable Hardware-Accelerated GPU Scheduling
- 14. Run a SFC Scan
- 15. Reinstall COD MWIII
What is Modern Warfare 3 Error Code 0x00001337 and How to Fix?
We’ve managed to share with you a couple of workarounds that should come in handy. Make sure to follow all troubleshooting methods until the problem has been fixed. So, without further ado, let’s jump into it.
1. Restart the PC
Before performing any other workarounds, you should always restart your PC or gaming console to simply refresh the system. Sometimes temporary system glitches or cache data issues can trigger multiple conflicts with the game multiplayer not working problem. So, try rebooting the system no matter what you’re using.
2. Run Modern Warfare 3 as an Administrator
You should run the Call of Duty Modern Warfare 3 game application as an administrator on Windows to allow the system user account control permission. Without having the permission, some applications might not work properly. To do this:
- Right-click on the COD: MWIII application on your PC.
- Select Properties > Click on the Compatibility tab.

- Now, click on the Run this program as an administrator option to enable it.
- Click on Apply and select OK to save changes.
- Once done, run the game to check for the error.
3. Check for Modern Warfare 3 Updates
In some cases, an outdated game patch version can also trouble you a lot with the game launching & errors. Updating the game to the latest version will help in reducing bugs and stability issues most of the time. To easily update the game, check the following steps:
Battle.net:
- Open the Battle.net client.
- Go to Game Library > Select Modern Warfare III.
- Click on the cog wheel icon next to the game.
- Next, click on Check for Updates.
- If an update is available, download and install it.
Steam:
- Open the Steam client > Go to Game Library.
- Right-click on Modern Warfare III > Select Properties.
- Click on Updates > Navigate to the Automatic Updates tab.
- Select Only update this game when I launch it.
- It’ll automatically install updates whenever available.
4. Verify and Repair the Game Files
Sometimes corrupted or missing game files on the PC might also trouble you while starting the game. It’s always better to verify and repair the game files by following the steps below on your PC to avoid errors.
Battle.net:
- Open Battle.net > Click on Modern Warfare III.
- Select the Cog Wheel icon next to the Play button.
- Now, select Scan and Repair > Wait for the repair to complete.
Steam:
- Open the Steam client > Go to Library.
- Right-click on Modern Warfare III in your library.
- Go to Settings and select Properties.
- Click on Local Files > Select Verify integrity of game files.
- Wait for the process to complete.
5. Disable Overlay Apps
Third-party overlay applications sometimes consume higher system resources which can cause game launching issues up to some extent.
Discord Overlay:
- Open Discord > Click on the gear icon at the bottom.
- Go to Overlay from App Settings.
- Turn on – Enable in-game overlay.
- Go to Games > Choose Modern Warfare 3.
- Enable in-game overlay – Turn it Off.
- Then restart the system.
Xbox Game Bar:
- Press the Win+I keys to open Windows Settings.
- Click on Gaming > Go to Game Bar.
- Record game clips, screenshots, and broadcast using Game bar – Turn it Off.
Game Mode:
- Press the Win+I keys to open Windows Settings.
- Click on Gaming > Go to Game Mode > Turn it Off.
Nvidia GeForce Experience Overlay:
- Open Nvidia GeForce Experience.
- Navigate to Settings.
- Click on General > Turn Off – In-Game Overlay.
- Once done, restart the PC to apply changes.
Other Overlays:
There are some other third-party overlay applications that can be installed on your system that should be disabled manually. Talking about the other overlay apps, we’ve listed the common ones below:
- MSI Afterburner
- Rivatuner Statistics
- Third-party RGB software
- Any other keyboard & mouse customizing software
- Other overclocking apps
- Screen recording or broadcasting apps
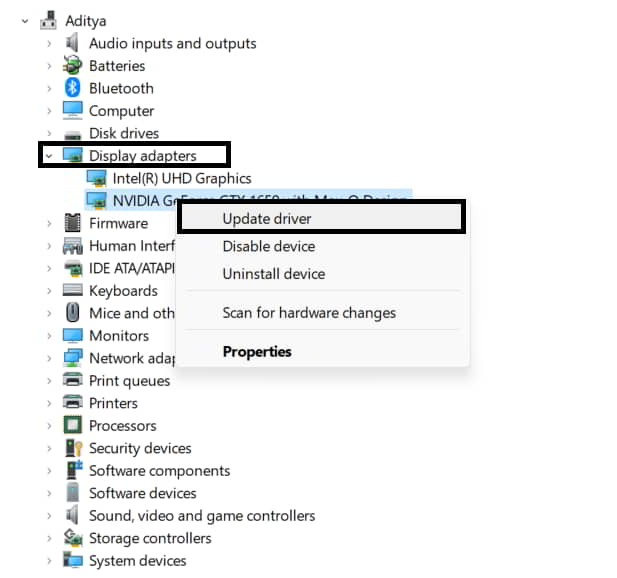
6. Check for Graphics Driver Updates
Sometimes issues with the graphics card driver such as an outdated driver or corrupted driver on the system can eventually trigger multiple conflicts while playing video games. It’s suggested to check for the graphics driver and install the latest driver version.
Recommended Update:
- Press the Win+X keys > Click on Device Manager from the list.
- Double-click on Display Adapters.
- Right-click on the dedicated graphics card that you use.

- Select Update Driver > Click on Search automatically for drivers.
- If there is an update available, it’ll automatically download & install the latest version.
- Once done, restart the computer to apply changes.
Manual Update:
If you can’t find any pending updates, head over to the official website of the respective graphics card brand below and search manually for the latest update. Do remember that you’ll always have to search for the latest driver version and specific for the model you’re using. If a new version is available for the graphics card, download the driver and install it on your PC. You can jump to the link below to do so:
7. Use the Dedicated Graphics Card
You should always use the dedicated graphics card on your PC to avoid game launching or graphical issues. In case, the integrated HD GPU is set as a default one then you’ll face issues.
For Nvidia:
- Right-click on the empty area on the desktop screen.
- Click on NVIDIA Control Panel.
- Select 3D Settings > Choose Manage 3D Settings in the left pane.
- Then select the Program Settings tab.
- Choose Call of Duty: Modern Warfare III from the drop-down list.
- If not available, click on Browse and go to the Call of Duty HQ directory.
- Open the sp23 folder > Add sp23-cod.exe to the list.
- Now, select a High-performance NVIDIA processor.
- Save changes and reboot the PC to apply changes.
For AMD:
Switchable Graphics offers several standard operating modes and can be configured to run a specific application using the desired GPU. AMD graphics card users should use the following steps.
- Right-click on the empty area on the desktop screen.
- Select AMD Radeon Settings from the context menu.
- Next, click on System > Select Switchable Graphics.
- Save changes and reboot the PC to apply changes.
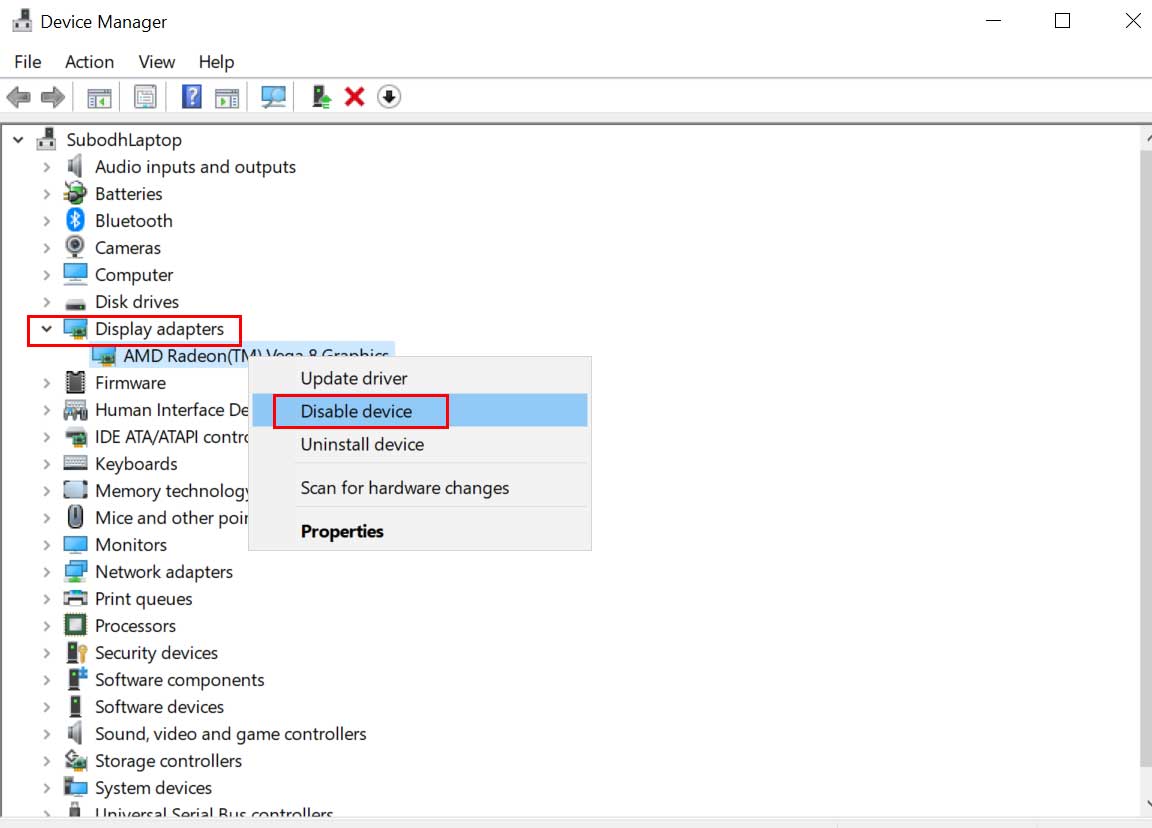
8. Disable Integrated Graphics
Sometimes the system may use an integrated graphics card by default which can cause multiple issues with the game launching experience or graphics-related conflicts. It’s suggested to disable the integrated graphics device on the PC by following the steps below.
- Press the Win+X keys > Open Device Manager.
- Double-click on Display Adapters.
- Right-click on the integrated GPU > Click on Disable Device.

- If prompted, confirm the same.
- Once done, reboot the PC to apply changes.
9. Turn Off Razer Applications
In case, you’re using any of the Razer applications on your system then make sure to disable them all to check if the problem has been fixed or not. Some of the COD MWIII players have tried this trick and found it useful enough.
10. Close Background Tasks
Background running tasks are useful for the system as well as the respective user to open applications and other tasks seamlessly. However, sometimes a couple of unnecessary third-party applications can run in the background without any of your knowledge. Those not-so-necessary tasks can consume system resources like CPU, RAM, GPU, and data bandwidth. You should manually close those unnecessary tasks individually to free up some system resources.
Please Note: Do not close system tasks or applications without knowledge. Otherwise, your system may get corrupted or you may face some issues.
- Open Task Manager by pressing the Ctrl+Shift+Esc keys.
- Go to Processes > Choose the unnecessary third-party tasks that you want to close.
- Click on End Task.
- Now, do the same steps for each task individually.
- Once done, restart your PC to apply changes.
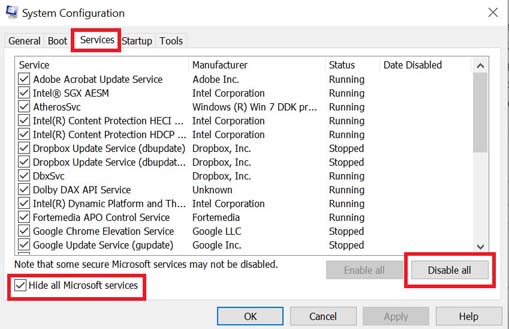
11. Perform a Clean Boot
Multiple reports did claim that several third-party programs are always running in the background from the Windows boot. So, performing a clean boot and disabling conflicting startup apps will be crucial enough to get better performance.
- Press the Win+R keys to open the Run dialogue box.
- Now, type msconfig and hit Enter to open System Configuration.
- Go to the Services tab > Enable the Hide all Microsoft services checkbox.

- Click on Disable all > Click on Apply and then OK to save changes.
- Now, go to the Startup tab > Click on Open Task Manager.
- Click on the Startup tab from Task Manager.
- Make sure to click on the particular task that has a higher startup impact.
- Once selected, click on Disable to turn it off.
- Do the same steps for each program that has a higher startup impact.
- Finally, make sure to restart your computer to apply changes.
12. Disable GeForce Experience Optimization
Nvidia GeForce Experience application is one of the useful tools that allows the games to be optimised. However, sometimes the game optimization using the graphics card software can be problematic and you should turn it off. Disabling optimization doesn’t affect the gaming experience or doesn’t change any settings.
- Open the Nvidia GeForce Experience app.
- Go to the Settings menu > Click on GAMES & APPS on the left side.
- Now, uncheck the Automatically optimize newly added games and applications option.
- Once done, relaunch the game to check for the issue.
13. Disable Hardware-Accelerated GPU Scheduling
The Hardware-Accelerated GPU Scheduling feature on Windows is quite useful for using graphics resources from the device efficiently. It also helps in prioritizing the graphical tasks in the background depending on which applications are running in the foreground. But sometimes this feature may cause multiple issues with the game launching or performance up to some extent. So, it’s better to turn it off by following the steps below.
Note: Do keep in mind that you don’t need to enable this option if you’re using OBS or Streamlabs for playing Call of Duty Modern Warfare 3.
- Press the Win+I keys to open Windows Settings.
- Click on System from the left pane.
- Select Display > Go to Graphics.
- Now, select Default graphics settings.
- Set Hardware-accelerated GPU scheduling – Off.
14. Run a SFC Scan
SFC (System File Checker) tool is useful to check whether any program file or a disk drive has some issues not on a Windows system. If there is an issue, you can try manually fixing it by following the steps below. To do this:
- Open the Start menu > Search for cmd.
- Right-click on Command Prompt from the search result.
- Click on Run as administrator > If prompted, click on Yes to give admin privileges.
- Type the following command in the cmd window and hit Enter to execute it:
sfc /scannow

- Now, wait for the process to complete. It may take a couple of minutes or so.
- Once done, reboot the PC, and check for the issue again.
15. Reinstall COD MWIII
Last but not least, you’ll need to uninstall and reinstall the Call of Duty Modern Warfare 3 (2023) game on your respective device. Sometimes issues with the game installation directory or files might trouble you. Though reinstalling the game isn’t always recommended, there is nothing else to do at your end.
For Steam:
- Open the Steam client on your PC.
- Go to Library > Right-click on COD MWIII.
- Select Uninstall > Click on Delete to confirm.
- Wait for the uninstallation process to complete.
- Exit the Steam client > Open File Explorer.
- Copy & paste C:\Program Files (x86)\Steam\steamapps\common on the address bar.
- Press Enter to search for the location.
- Go to the COD MW3 folder > Delete the folder completely.
- Reboot the PC to apply changes.
- Finally, open Steam > Reinstall the COD MWIII game again.
For Battle.net:
- Open the Battle.net client.
- Select Call of Duty: Modern Warfare III from the left panel.
- Choose the Options menu on the left side.
- Click on Uninstall Game > If prompted, confirm the uninstallation process.
- Once done, close the Battle.net launcher, and reboot the PC.
- Next, open the Battle.net launcher again > Start installing COD: MW3.
- Click on the Options menu > Select Modify Install.
- Select the mode that you want to install and select Confirm.
- Hit Start Install and wait for it to complete.
- Finally, launch the game to check for the 0x00001337 error again.
That’s it, guys. We assume this guide was helpful to you. For additional queries, you can comment below.
