No Rest for the Wicked is an action role-playing video game created by Moon Studios and published by Private Division. The game’s plot is set in the year 841, and the player takes on the role of a holy warrior who must go to the island of Isola Sacra to investigate a plague known as the “Pestilence.” Despite being available as an early access game on PC, some players have encountered an issue where the game becomes stuck on loading screens upon launch. This problem disrupts the otherwise smooth gaming experience that players expect from No Rest for the Wicked.

Page Contents
Reason Why No Rest for the Wicked is Stuck on the loading screen
It is important to make sure that all of your drivers, especially the audio and graphics drivers, are up-to-date to avoid compatibility issues that could prevent games from loading properly. If you are using a platform such as Steam, you can verify the integrity of game files to check for any missing or outdated files and replace them as necessary. In some cases, deleting specific game-related files from the registry can also resolve loading issues, but it is important to be cautious when making registry edits as they can affect system stability.
Running the game in compatibility mode for your current operating system or an older one, such as Windows 8, might help, as well as disabling full-screen optimizations. If none of these solutions work, it could be due to corrupt game data, and you may need to reset or reinstall the game. However, this could result in losing your game progress, so be aware.
Fix: No Rest for the Wicked is Stuck on the loading screen
Here are some troubleshooting methods to resolve the issue of being stuck on the loading screen while playing the latest No Rest for the Wicked. Let’s dive into the guide below.
1. Check-out System Requirements
Before playing the game, check the system requirements to avoid issues with launching and gameplay.
Minimum System Requirements:
- OS: Windows 10
- Processor: Intel Core i5-8400 / AMD Ryzen 5 2600
- Memory: 16 GB RAM
- Graphics: Nvidia GeForce GTX 970 / AMD Radeon RX Vega 56
- Storage: 35 GB available space
- Additional Notes: SSD Recommended
Recommended System Requirements:
- OS: Windows 10 / Windows 11
- Processor: Intel Core i5-12600K / AMD Ryzen 7 5800X3D
- Memory: 16 GB RAM
- Graphics: Nvidia GeForce RTX 3070Ti / AMD Radeon RX 6800 XT
- Storage: 35 GB available space
- Additional Notes: SSD Recommended
2. Increase Virtual RAM
Virtual memory combines RAM with temporary space on the hard disk. If your computer runs out of RAM, increasing the virtual memory manually might help.
- Press the Windows logo key on your keyboard.
- Start typing “advanced system settings” and click “View Advanced System Settings”.
- Click on “Settings”, then click on the “Advanced” tab and then click on “Change”.
- Uncheck the box next to “Automatically manage paging file size for all drives”.
- Select your C: drive (where you’ve installed Windows) and click the “Custom size” option.
- Please type “4096” in the text box for both “Initial size (MB)” and “Maximum size (MB).”
Note: It is always better to increase your virtual memory three times higher than your current RAM size (1 GB = 1024 MB). - Click “Set” and then “OK” to save changes.
- Restart your computer and your game for better performance.
3. Properly Place the Storage and RAM in the slot
If you’re experiencing difficulty with No Rest for the Wicked game getting stuck on the loading screen, there is a simple solution that you can try. First, remove the side panel of your CPU cabinet. Then, unplug the HDD/SSD and RAM components from their slots, being careful not to damage them. Next, gently clean the slots and components, ensuring they are free of debris or dust. Finally, replace the components in their slots properly, ensuring they are securely in place. This should help resolve the issue and get No Rest for the Wicked game running smoothly again.
4. Update GPU Drivers
If you haven’t updated your graphics driver on Windows, install the latest patch version by following the steps below:
- Press the Windows + X keys to open the Quick Link Menu.
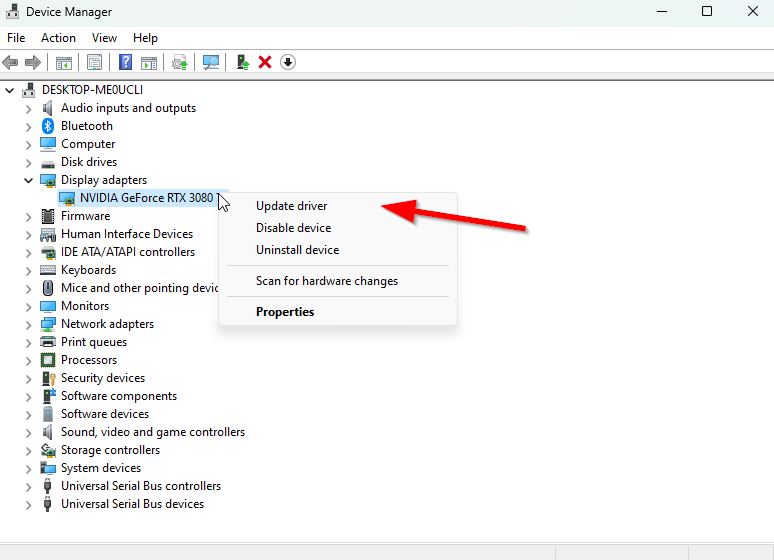
- Now, click on Device Manager from the list > Double-click on Display adapters.
- Right-click on the dedicated graphics card that you’re using.

- Next, select Update driver > Choose to Search automatically for drivers.
- If an update is available, the system will automatically download & install it.
- Once done, restart the computer to apply changes immediately.
5. Close Unnecessary Background Tasks
One way to optimize your PC’s performance is to close unnecessary background tasks, preventing additional resource usage. To clear out these tasks:
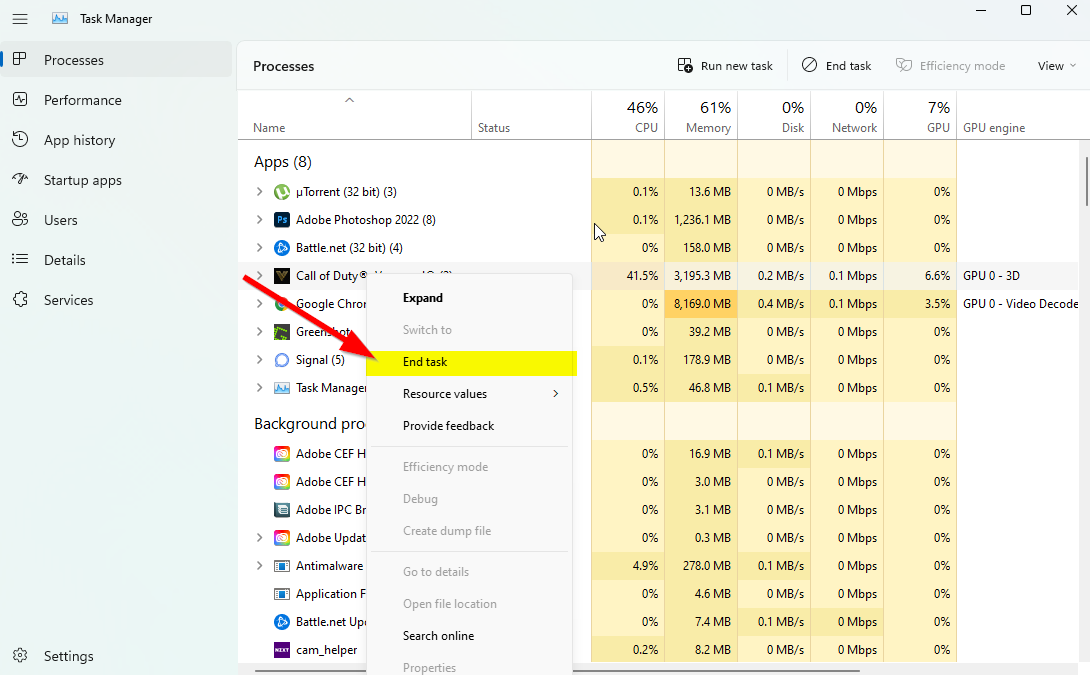
- Press the Ctrl + Shift + Esc keys to open Task Manager.
- Click on the Processes tab > Select the task you want to close.

- Once selected, click on End Task. Make sure to do the steps for each task individually.
- Once done, restart your computer to change effects immediately.
6. Update No Rest for the Wicked
If you haven’t recently updated your No Rest for the Wicked game, follow these steps to check for updates and install the latest patch (if available).
1. Open the Steam client.
2. Go to your Library and find No Rest for the Wicked in the left pane.
3. Click on the game to select it.
4. The client will automatically search for any available updates. If an update is found, make sure to click on the “Update” button.
5. Wait for the update to install and for the Steam client to close. This may take some time.
6. Once the client has closed, reboot your computer to apply the changes.
7. Finally, try relaunching the game to ensure that the update is successful.
7. Check for Windows Updates
Over time, the build of your Windows operating system may become outdated or corrupted. If you suspect this is the case, you can follow the steps below to check for available updates for your system. It is recommended that you install any available updates as soon as possible. This will ensure that your system has the latest bug fixes and improvements. Follow the steps given below to check for and install Windows updates:
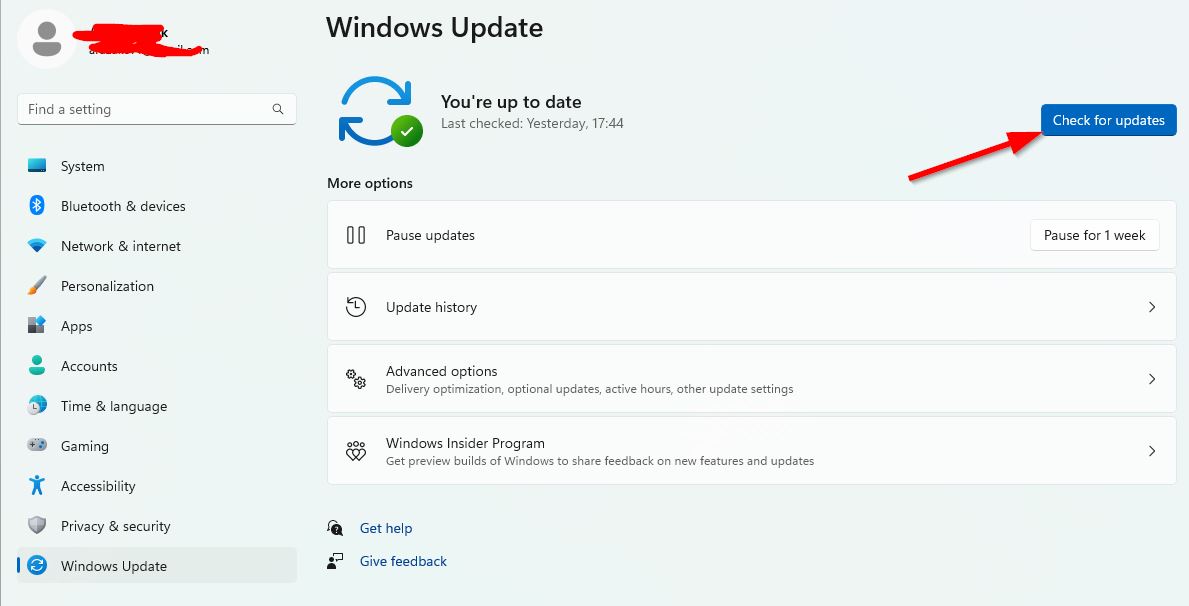
- Press the Windows + I keys to open up the Windows Settings menu.
- Next, click on Update & Security > Select Check for updates under the Windows Update section.

- If there is a feature update available, select Download and install.
- Wait for some time until the update gets completed.
- Finally, reboot your PC to apply changes immediately.
8. Try Disabling Overlay Apps
Some widely used applications appear to have their own overlay program that can run in the background and negatively impact gaming performance or even cause launching issues. To resolve the problem, you can turn off these overlay programs by following the steps below:
- Launch the Discord app > Click on the gear icon at the bottom.
- Click on Overlay under App Settings > Turn on the Enable in-game overlay.
- Click on the Games tab > Select No Rest for the Wicked.
- Finally, turn off the Enable in-game overlay toggle.
- Make sure to reboot your PC to apply changes.
- Press the Windows + I keys to open Windows Settings.
- Click on Gaming > Go to Game Bar > Turn off Record game clips, screenshots, and broadcast using the Game Bar option.
If you are unable to find the Game Bar option, search for it from the Windows Settings menu.
Disable Nvidia GeForce Experience Overlay
- Launch the Nvidia GeForce Experience app > Head over to Settings.
- Click on the General tab > Disable the In-Game Overlay option.
- Finally, restart the PC to apply changes and relaunch the No Rest for the Wicked game.
Also, remember that you should always disable some other overlay apps like MSI Afterburner, Rivatuner, RGB software, or any other third-party overlay apps that run in the background.
9. Perform a Clean Boot
Certain apps and their services may start automatically once your system boots up. This can cause them to consume a significant amount of internet bandwidth and system resources. If you are experiencing this issue, try performing a clean boot on your computer. This will help you identify the cause of the problem. Here’s how you can do it:
- Press the Windows + R keys to open the Run dialog box.
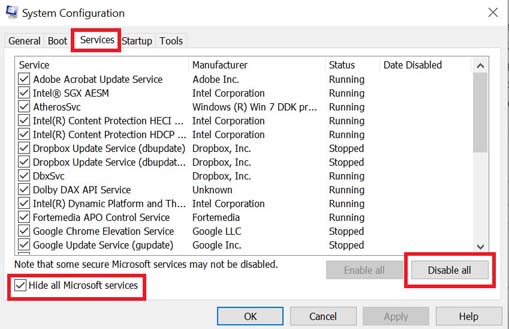
- Now, type MSConfig and hit Enter to open System Configuration.
- Go to the Services tab > Enable the Hide all Microsoft services checkbox.

- Click on Disable all > Click on Apply and then OK to save changes.
- Now, go to the Startup tab > Click on Open Task Manager.
- The Task Manager interface will open. Here, go to the Startup tab.
- Then click on the particular task that has a higher startup impact.
- Once selected, click Disable to turn them off from the startup process.
- Do the same steps for each program that has a higher startup impact.
- Once done, make sure to restart your computer to apply changes.
10. Verify Game Files
If there is an issue with the game files and they get corrupted or missing, then make sure to perform this method to check for the issue easily.
- Launch Steam > Click on Library.
- Right-click on No Rest for the Wicked from the list of installed games.
- Now, click on Properties > Go to Local Files.

- Click on Verify Integrity of Game Files.
- You’ll have to wait for the process until it gets completed.
- Once done, restart your computer.
I hope this guide helped resolve No Rest for the Wicked being stuck on the loading screen on your PC.
