There are plenty of extension files available for the Windows platform that includes several file formats that actually allow your system to create or open such a file via the appropriate application or program. Such as if you open a .docx extension file on your Windows, it’ll ask the system to run with the Microsoft Word program. OXPS extension file is also one of them. Don’t know what is OXPS file and how to open it in Windows 10?
Here we’ve shared the guide that can help you. The OpenXPS (OXPS) file is basically based on the XML Paper Specification (XPS) format that has been developed by Microsoft as an alternative for the Enhanced Metafile (.EMF) format. However, OpenXPS is an open format and still has been used by Windows users without any issue.
Keep in mind that although XPS and OXPS file formats are the same, you can’t simply interchange these extensions to change their nature.
Also Read
Page Contents
What is OXPS File?
An OXPS is also known as Open XML Paper Specification (OpenXPS) format. It’s a default XPS document file for Windows and OXPS files can be created while printing to a Microsoft XPS Document Writer using a printer on your computer. To be very precise, OXPS files can be often used for letters, postcards, newsletters, business documents, etc.

How to Open OXPS File in Windows 10?
So, installing the XPS Viewer on your Windows 10 will completely do the job for you. But this applet doesn’t come pre-installed with Windows these days. That means you’ll have to manually install or enable it by following some of the possible methods mentioned below.
1. Use Windows Accessories
It’s always a good idea to recheck whether XPS Viewer is already installed on your Windows 10 or not. To do so:
- Click on the Start Menu > Type Windows Accessories and click on it to expand.
- Now, select XPS Viewer (if available).
If the XPS Viewer is not available then you can follow the next method.
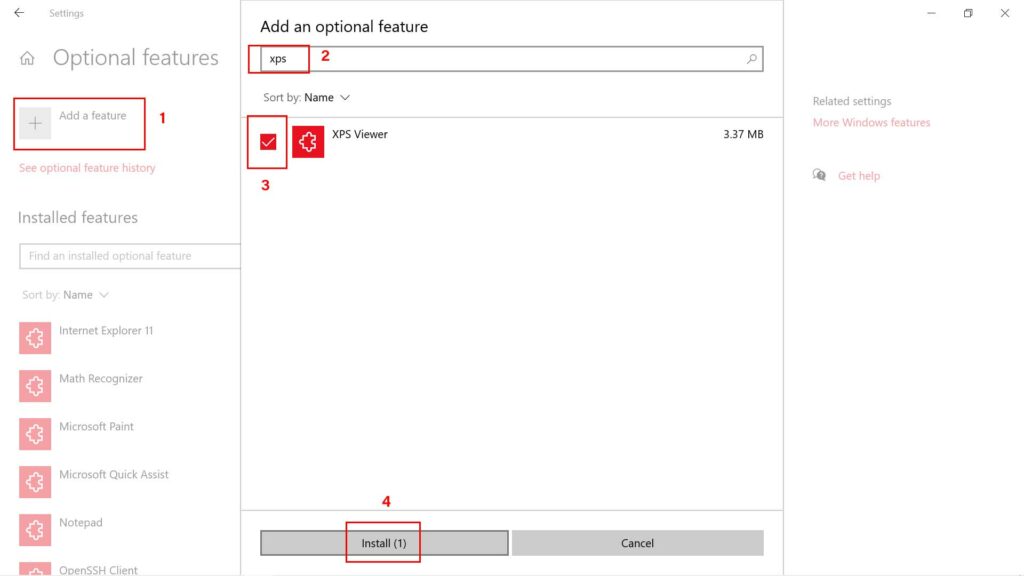
2. Use Optional Features of Apps Settings
Secondly, you can go to the Apps Settings menu to search for it from the Optional Features option. To do this:
- Press Windows + I keys to open Windows Settings.
- Go to Apps > Click on Optional Features.

- Click on Add a Feature > Type XPS Viewer in the search bar.
- Click on the checkbox of XPS Viewer to select it.
- Now, click on Install > Once installed, make sure to close the settings window.
- Reboot your computer to apply changes.
3. Use Command Prompt
However, if XPS Viewer isn’t available or you can’t install it then make sure to follow this method to use the PowerShell command prompt in order to install the XPS Viewer on your computer. To do that:
- Right-click on the Start Menu (Windows logo) from the left-bottom corner.
- Once the Quick Access Menu appears, click on Windows PowerShell (Admin).
- If prompted by UAC (User Account Control), click on Yes to allow it.
- Now, type the following command and hit Enter to execute it:
Get-WindowsCapability -Online |? {$_.Name -like "*XPS*" -and $_.State -eq "NotPresent"} | Add-WindowsCapability -Online
- Let the process to complete. Once done, reboot your computer.
- Finally, try running XPS Viewer from Windows Accessories.
4. Use DISM Command to Install XPS Viewer
- Click on the Start Menu > Type cmd.
- Right-click on Command Prompt from the search result.
- Select Run as administrator > If prompted by UAC, click on Yes to proceed.
- Now, copy and paste the following command then hit Enter to execute it:
dism /Online /Add-Capability /CapabilityName:XPS.Viewer~~~~0.0.1.0
- Let the process complete and restart your computer to apply changes.
- Finally, check whether you’re able to open the OXPS file via XPS Viewer.
That’s it, guys. We assume this guide was helpful to you. For further queries, you can comment below.
