Photoshop could not complete your request. This error message generally appears on Adobe Photoshop due to the generator plugin or settings related to the image file extension. Today, while navigating through the Reddit form, we saw that many users asked about the solution for this issue. So after thinking a bit, we finally brought up a guide on how to fix Photoshop that could not complete your request error message.
Talking about this issue, then as per our opinion, this issue is caused due to a locked library folder or a generator plugin. We have about five solutions for you guys in this guide. So, let’s get started.
Also Read

Page Contents
Fix: Photoshop Could Not Complete Your Request
Fixing this issue is quite challenging but not impossible. You just need to follow some easy tricks mentioned-below to fix the problem permanently.
Fix 1: Change Image File Extension

If the message pop-ups while opening some specific image files, you should try to change the image file extension from .psd to .png or .jpeg; this might fix the issue. In case it is not resolved by this, it clearly means that your image file is corrupted.
Meanwhile, if you want, then you may also try to use the Export option in Photoshop and Save as other file formats such as .png or .jpeg.
Fix 2: Disable Generator

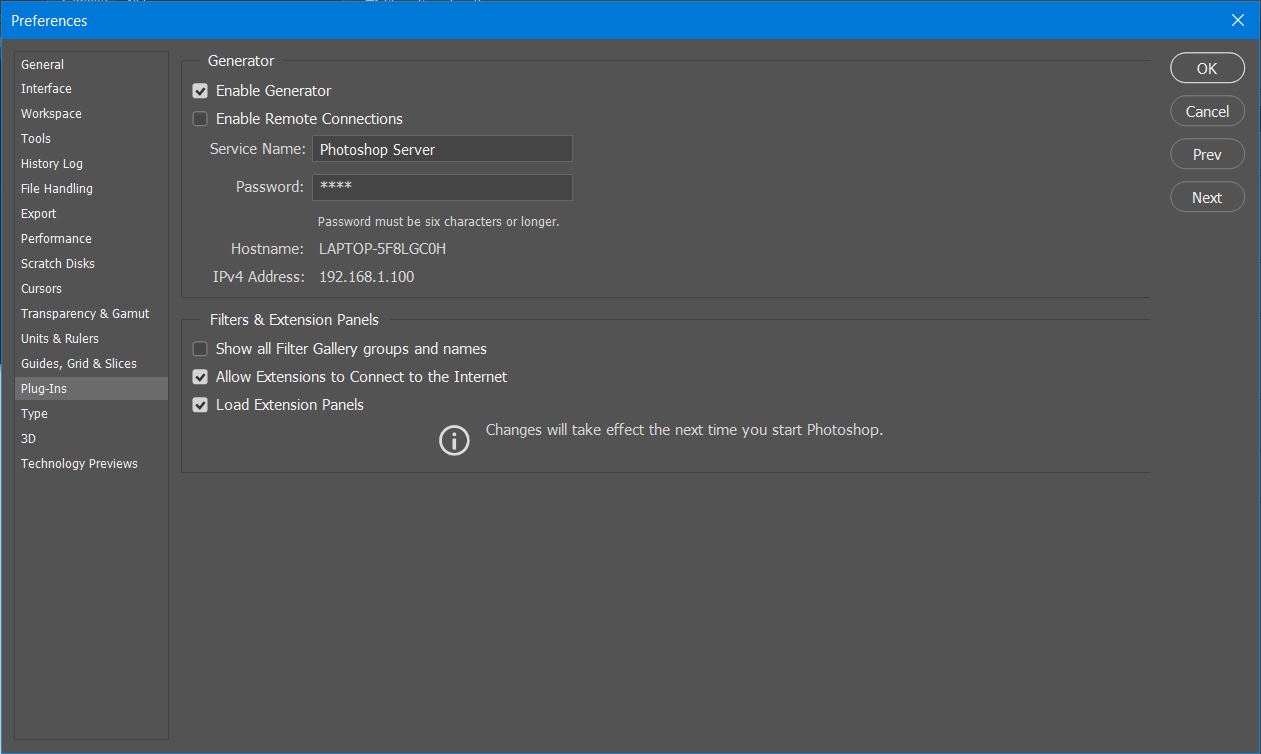
As I told you earlier, that this issue might be due to the generator plugin. So you need to disable this plugin, and to do so, follow the steps given below: –
- First of all, you need to open Adobe Photoshop on your PC or Laptop.
- The next step is to click on Edit Followed by Preferences.
- Now, simply tap on the Plug-ins tab located at the left pane of the opened window.
- After that, Uncheck the enable generator option to disable the generator.
- Then, you’ll get an OK button. Click on it.
- Now, close the Adobe Photoshop and open it again.
After Adobe Photoshop opens up, check if the issue is still displayed or not.
Fix 3: Unlock the Library Folder
A locked library folder might be the reason for displaying Photoshop could not complete your request error message. So you need to unlock the library folder first.
- Firstly, you just need to open the Finder application.
- After that, navigate through the User Directory. Or if you want, then you may directly search for ~/Library/ in the Cortana search box.
- Now, simply right-click on the Library folder or press and hold the Ctrl button. Simultaneously, click on the Library folder.
- Then, a drop-down menu will open. From that menu, choose the option Get Info.
- Now, un-check the Locked tab located under the folder details.
Fix 4: Reset Photoshop Preferences
For Mac
- Open the Adobe Photoshop and directly navigate through the ~/Library/Preferences/Adobe Photoshop CSx Settings/directory.
- Now, simply move the CS6 Prefs.PSP files to desktop.
- After that, open Adobe Photoshop and check if the issue is resolved or not.
For Windows

- Hold the Windows Key and Press the R button on your keyboard to open the Run box.
- Now, inside the Run Dialogue box, type %AppData% and hit the enter key to access the AppData directory.
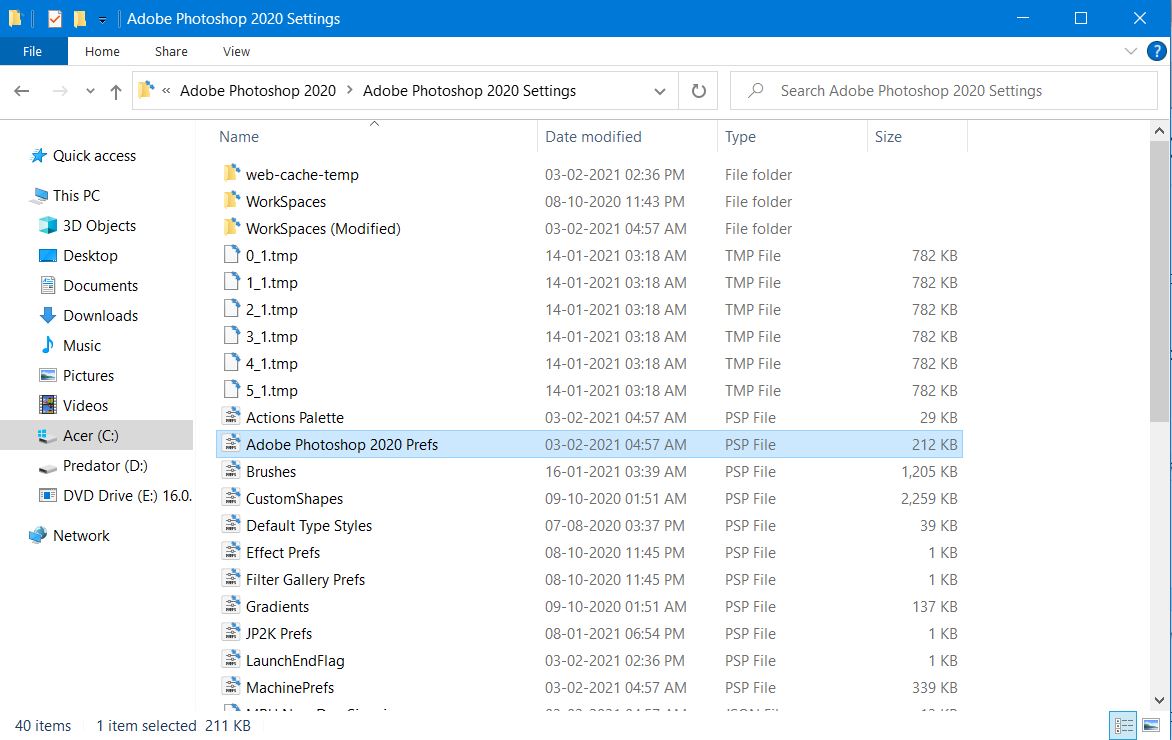
- However, after accessing the AppData directory, navigate to Roaming/Adobe/Adobe Photoshop CSx/Adobe Photoshop Settings/ directory.
- Now, all you need to do is simply move both the file Adobe Photoshop CS6 Prefs.PSP and Adobe Photoshop CS6 X64 Prefs.PSP to desktop.
At last, open the Adobe Photoshop application and check if the problem is fixed or not. In case, your issue isn’t fixed, head on to the next fix.
Fix 5: Uninstall and then Reinstall the Adobe Photoshop

To uninstall and reinstall the Adobe Photoshop, follow the instruction given below step-by-step: –
- Open the Start menu and there search for Add Programs.
- Now, click on the Add Programs. A new window will open with the list of programs that are installed on your PC.
- Navigate through that list and find out Adobe Photoshop.
- After that, right-click or double-click on the Adobe Photoshop to uninstall it entirely from your PC or Laptop.
- Wait until the uninstallation process is completed.
- Once it is done, Open Google Chrome or whatever browser you use and go to the official site of Adobe Photoshop.
- Now, click on your preferable version of Adobe Photoshop and download it.
After you have downloaded the file, go to the download folder and double click on the file that you’ve downloaded.
Now, you’ll see an installation window appears. Simply follow the on-screen instruction and install it on your PC.
That’s it. Now, after the Adobe Photoshop installation process is completed. Open Adobe Photoshop and check if the error is resolved or not. In case you still have the error message “Photoshop Could Not Complete Your Request,” you might need to contact the support team for a solution.
For more gaming and other updates, subscribe to our YouTube Channel. Also, check out our Gaming Guides, Windows Guides, Social Media Guides, iPhone, and Android Guides to know more.
