In the ever-evolving landscape of video gaming, the Steam Deck has emerged as a game-changer, quite literally. Almost every video gamer is aware that the Steam Deck is quite a fascinating device. It is very popular to play and purchase games that are available on Steam, but it offers something more out of the box. You might not be aware that the Steam platform also allows you to install non-Steam games on your Steam Deck. This means that among the plethora of games non-available on Steam, you can still play The Crew Motorfest on Steam Deck.
Recently, The Crew Motorfest was launched, which has become quite popular among the players. The game has been released for many platforms, like Play Station, Xbox, Amazon Luna, and Windows. As Crew Motorfest comes exclusive, it is only available on the Ubisoft Connect and Epic Games Store and not on Steam. It is quite saddening for Steam Deck users that they will not be able to play the game directly, but there are methods through which they can. If you’re ready to hit the virtual road and embark on an adrenaline-pumping journey, this guide is your roadmap to unlocking the full potential of The Crew Motorfest on the Steam Deck.
The Crew Motorfest is an open-world racing game that takes players on a cross-country adventure through a meticulously recreated United States. With a rich variety of cars, customization options, and a sprawling open world, it promises a gaming experience like no other. However, transitioning from traditional gaming platforms to the compact and versatile Steam Deck can pose some unique challenges. In this guide, we have provided full-fledged information along with steps on installing and playing The Crew Motorfest on Steam Deck.
Page Contents
How to Play The Crew Motorfest on Steam Deck
For the Crew Motorfest on Steam Deck, there are two methods. One is directly installing the Ubisoft Connect app on the Steam deck, and the second is installing Windows on your Steam deck. Both methods are good and have been tested multiple times. It depends on which method you would like the most.
However, the recommended method is to install windows on your steam deck so you can play The Crew Motorfest hassle and error free. Now, let’s deep dive into both methods of installing The Crew Motorfest on your Steam deck.
Method 1: Installing Ubisoft Connect directly on Steam Deck
It’s quite unfortunate that Ubisoft Connect is designed to work on Windows and not on Linux. But we can still install it on our Steam deck using Proton (an experimental setting). Here is how you can install Ubisoft Connect.
Warning
Please keep in mind that the steps involved are quite hectic, time-consuming, and require attention. GetDroidTips does not take any responsibility for any technical mishap by following the below steps or methods. Make sure to follow each step carefully for error-free installation.
Step 1: Booting Steam Deck to Desktop Mode
To install the Ubisoft Connect, we have to boot into desktop mode, as the Steam OS doesn’t support installing non-Steam apps. Here is how you can boot into desktop mode.
Press the button on the left side of the Steam deck until a menu appears.
Now select the option “Power”.
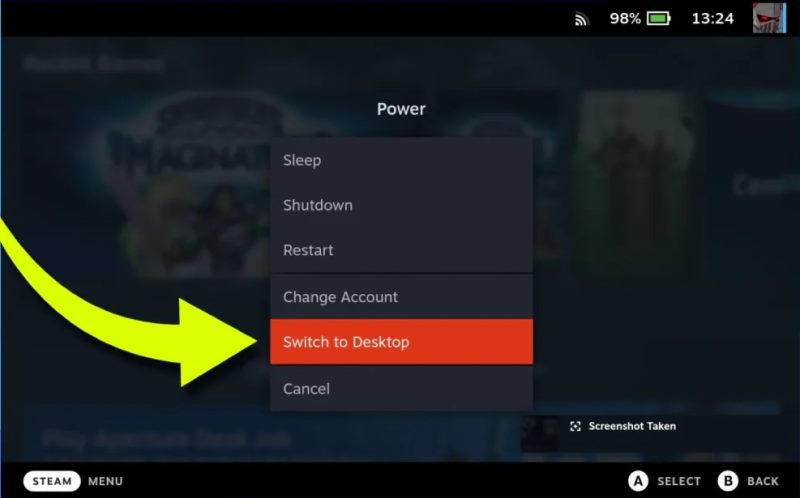
Finally, a new window will appear on the screen. Now select or tap Switch to desktop, and your Steam deck will boot into desktop mode.
Step 2: Installing Browser (Chrome) on the Steam Deck
After switching to desktop mode, you will notice the same Linux OS as it runs on a normal PC. Now, it’s time to install a browser for ease.
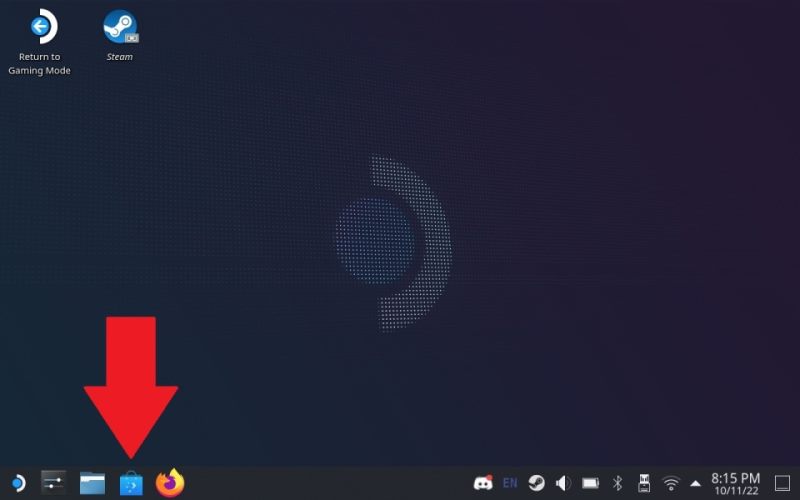
Navigate, and now click on the Discover app on the taskbar. Launch it, search for the Chrome browser, and finally install it.
When the installation is done, we can move on to our next step.
Step 3: Downloading Ubisoft Connect on Steam Deck
As we have now successfully installed the browser, it is time to download the Ubisoft application with its help. Here is how you can do it.

Launch the browser (chrome) and search for Ubisoft Connect. When a search result appears, click on the first link.

Wait until the screen loads and look for the option that says, “Download for PC “. Click on that option and wait until the downloading is finished.
Step 4: Installing Ubisoft connect on Steam Deck
Once the download is complete, it is time to install it on our Steam deck. Make sure to follow the steps carefully. Here is how you can do it.
- Be in desktop mode and launch the Steam application.
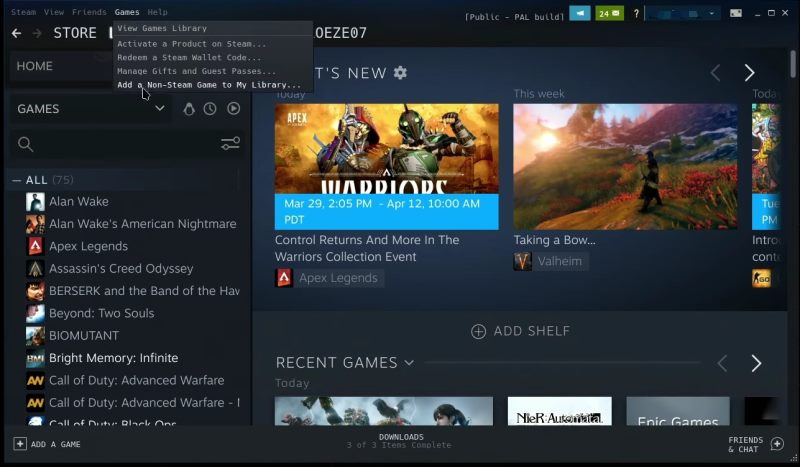
- On the top-most bar, click on the games, and then click on “Add a non-steam game to the library”.
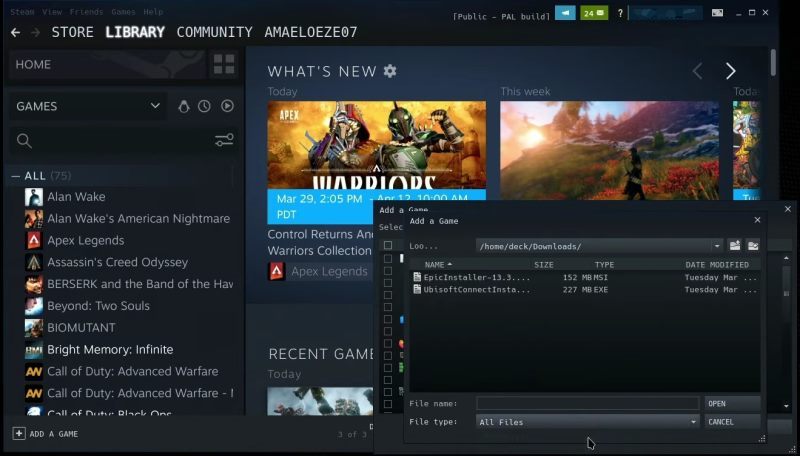
- A popup will appear. Now click on the browse button and look at the Ubisoft Connect you just downloaded, or you can go to “/home/deck/downloads”. Make sure to select the option “all files” under file type.
- Now click on the Ubisoft Connect application and select the program by clicking the same button. Now scroll all the way down on the sidebar menu until you find “UbisoftConnectInstaller.exe.”.
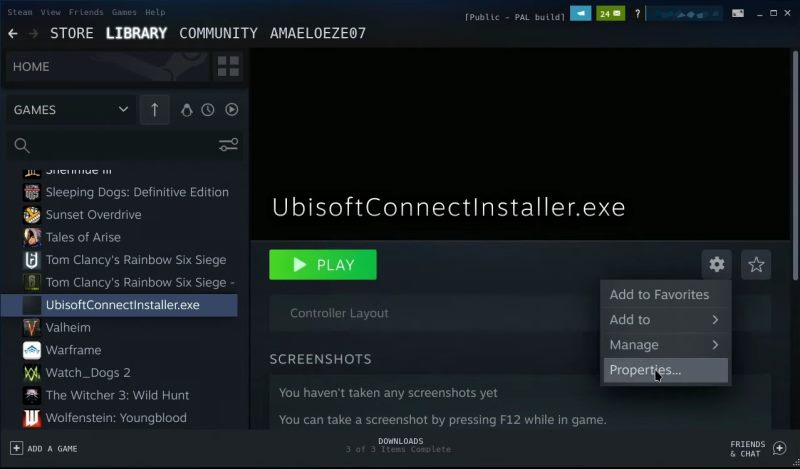
- Click on “UbisoftConnectInstaller.exe” and click on the settings button, then click on properties.
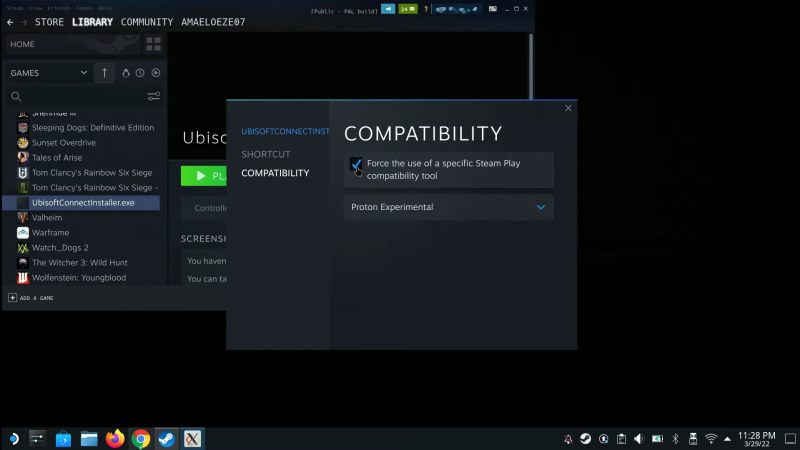
- Under properties, go to compatibility. Make sure you have selected the “force the use of a specific Steam Play compatibility tool” (proton experimental).
- Now close the menu and click on the play button to start the Ubisoft Connect Installer.
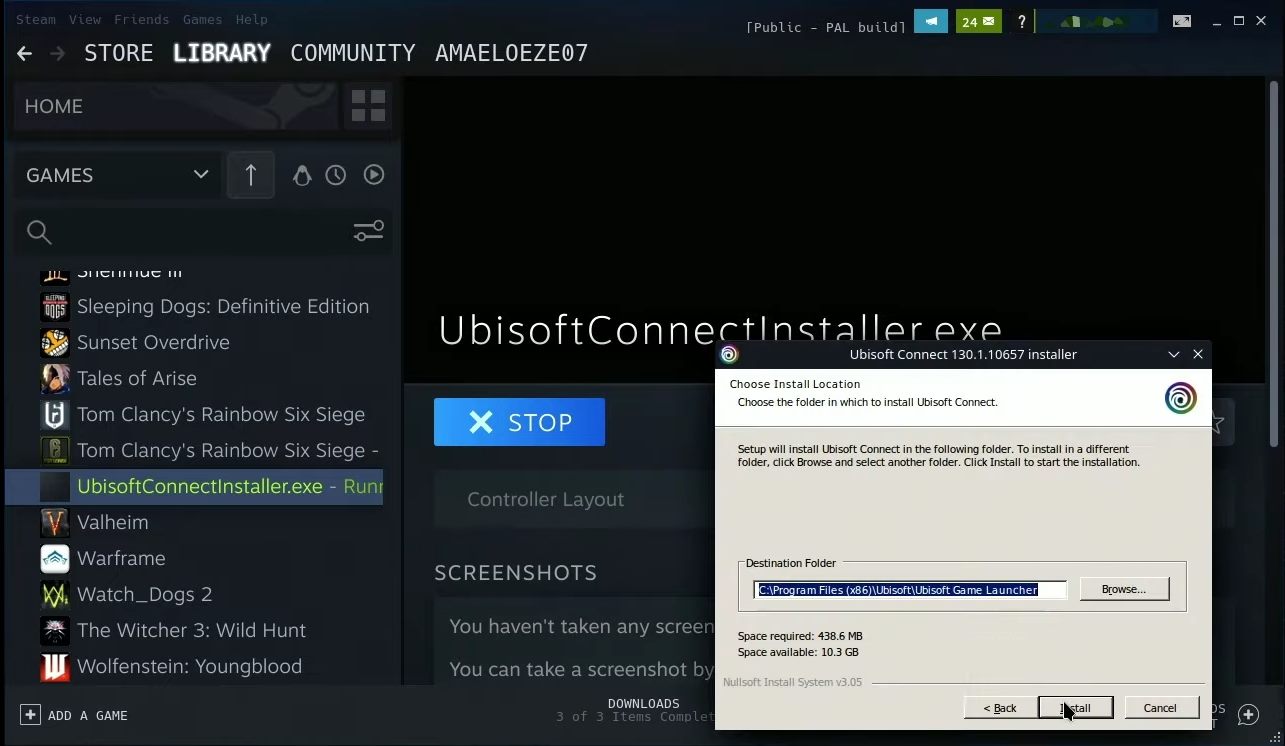
- Installation will start now; install it like you install a normal application on a Windows PC.
Finally, Ubisoft Connect is successfully installed on your Steam, so let’s move on to the steps for launching it on the same.
Step 5: Launching Ubisoft connect on Steam Deck
After you have successfully installed Ubisoft Connect, Now it is time to tweak some compatibility settings in order to run Ubisoft Connect on your Steam deck. Here is how you can do it.
Note: This will make the Ubisoft Connect compatible with the Steam deck OS.
- Click on the games, and then click on “Add a non-steam game to the library”.

- Click on browse (make sure to select file type as “all files”) and go back to the beginning.
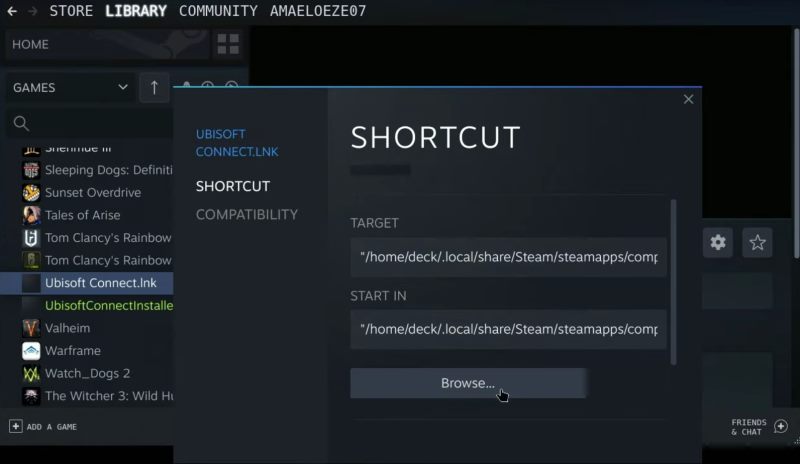
- Go to home – deck – .local – share – Steam – Steamapps – comapatdata – [numerical key*] – pfx – drive_c – users – steamuser – desktop and then finally open Ubisoft connect.lnk file and add selected program.
path:home/deck/.local/share/Steam/steamapps/compatdata/[numerical_key]/pfx/drive_c/users/streamuser/Desktop/Ubisoft Connect.lnk
The numerical key here is a longer sequence of digits if you have installed apps other than Steam. In my case, it was 2935145632 – Make sure to find one on the list.
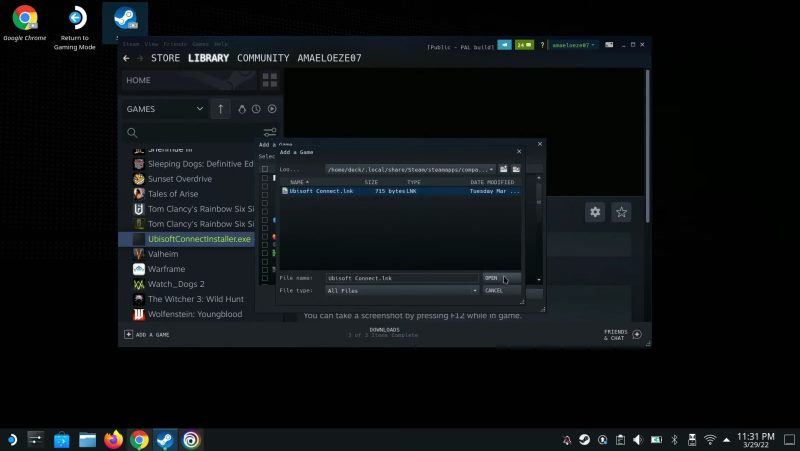
- Now select Ubisoft Connect.lnk, click on the settings button, and then click on properties.
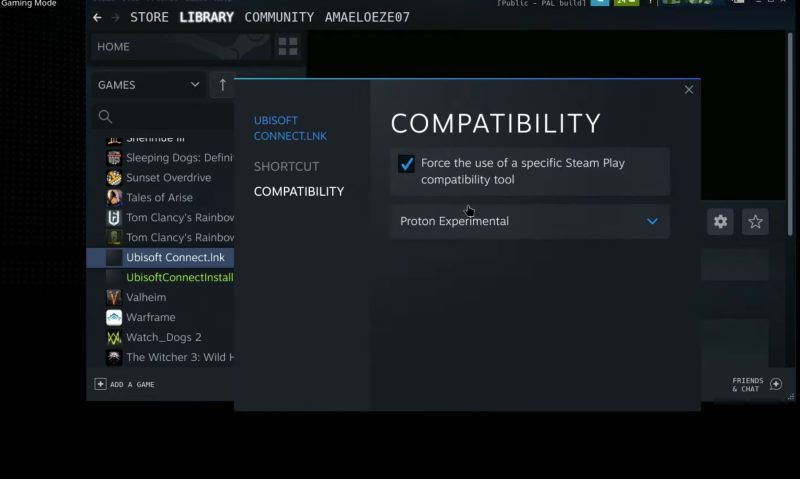
- Under properties, go to compatibility. Make sure you have selected the “force the use of a specific Steam Play compatibility tool” (proton experimental).
- Close the windows and again go to the properties, but this time go to the option shortcut and click on browse. (This is required so that the steam knows where to find the Ubisoft Connect application.)
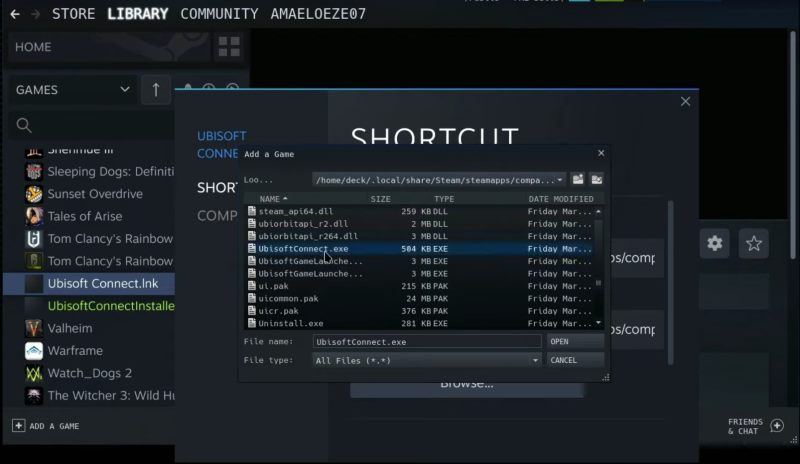
- Now go back a little by using the back-folder button until you see the program files folder (program files x86, to be specific).
- Open the Program Files x86 folder, then the Ubisoft folder, then the Ubisoft game launcher folder, and finally click on UbisoftConnect.exe (find it in the Ubisoft game launcher folder).
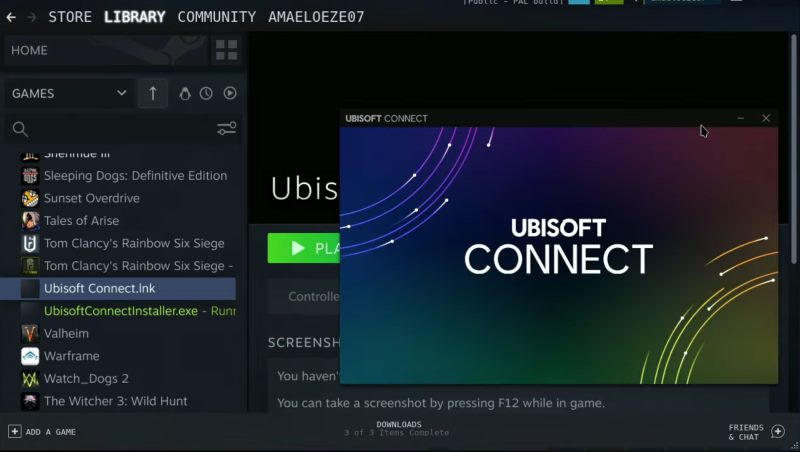
- Now close the window and hit play, and woah, Ubisoft Connect will be launched successfully on your Steam deck.
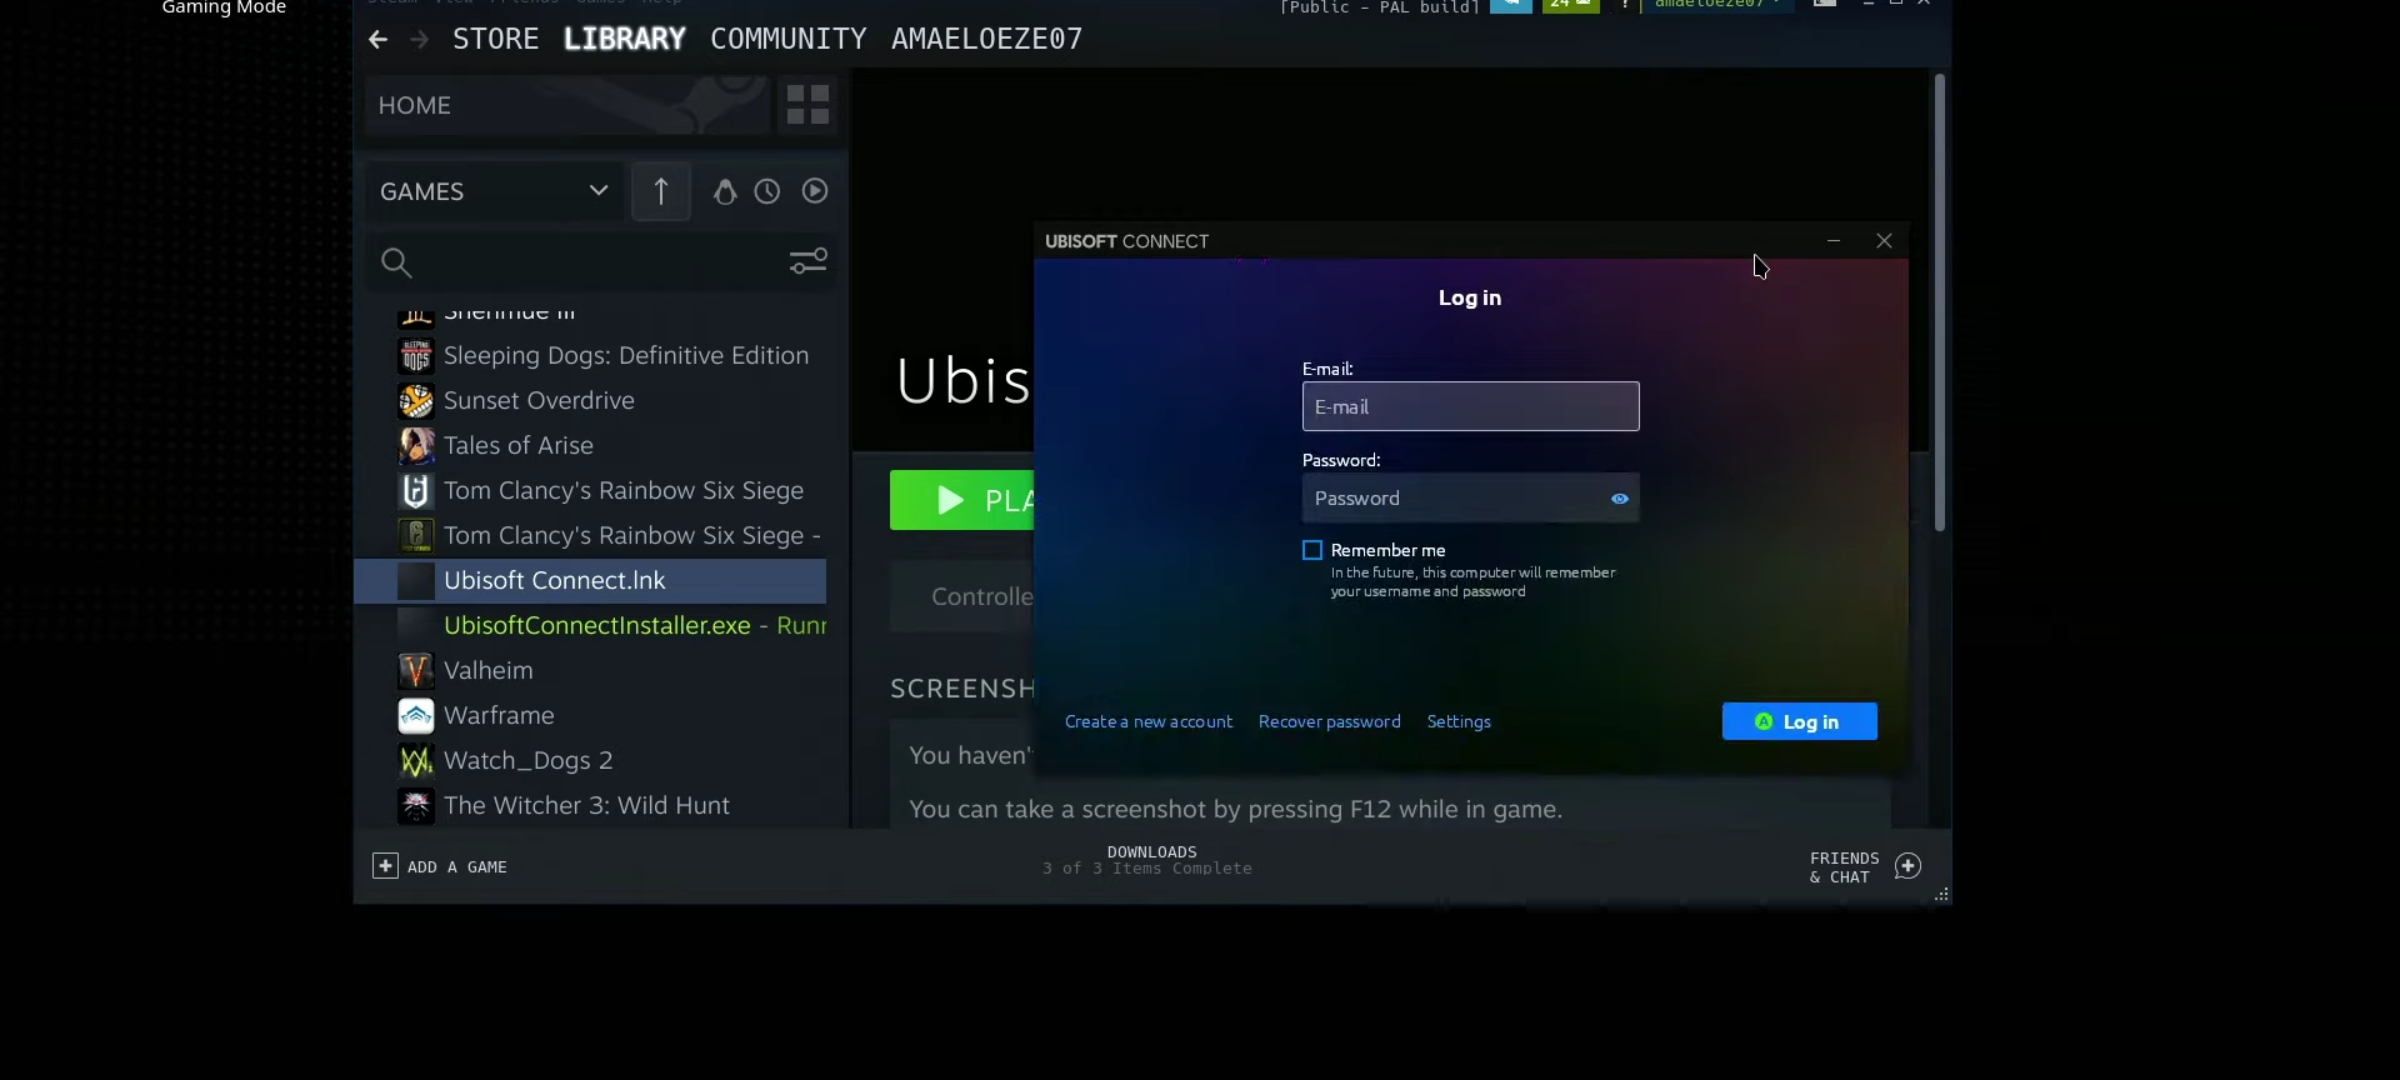
- After Ubisoft Connect has launched, sign in with your credentials, download the Crew Motorfest game, and enjoy.
Note: Keep in mind that you might encounter some errors while using Ubisoft Connect on your Steam, as it is not supported natively. If you happen to encounter errors often, then try the next method; it will do the needful.
Method 2: Installing Ubisoft Connect by Installing Windows 11 on Steam Deck
As we know, Ubisoft Connect is officially supported on Windows 11, and it is also compatible. So, it is better to install Windows 11 on the Steam Deck and then run Ubisoft Connect. This method is also quite hectic and requires a number of steps. Make sure to follow the steps carefully.
Warning
Note: It is advised to install Windows 11 on the Steam Deck using a microSD or USB drive so that if you remove the microSD or USB drive, you are back to the Steam OS. Installing it on the main drive can be quite risky, and rolling back to SteamOS is also difficult for some users.
This will save you time and keep your steam deck from malfunctioning. Also, make sure to use a USB storage device or microSD that supports USB 3.0 and has at least 64 GB to run the game lag-free. However, the process mentioned below is irrespective of the Windows version you are installing; you can install Windows 10 if you wish to.
Step 1: Creating Bootable drive for Installation
At first, it is necessary to create a bootable drive for the installation of Windows. Without this step, the installation cannot be carried out. Here is how you can do it.
- Go to Google and search for “Create Windows 11 Installation Media”.
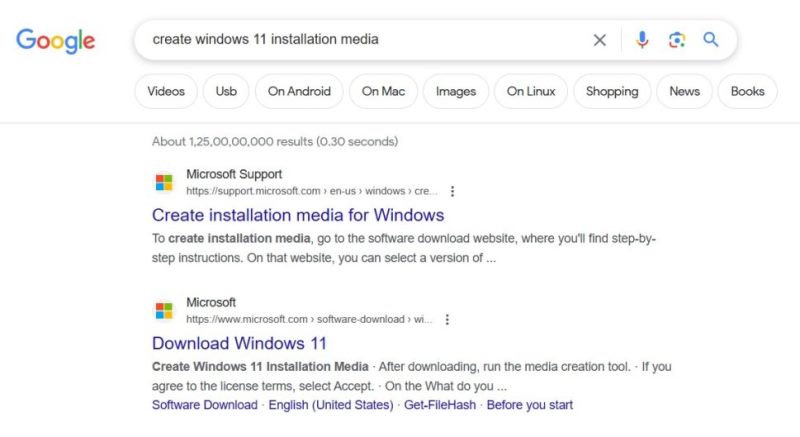
- Open the first link, and under “Create Windows 11 Installation Media,” click on the Download Now button.
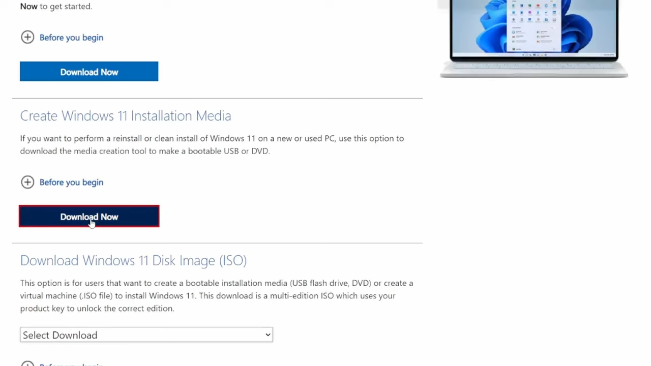
- Once the tool downloads, install it with the recommended settings. (Make sure a USB storage device or microSD is connected to your PC.)
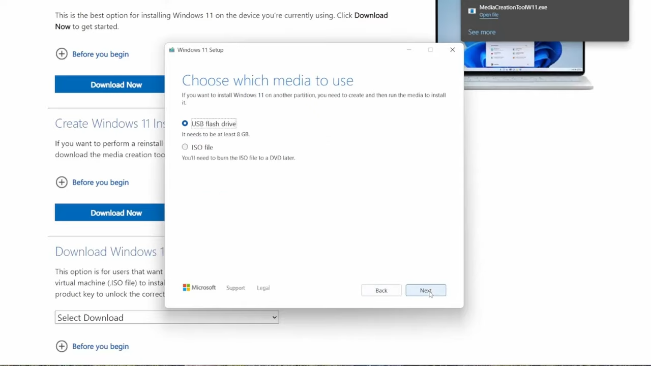
- During installation, choose the media to use (in my case, it’s a USB flash drive; you can choose according to your preference).
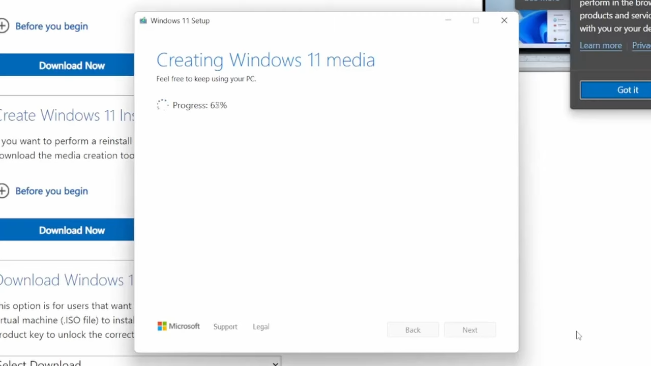
- Click next, and in a few moments, your USB device will be converted into a bootable drive.
Step 2: Loading Steam Deck drivers on microSD or USB drive
Now it is time to download drivers for the Steam deck so that each setting of Windows 11 works normally on it. Here is how you can do it.
- Navigate to Google and search for “Steam Deck Windows Drivers”.
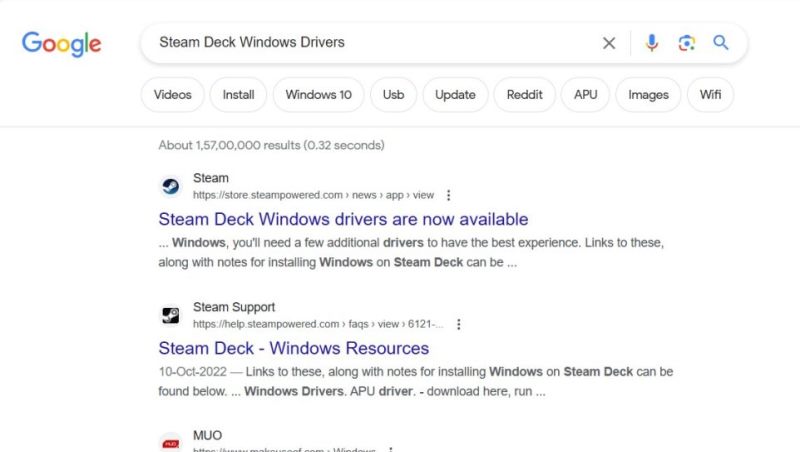
- Click on the first link that appears on the screen. When the page loads completely, look for “Steam Deck Windows Resource” and click on it.
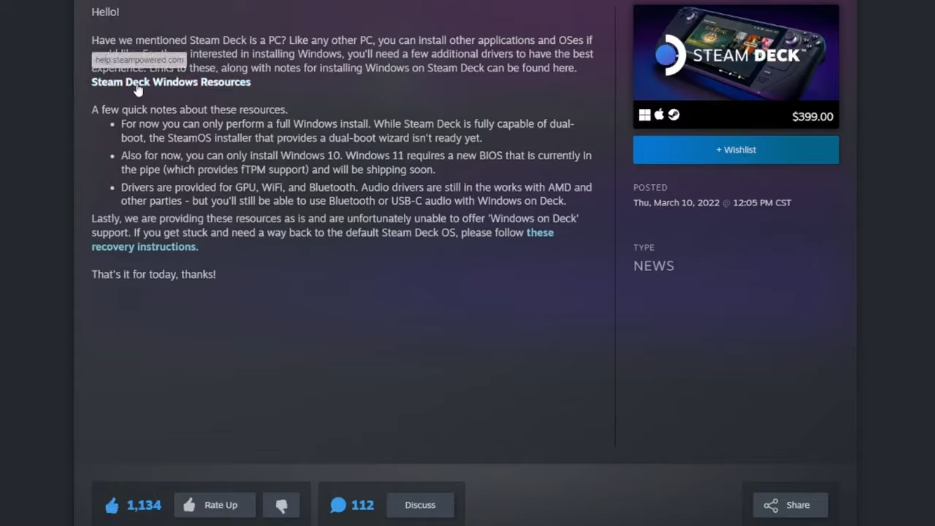
- A new page will be opened. Now download all the drivers listed out there (like the Wi-Fi driver, the APU driver, the SD card reader driver, and the audio drivers). This can be done by clicking the download button on the website.
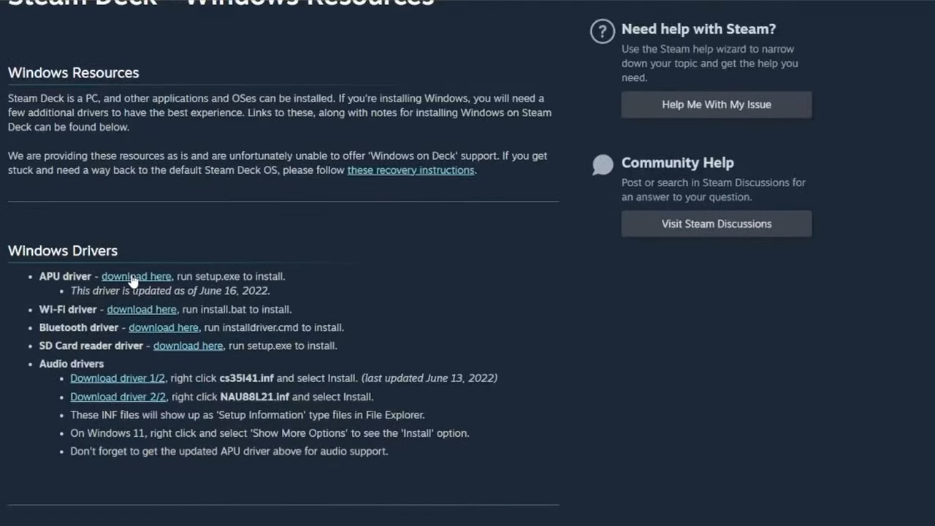
- After downloading is complete, extract all the drivers, keep them in a separate folder named “drivers,” and transfer them to a USB drive. (You can delete the original drivers you downloaded as they are no longer needed.)
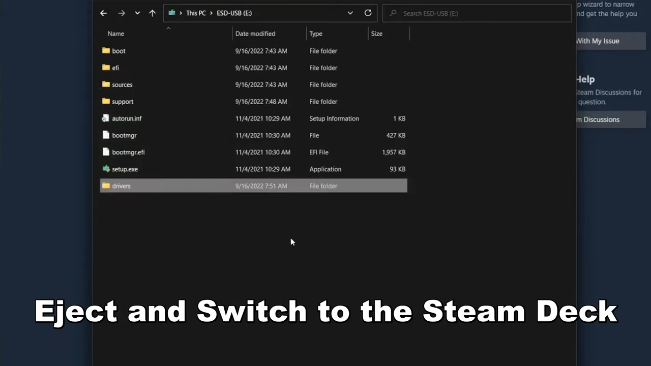
- Finally, remove or eject the USB drive from the PC.
Step 3: Booting Windows 11 on Steam Deck
This is the main and crucial step. After drivers for Steam Deck have been downloaded, it is now time to install Steam Deck on Windows 11. Here is how you can do it.
- On the steam deck, hold the power button until the power menu appears.
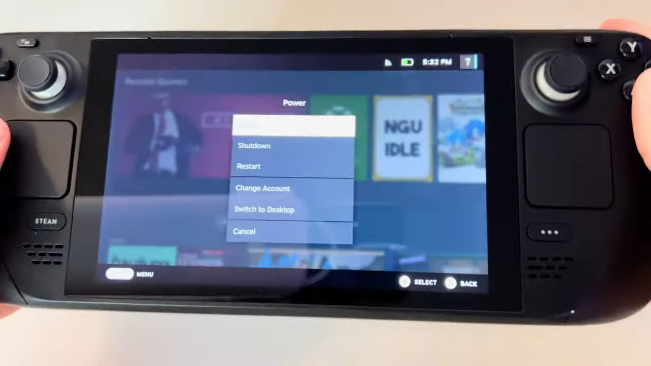
- Now press A and click on Shutdown. After that, nicely insert the USB drive into the Steam deck. Hold the volume-down button, and along with this, tap the power button until the boot menu appears on the screen.
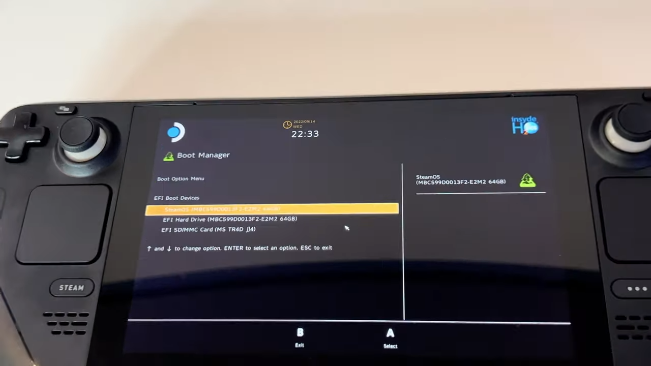
- When it does, select the USB drive from the list of boot menus, and finally press the button A to boot into Windows 11. (This will boot the windows in portrait mode, which has to be changed to landscape mode.)
- When Windows 11 loads and you are on a desktop screen, Do a right-click (long-press on the screen if you are not using a mouse) and click on display settings.
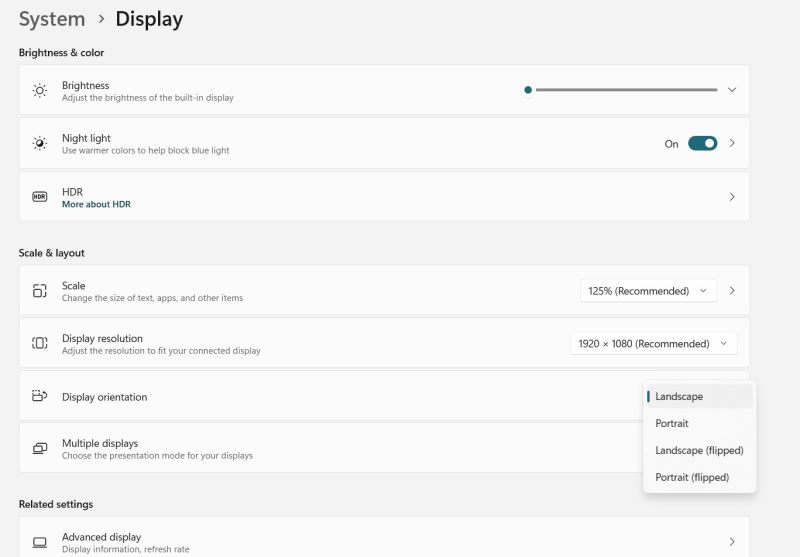
- Under Display, select the display orientation as landscape. Now to get started, let’s install all the important drivers.
Step 4: Installing drivers
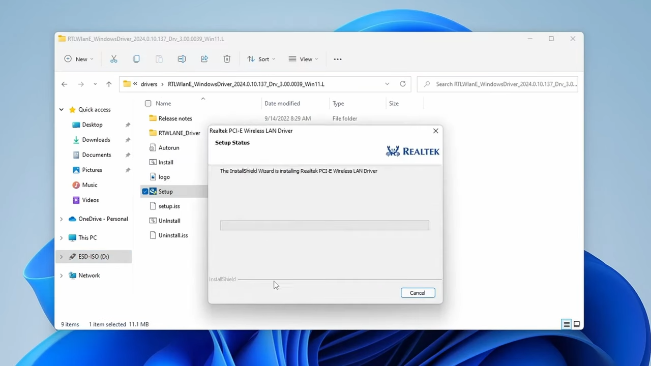
Driver installation is required so that the Windows OS does not crash or malfunction. Here is how you can do it. Navigate to the drivers folder on your USB drive and install all the drivers. Each driver has its own installer, but the process is almost the same.Once all the drivers are installed, restart your Steam deck, and you are good to go.
Step 5: Installing Ubisoft Connect
Now we have to download the Ubisoft Connect application in order to download and install the Crew Motorfest game on our Steam deck. Here is how you can do it.
- Launch the browser (Microsoft Edge) and search for Ubisoft Connect. When a search result appears, click on the first link.

- Wait until the screen loads and look for the option that says, “Download for PC “.
When the download finishes, install it like you would a normal application on a PC.

- Login to the Ubisoft Connect application with your credentials and search for The Crew Motorfest.
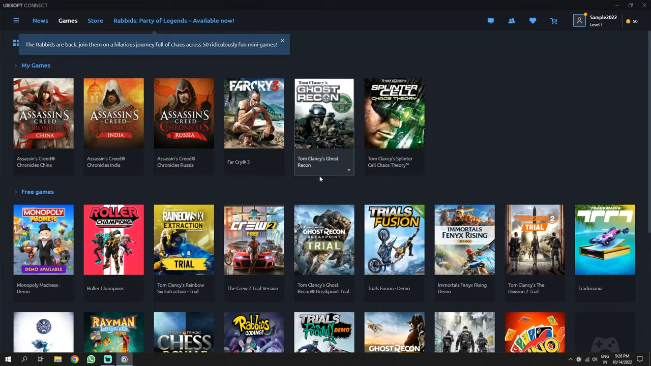
- Download and install it, and finally enjoy The Crew Motorfest on your Steam deck.
Conclusion
This brings us to the end of this guide for How to Play The Crew Motorfest on Steam Deck. Whether you’re a seasoned racer looking to take your skills on the road or a newcomer eager to explore the vast open world of The Crew Motorfest game, playing this game on your Steam Deck will definitely give you thrills. You may follow any of the above methods as you desire, and in case you face any difficulty following the steps above, do comment below and I will be there to help you out.
