Apple completely changed their design aesthetics with the launch of the Apple iPhone x. Moreover, the iPhone 11 series i.e. iPhone 11, 11 Pro and 11 Pro Max, although got different names, they share pretty much the same overall design. We all know that for achieving the all-screen design, Apple went ahead and removed the physical home button and in place of the Touch ID brought in the Face ID. However, there are times where you need to force start your Apple iPhone to enter the DFU mode, etc.
And if you are looking for the solution then, you are at the right place as in this post, we will give you a guide on how to power on iPhone 11, iPhone 11 Pro and iPhone 11 Pro Max. We will give you a complete guide for performing step by step operations for performing force restart and other functions on your iPhone. So, without any further ado, let us get straight into the article itself:

Page Contents
How to Power on iPhone 11, iPhone 11 Pro, and iPhone 11 Pro Max
Below are two methods, one which explains how to force restart your iPhone and the second one explains how to enter the DFU mode.
Force Restart your iPhone
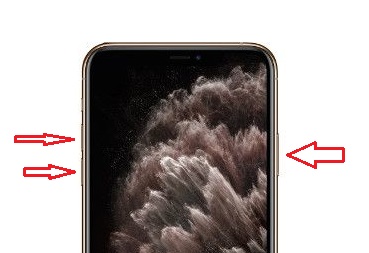
Without the presence of a physical home button, it becomes a bit confusing to force restart your smartphone. Apple brought in this change with the launch of the iPhone 8. What you have to do is simply press the two Volume button (up and down) and the single Side button on the right side.

Once you have pressed the right-side button along with the Volume button combination then your device will show up the Apple logo. If the Apple logo does not appear then, you might need to charge your device and even if that doesn’t help, its time to get your iPhone checked at the service station.
How to Enter DFU Mode on iPhone
You can use the above forced restarting method in case your device is freezing, surfacing with errors, or has completely stopped responding then, this method might come handy. DFU stands for Device Firmware Update. Besides, this method lets your iPhone update the firmware and restore the OS which was working perfectly. In fact, this DFU method can be perfect if you have installed a beta update on your device and it is often causing issues in your iPhone. You can quickly roll back to the previously installed software version using this method. But for all this, you need to have the latest version of the iTunes installed on your device.
To check that you have the latest version of iTunes installed on your computer, follow the below steps:
- Firstly, turn on your iPhone.
- Now connect it to your computer using a Lightning to USB cable.
- Open iTunes on your PC, and check that your iPhone appears in the list of devices.
- Then in your iPhone, press the Volume Up button immediately followed by the Volume Down button.
- Press and hold the Power button until your iPhone’s screen turns black.
- Release the Side button and then hold down both the Side button and Volume Down button together.
- Then release the Side button, but continue pressing the Volume Down button.
- Wait for at least five seconds for iTunes to recognize DFU recovery mode has been enabled.
You will be presented with a message stating “iTunes has detected an iPhone in recovery mode. You must restore this iPhone before it can be used with iTunes”. In case you do not see this message then, you need to perform the steps once again. Close the iTunes recovery prompt and restore your iPhone back to factory settings by selecting Restore iPhone. Once booted up your iPhone will automatically exit out of DFU mode.
So, there you have it from my side in this post. I hope you liked this post, and were able to forcefully restart your iPhone and use the DFU mode to restore the previously installed version. Let us know in the comments below if you come across any issues while following any of the above-mentioned posts. Until the next post…Cheers!
