VOID Interactive has released Ready or Not as an intense, tactical, first-person shooter, and realistic multiplayer video game that allows players to get into the SWAT police units to extract hostiles and fight the situation. Though the title is in early access mode for a year, it’s one of the highly recommended games by PC gamers. Unfortunately, some players are facing the Ready or Not Low Level Fatal Error on the PC while launching the game, and it crashes.
Regarding the LowLevelFatalError, it looks like Ready or Not PC players are facing the startup crashing issue after receiving the particular error message. It says,
The UE4-Haze1 Game has crashed and will close. LowLevelFatalError [File:D:\BuildAgent\work\40b40aa365e0f6fc\Haze1\Main\Engine\Source\Runtime\RenderCore\Private\RenderingThread.cpp] [Line: 998]

Page Contents
- Fix: Ready or Not Low Level Fatal Error
- 1. Reboot the PC
- 2. Run the game as an administrator
- 3. Set Launch Options on Steam
- 4. Update Graphics Driver
- 5. Run the game on a dedicated GPU
- 6. Verify and Repair Game Files
- 7. Disable Overlay Apps
- 8. Reinstall Microsoft Visual C++ Redistributables
- 9. Update Windows
- 10. Try Disconnecting Other Peripherals
- 11. Update the Ready or Not game
Fix: Ready or Not Low Level Fatal Error
Ready or Not game is based on Unreal Engine 4 (UE4) via Epic Games that has been used for game development, visualizations, etc. However, just like other game engines and titles, it’s also prone to crashes on the PC due to the corrupted game or issues with the graphics related to LowLevelFatalError.
It becomes so frustrating among the affected players to encounter such an issue but nothing to worry about it. Here we’ve shared some troubleshooting methods below that might be handy. You should follow all the workarounds properly to resolve it. So, without further ado, let’s get in.
Also Read
Ready or Not Voice Chat / Push to Chat Not Working, How to Fix?
Ready or Not Multiplayer Not Working, How to Fix?
Ready or Not Best Graphics Settings for 3070, 3080, 3090, 1060, 1070, 2060, 2080, and More
Is Ready or Not Coming to PS5, PS4, Xbox, and Switch?
Fix: Ready or Not Low GPU Usage Error
How to Fix: Ready or Not Mods Not Working or Not Showing Up
1. Reboot the PC
First, you should restart your computer to refresh the system from temporary glitches. Sometimes restarting the system normally can also fix multiple issues whatsoever. Even though some affected players might not find it useful, everyone should try it once.
2. Run the game as an administrator
Sometimes running the game exe application as an administrator on the PC might come in handy to avoid crashes because the system (user account control) requires the admin permission to run the program properly. To do that:
- Right-click on the Ready or Not exe application file on your PC.
- Now, select Properties > Click on the Compatibility tab.

- Make sure to click on the Run this program as an administrator checkbox to checkmark it.
- Click on Apply and select OK to save changes.
- Now, you can just double-click on the game exe file to launch it.
If you use the Steam client to run the game then make sure to do the same steps for the Steam application to give it admin access.
3. Set Launch Options on Steam
Sometimes you may have to set launch options on Steam for the specific game to make it compatible or force run with the mentioned DirectX version. The chances are high that your system isn’t running the DirectX 11 version.
- Open Steam > Click on Library.
- Right-click on Ready or Not from the left pane > Click on Properties.
- Under the General section, you’ll find out Launch Options.
- Here just type -d3d11 and then try launching the Ready or Not game to check if the Low Level Fatal Error is still appearing or not.
Note: Sometimes your graphics card isn’t supported by the all features of DirectX 11. In that case, you might have to upgrade your graphics card.
4. Update Graphics Driver
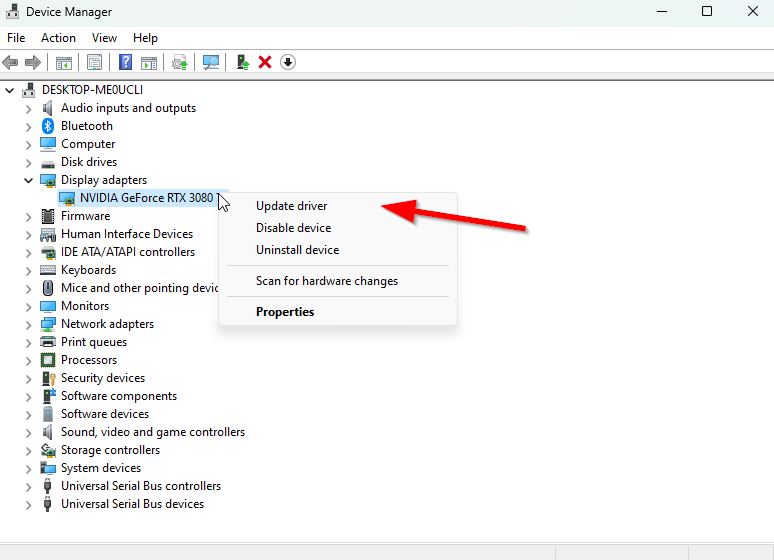
It’s highly recommended to check for the graphics driver update because an outdated or missing graphics driver eventually causes issues with the game launching as well as errors. To do that:
- Right-click on the Start Menu to open up the Quick Access Menu.
- Click on Device Manager from the list to open the interface.
- Now, you’ll need to double-click on Display adapters to expand it.

- Then right-click on the dedicated graphics card name you’re using to bring the context menu.
- Next, click on Update driver > Choose Search automatically for drivers.
- The system will automatically check for the available update.
- If an update is available, it’ll automatically download and install the latest version.
- Once done, make sure to restart your PC to apply the changes.
If there is no update showing on the PC then make sure to head over to the official manufacturer’s website of the respective graphics card and search manually for the latest update. If a new version is available for your specific GPU model, just download the file on your PC and install it. Whatever graphics card you use, jump to the link below as per the manufacturer.
5. Run the game on a dedicated GPU
You should also ensure that your using the dedicated GPU on your Windows computer instead of using the integrated HD graphics. To do so:
For Nvidia GPU:
- Right-click on the desktop screen to open the context menu.
- Now, click on Nvidia Control Panel to open it.
- Head over to 3D Settings > Select Manage 3D Settings.
- Open the Program Settings tab and choose Ready or Not from the drop-down menu.
- Next, select the preferred graphics processor for this program from another drop-down menu.
- Finally, your Nvidia GPU should show as High-Performance Nvidia Processor.
- Save the changes and reboot the PC.
For AMD GPU:
- Right-click on the desktop screen to open the context menu.
- Now, open Radeon Settings > Navigate to Additional Settings.
- Go to Preferences > Select Power > Choose Switchable Graphics Application Settings.
- Select Ready or Not from the list of installed applications. [If the game isn’t in the list, you can select Add Application and include the game exe file]
- Finally, select High Performance from the Graphics Settings, option > Reboot the PC.
You can also try following the steps below to set the game graphics to high performance on the PC.
- Press the Windows + I keys to open up the Windows Settings menu.
- Click on System > Click on Display.
- Select Graphics > Here make sure to add your Ready or Not game application file to the list by clicking on Browse.
- Just select the game file from the installed directory > Once added, click on the Ready or Not game from the list.
- Now, click on Options > Select High performance under Graphics preference.
- Then click on Save to apply changes.
6. Verify and Repair Game Files
Mostly missing or corrupted game files which are installed on your PC may trigger several issues with the game application launching properly. It’s always a better idea to verify the integrity of game files on the Steam client by following the steps below. The game client will automatically verify and repair the problematic game files to reduce errors or crashes.
- Launch the Steam client > Click on Library.
- Right-click on Ready or Not from the list of installed games.
- Now, click on Properties > Go to Local Files.

- Click on Verify Integrity of Game Files.
- You’ll have to wait for the process until it gets completed.
- Once done, just restart your computer.
7. Disable Overlay Apps
In some cases, a couple of applications may come with an additional overlay app or interface that basically allows gamers to take in-game screenshots, record gameplay videos, share with friends, chat with friends in gaming, etc. However, these overlay apps or tools require higher system resources to run in the background which can eventually put pressure on the game launching. It can cause lags, stutters, crashes, FPS drops, etc. To turn it off:
Disable Discord Overlay:
- Launch the Discord app > Click on the gear icon at the bottom.
- Select Overlay under App Settings > Turn on the Enable in-game overlay.
- Click on the Games tab > Select Ready or Not.
- Finally, turn off the Enable in-game overlay toggle.
- Make sure to reboot your PC to apply changes.
Disable Xbox Game Bar:
- Press Windows + I keys to open Windows Settings.
- Click on Gaming > Go to Game Bar > Turn off Record game clips, screenshots, and broadcast using the Game bar option.
Disable Nvidia GeForce Experience Overlay:
- Launch the Nvidia GeForce Experience app > Head over to Settings.
- Click on the General tab > Disable the In-Game Overlay option.
- Finally, restart the PC to apply changes, and launch the game again.
Disable Steam Overlay:
- Open the Steam client on the PC > Click on Library.
- Right-click on Ready or Not from the left pane > Select Properties.
- Now, click on General > Make sure to Uncheck the Enable the Steam Overlay while in-game option.
There are some other overlay apps that can cause trouble for you something as MSI Afterburner, Rivatuner, RGB software, etc. You should turn them off as well. This method did fix the Ready or Not Low Level Fatal Error for some players.
8. Reinstall Microsoft Visual C++ Redistributables
If your Windows computer isn’t running the latest version of Visual C++ or the required version then you may encounter several issues whatsoever. To do that:
- Press the Windows key from the keyboard to open the Start Menu.
- Now, type apps & features to search.
- Open Apps & Features from the search result.
- Click on the Microsoft Visual C++ program(s) from the list individually.
- Select each program and click on Uninstall.
- Follow the on-screen instructions to complete uninstallation.
- Next, visit the official Microsoft website and download the latest Microsoft Visual C++ Runtime.
- Once done, install it on your computer > Restart the system to change effects.
9. Update Windows
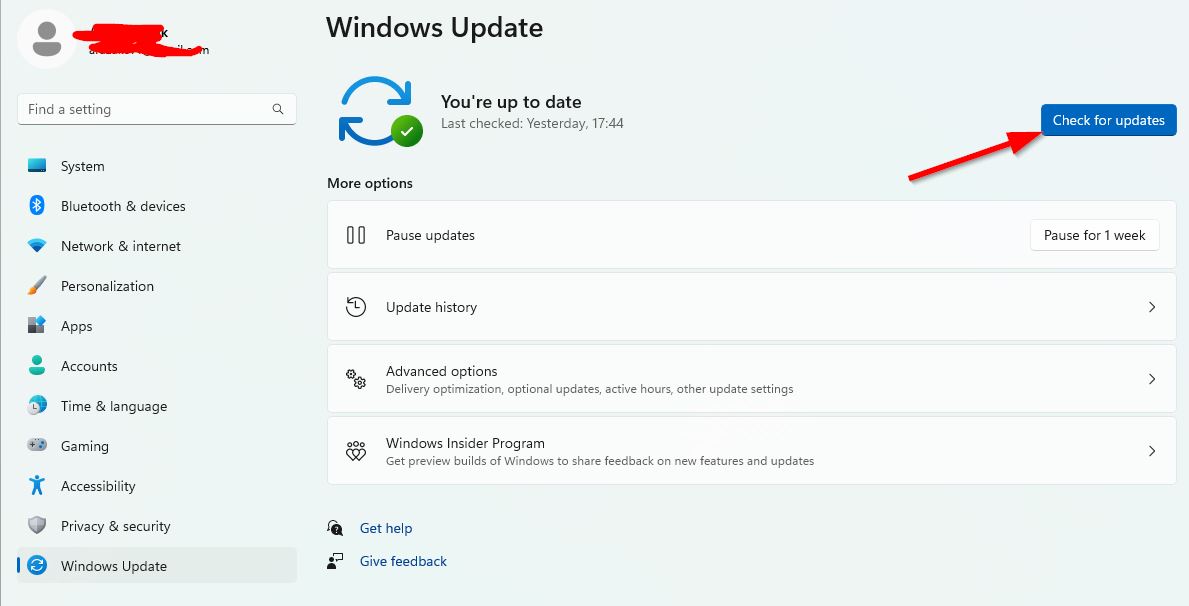
Just like an outdated game or application, it’s also recommended to update your Windows OS version or the build version to make the system compatible. It also improves performance and fixes bugs or stability issues whatsoever. To do so:
- Press the Windows + I keys to open up the Windows Settings menu.
- Click on Windows Update from the left pane > Click on Check for updates.

- If there is an update available, you should select Download and Install.
- Wait for the update process to be completed.
- Once done, reboot your PC to apply changes.
You should also check for the optional updates by following the steps below because some of the device driver updates and security patch updates may appear in a separate section.
- Press the Windows + I keys to open up the Windows Settings menu.
- Click on Windows Update from the left pane > Click on Advanced Options.
- Now, scroll down a bit and find the Additional options section.
- Click on Optional updates > If there is an update available, make sure to select the update.
- Click on Download & install > Reboot the system once the update is installed.
10. Try Disconnecting Other Peripherals
You should also try disconnecting other unnecessary USB peripheral devices from your computer such as additional display monitors, USB storage devices, USB flash drives, printers, webcams, controllers, RGB accessories, USB dongles for Bluetooth, etc. Just keep the mouse and keyboard connected to the PC then check for the issue again. Sometimes disconnecting and reconnecting the keyboard or mouse can also come in handy.
11. Update the Ready or Not game
If none of the methods worked for you then make sure to check for the game update and install it to the latest version. An outdated game patch version can eventually cause multiple issues on the system or become incompatible to run properly. You can follow the steps below to update the Ready or Not game via the Steam client.
- Open the Steam client > Go to Library.
- Click on Ready or Not from the list of installed games on the left pane.
- Now, the client will automatically search for the available update.
- If there is an update available, you’ll see the Update option > Just click on it.
- Wait for a couple of minutes or so until the game update completes. [Depends on the storage space and internet connectivity]
- Once done, make sure to close the Steam client.
- Finally, reboot your PC to apply changes, and launch the Ready or Not game again to check for the Low Level Fatal Error.
That’s it, guys. We assume this guide was helpful to you. For additional queries, you can comment below.
