Remote desktop sessions are something really important for many individuals, let it be for school or work. The purpose of remote desktop sessions is different for all. To execute such sessions, TeamViewer makes up to be a dominating client for this purpose. However, having the ability to record these sessions serve equal importance as actually taking part in them.
Recording the remote desktop sessions will help you go through the sessions again and again, as many times as you want. This equally benefits for schools as well as those having important work tasks. So today, we’ll run down through everything you need to do to record these sessions with the help of our guide on how to record Remote Desktop Session Easily.
How to Record Remote Desktop Session Manually with TeamViewer
- In order to manually record a remote desktop session with TeamViewer, the first thing you need to do is open the application and establish the connection that you want
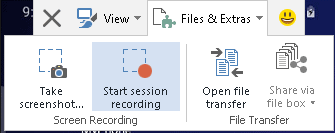
- Once you’re done with the connecting process, click on the File & Extras option from the toolbar

- This will drop down a menu of new options. From there, click on the Start session recording option. This will start recording your current session

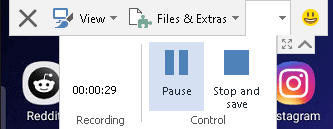
- While the session is recording, you can choose to pause the video and view the time elapsed. Right next to this, you also have the option to stop the recording. When you’re done with the session, simply click on the Stop and save option

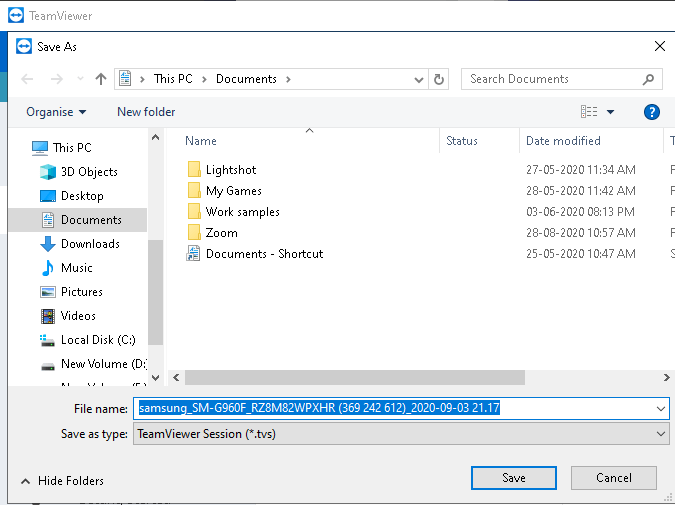
- When you choose to stop the recording, you’ll get the option to choose the destination to where you wish to save the file and you’re all set once you select your destination.

How to Record Remote Desktop Session Automatically with TeamViewer
- Open the TeamViewer application on your system
- Next, navigate to Extras>Options

- This will open up the Options window of the TeamViewer application. From there, go into the Remote Control section from the left panel

- In the Remote Control section, tick/check/mark the Start recording of remote control sessions automatically option under the Remote Control Defaults heading

- After doing so, select the OK button to save your changes.
After you save the changes, any session that you start from now on will be automatically saved. After each session ends, you’ll get a popup window from which you can choose the destination where you want to save the recorded file. Unlike manual remote desktop session recording, turning on the automatic feature will record every session automatically.
The steps to record remote desktop session with TeamViewer is pretty easy and convenient. As far as we know, TeamViewer makes to be the best choice for both remote desktop sessions as well as recording them. That said, we hope reading the article above has equipped you with some bit of information. Please let us know by commenting down below if you have any further queries regarding the same.
Also, check out our iPhone Tips and Tricks, PC tips and tricks, and Android Tips and Tricks if you’ve got queries for it or want help. Thank you!
