Here we will guide on how to repair IMEI on any ZTE smartphone running on Qualcomm Snapdragon processor.
It looks like that you have a ZTE Android Device and has corrupted your IMEI Number. Maybe you are seeing a NULL or INVALID in the fields of IMEI. Well, this is quite a common issue which a lot of users face when they root or flash a firmware on their device. Just in case you don’t already know, IMEI stands for International Mobile Equipment Identity and it is mandatory for every Smartphone in order to get registered with the Service provider in order to enable active data, SMS, call service.
If you don’t have an IMEI Number or have NULL or INVALID IMEI, then you won’t be able to register your device to Service Provider which would result in the inability to enable active data, SMS, call service. Anyways, the thing is that you want to repair the IMEI on your ZTE Device and you want to do it quick.

Well, don’ you worry as we at the GetDroidTips got you covered. Today, in this post, we would be covering on How to Repair IMEI on any ZTE devices (Qualcomm Snapdragon).
Page Contents
How to Repair IMEI on any ZTE devices (Qualcomm Snapdragon)
Now, wait before getting straight to How to Repair IMEI on any ZTE devices (Qualcomm Snapdragon), let us take a look at some of the Prerequisites, should we?
- This method would work for only those ZTE Android Devices which have the Qualcomm Snapdragon chip inside.
- Your ZTE Android Device should be rooted.
- You should have ADB Fastboot installed on your PC. You can also follow our guide on How to Install ADB and Fastboot on Windows.
- The drivers for your ZTE Device should be installed on your Windows PC. You can take a look at our post on Download latest ZTE USB drivers and installation guide.
- An Active internet connection.
Now once that’s clear, let us now take a look at How to Repair IMEI on any ZTE devices (Qualcomm Snapdragon).
How to Repair IMEI on any ZTE devices (Qualcomm Snapdragon)

In order to Repair IMEI on your ZTE devices (Qualcomm Snapdragon), you need to follow these steps carefully:
- First of all, you need to download the WriteDualIMEI W G eMMC.rar. You can do so by clicking on the download button below.
- After downloading the WriteDualIMEI W G eMMC.rar file from above, extract it into a folder on your desktop. You can do it using any ZIP Compression Utility Software like WinRAR.
- Now, on your ZTE Android Device, enable the USB Debugging.
Enable USB Debugging on your ZTE Android Device
- First of all, go to the Settings on your ZTE Android Device.
- Here, tap on About Phone.
- Now, tap on the Build Number 7 times until you see a message saying “You are now a developer”.
- GO back to the Settings on your Android Device.
- Here, tap on the Developer Options.
- Finally, enable the USB Debugging.
- That’s it!
- It’s time to connect your ZTE Android Device to your PC via a USB Cable.
- Now, open the Command Prompt Window on your Windows PC by simply pressing Win + R key and entering cmd.
- Enter the following command on your Command Prompt Window to check if the device is connected properly.
adb shell
- You must see your device in the list of devices attached. Now, give root permissions by entering:
su
- Now, you need to Open the DIAG COM Port, to do so, just enter the following command into the Command Prompt Window:
setprop sys.usb.config diag,adb
- Go to the folder where you extracted the contents of the WriteDualIMEI(W+G_eMMC).rar file.
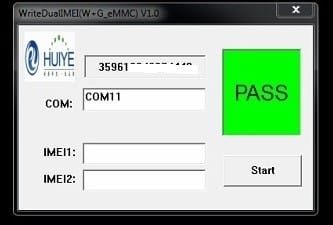
- Here, double-click on the WriteDualIMEI(W+G_eMMC).exe file.
- Now, select the COM Port and enter your IMEI 1 and IMEI 2, you can find them on your ZTE Android Device’s Back Panel or on the box.
- Click on the Start button to start the repairing process.
- Reboot your ZTE Android Device once.
- Now, check your ZTE Device’s IMEI by dialing *#06#.
You have successfully repaired your ZTE Android Device’s IMEI. Pretty easy, No?
So that’s it guys, this was our take on How to Repair IMEI on any ZTE devices (Qualcomm Snapdragon). Just in case, if you have stuck somewhere between the guide or had any queries related to the topic then feel free to leave them in the comments section down below.

does this work on Z981?
HI , can you repair IMEI on ZTE 233 VPP