The Out of Video Memory Error is a common issue among video games regarding the low VRAM on the configuration. Talking about The Finals, it’s a free multiplayer title that offers a crazy gaming experience. Even though the game runs smoothly across several PC configurations, Embark Studios has done well with the overall improvements and optimizations. However, The Finals Out of Video Memory Error on Unreal Engine 5 has become a hot topic.
We should also mention that most video games are experiencing Video Memory Errors (low VRAM) based on Epic Games’ Unreal Engine 5. It indicates that your respective graphics card does have a lower video memory or maybe the graphics card isn’t compatible with the game. In some cases, an outdated graphics driver version conflicts with the DirectX installation, outdated system software, corrupted game files, an outdated game patch version, third-party background tasks, or incompatible in-game graphics settings can be responsible.
Page Contents
- The Finals Out of Video Memory Error Fix
- 1. Restart the PC
- 2. Check for Your PC Specifications
- 3. Run The Finals as an Administrator
- 4. Update The Finals
- 5. Repair the Game Files
- 6. Close Background Tasks
- 7. Disable Fullscreen Optimizations
- 8. Update the Graphics Driver
- 9. Run the DirectX Diagnostic Tool
- 10. Switch to Dedicated GPU
- 11. Try Increasing Virtual Memory
- 12. Enable Sysmem Fallback Policy
- 13. Tweak the Config File
- 14. Force Use DirectX 11
- 15. Increase Shader Cache Size
- 16. Enable Debug Mode
- 17. Delete DirectX Shader Cache
The Finals Out of Video Memory Error Fix
If we take a quick look at the error message, it says “Out of video memory trying to allocate a rendering resource. Make sure your video card has the minimum required memory. Try lowering the resolution and closing other applications that are running. Exiting…”. Now, if you’re also one of the victims to encounter the same error with The Finals game most of the time then don’t worry.
Fortunately, here we’ve provided a couple of workarounds that might come in handy. Make sure to follow all troubleshooting methods until the error has been fixed. So, without further ado, let’s jump into it.
1. Restart the PC
You should try restarting the computer to ensure there is no conflict with the system. Any temporary system cache issue or glitch can eventually cause multiple errors with the game launching. To do that:
- Open the Start menu.
- Click on the Power icon > Click on Restart.
- Once the system reboots, check for the issue again.
2. Check for Your PC Specifications
In case, your PC specifications meet the system requirements of the game then it’s fine. Otherwise, if your PC configuration isn’t compatible with the game then you’ll need to identify the outdated hardware or software and upgrade accordingly. You can check out the system requirements of the game mentioned below.
MINIMUM:
- OS: Windows 10 or later 64-bit (latest update)
- Processor: Intel Core i5-6600K or AMD Ryzen R5 1600 processor
- Memory: 12 GB RAM
- Graphics: NVIDIA GeForce GTX 1050 Ti or AMD Radeon RX 580
- DirectX: Version 12
RECOMMENDED:
- OS: Windows 10 or later 64-bit (latest update)
- Processor: Intel Core i5-9600K or AMD Ryzen 5 3600 processor
- Memory: 16 GB RAM
- Graphics: NVIDIA GeForce RTX 2070 or AMD Radeon RX 5700 XT
- DirectX: Version 12
3. Run The Finals as an Administrator
You should run the game executable application as an administrator to avoid user account control regarding privilege issues. The chances are high that your game application is getting blocked by the system admin permissions. To do this:
- Right-click on the TheFinals.exe app on your PC.
- Now, select Properties > Click on the Compatibility tab.

- Enable the Run this program as an administrator checkbox.
- Click on Apply and select OK to save changes.
4. Update The Finals
We should also recommend our readers manually check for the game update via the Steam client to make sure there is no outdated game version causing multiple errors.
- Open the Steam client > Go to the Library.
- Now, click on The Finals from the left pane.
- Steam will automatically search for the available update.
- If a new update is available, click on Update.
- Ensure to wait for the update to complete.
- Once done, reboot the PC to apply changes.
5. Repair the Game Files
Another thing you can also do is repair the installed game files on the PC by following the steps below. Missing or corrupted game files on the system can trigger multiple issues with the game startup or other errors. To do so:
- Launch the Steam client > Click on Library.
- Right-click on The Finals from the list.
- Click on Properties > Go to Local Files.

- Click on Verify Integrity of Game Files.
- This process may take some time to complete. So, have some patience.
- Once done, reboot the PC to apply changes.
6. Close Background Tasks
Unnecessary background running tasks can mostly consume a lot of system resources like CPU or Memory usage, eventually causing system performance issues. It’s better to close all unnecessary tasks and check for the issue again.
- Press the Ctrl+Shift+Esc keys to open Task Manager.
- Now, click on the Processes tab.
- Click to select tasks that are unnecessarily running in the background.
- Then click on End Task to close processes one by one.
- Once done, restart your system.
7. Disable Fullscreen Optimizations
It’s better to try to turn off the fullscreen optimizations feature on Windows so that the respective program can run smoothly without any display-related issues.
- Right-click on The Finals application on your PC.
- Select Properties > Click on the Compatibility tab.
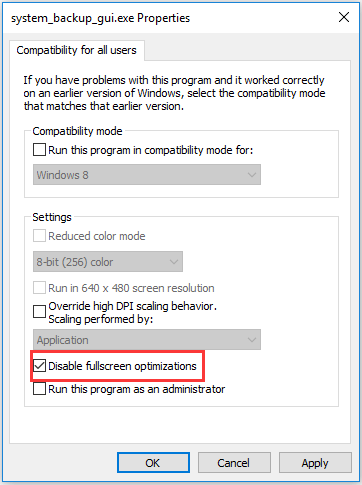
- Click on Disable fullscreen optimizations to select it.
- Then click on Apply and select OK to save changes.
8. Update the Graphics Driver
You should try checking for the graphics driver update on your Windows PC and installing the latest version to ensure no update is pending. An outdated or missing graphics driver can trigger issues with properly functioning graphics-intensive programs. To do that:
- Right-click on the Start Menu to open the Quick Link Menu.
- Click on Device Manager from the list.
- Double-click on Display Adapters to expand it.
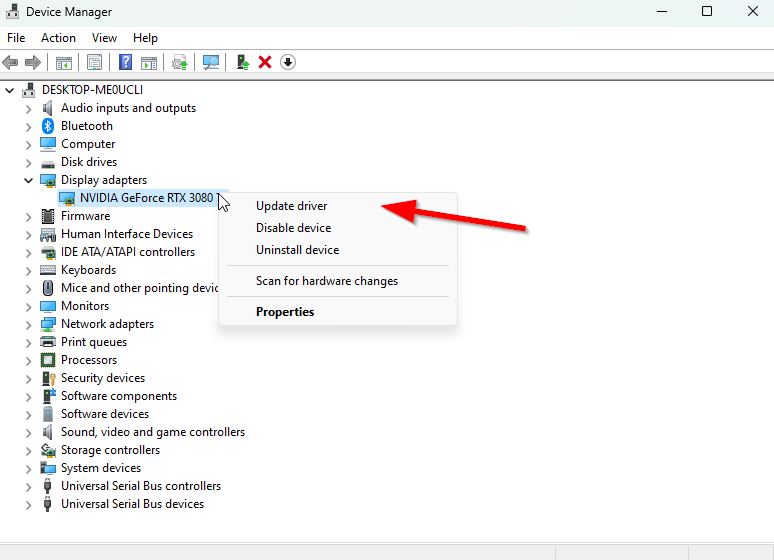
- Right-click on the dedicated graphics card.
- Now, click on Update driver.
- Choose Search automatically for drivers.
- The system will automatically check for the available updates.
- If a new update is available, download & install the same.
- Once done, you should restart your PC to apply the changes.
If you can’t find any pending updates, then just head over to the official website of the respective manufacturer below and search manually for the latest update. If a new version is available for the graphics card, download the driver and install it on your PC. You can jump to the link below to do so:
9. Run the DirectX Diagnostic Tool
You can also run the DirectX Diagnostic Tool on your computer by following the steps below to check which DirectX version is installed. If an outdated DirectX version is running then manually update the same.
- Press the Win+R keys to open the Run dialogue box.
- Now, type dxdiag and hit Enter to open the DirectX Diagnostic Tool.
- Go to the System tab > Check the DirectX version.
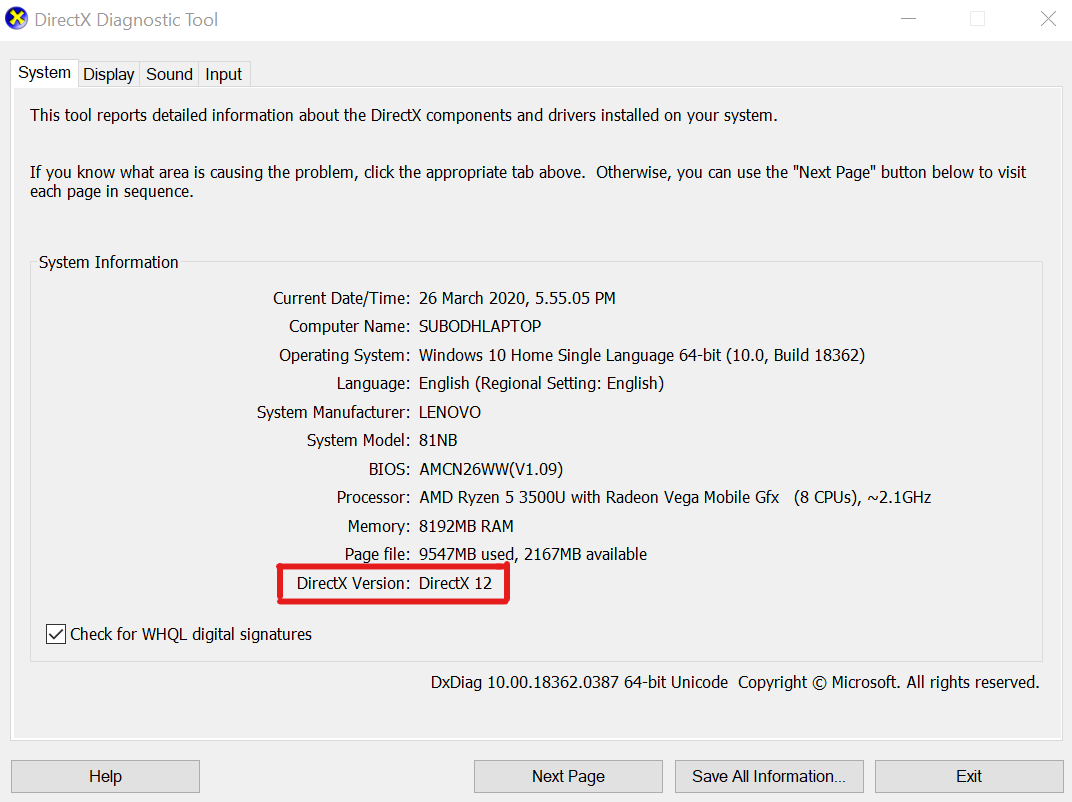
- Next, you can go to the Display tab.
- Here you can check DirectX 3D Feature Levels and other DirectX Features. [optional]
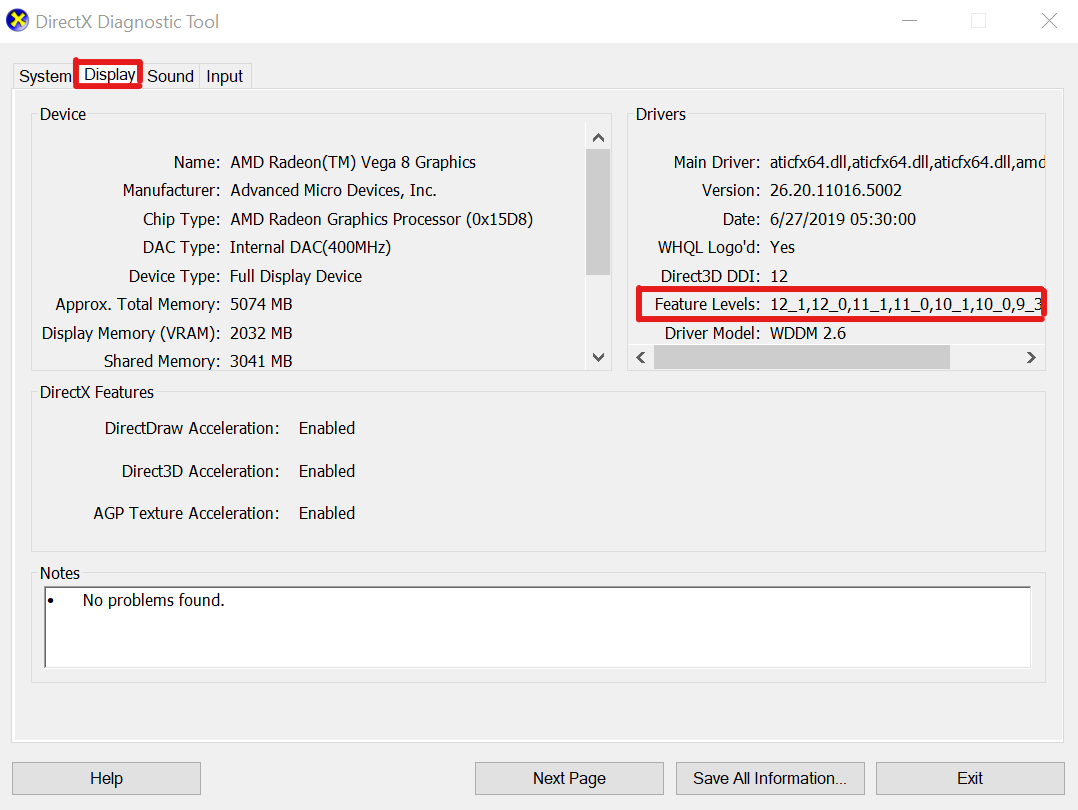
- If your PC is running an outdated DirectX version, visit the DirectX End-User Runtime Web Installer link.
- Download the installer file and then run it to install the latest DirectX version.
10. Switch to Dedicated GPU
Well, the specific error can appear on the PC due to multiple possible reasons but the chances are high that somehow the integrated graphics card is troubling a lot. Whereas some incorrect graphics settings might also cause multiple issues.
For Nvidia GPU:
- Right-click on the blank desktop screen.
- Open Nvidia Control Panel > Click on Manage 3D Settings.
- Now, click on Program Settings > Select The Finals.
- Select High-Performance Nvidia Processor from the list.
- Make sure to apply changes and reboot the PC.
For AMD GPU:
- Right-click on the blank desktop screen.
- Open AMD Radeon Settings > Click on Preferences.
- Go to Additional Settings > Click on System.
- Select Switchable Graphics > Select The Finals.
- Click on High-Performance Profile.
11. Try Increasing Virtual Memory
The chances are high that your physical RAM capacity is getting on the verge of working limit on the system due to plenty of background and foreground tasks. It’s highly recommended to increase the virtual memory by setting up the paging file size on the PC. The paging file size should be higher than the RAM capacity for better results. You can follow the steps below to increase the virtual memory size on your PC.
Please Note: You must be logged on as an administrator or a member of the Administrators group to complete this process. The network policy settings may also cause such issues if your computer is connected to a network.
- Open the Start menu > Click on Control Panel.
- Click on Performance and Maintenance > Go to System.
- From the Advanced tab, click on Settings under Performance.
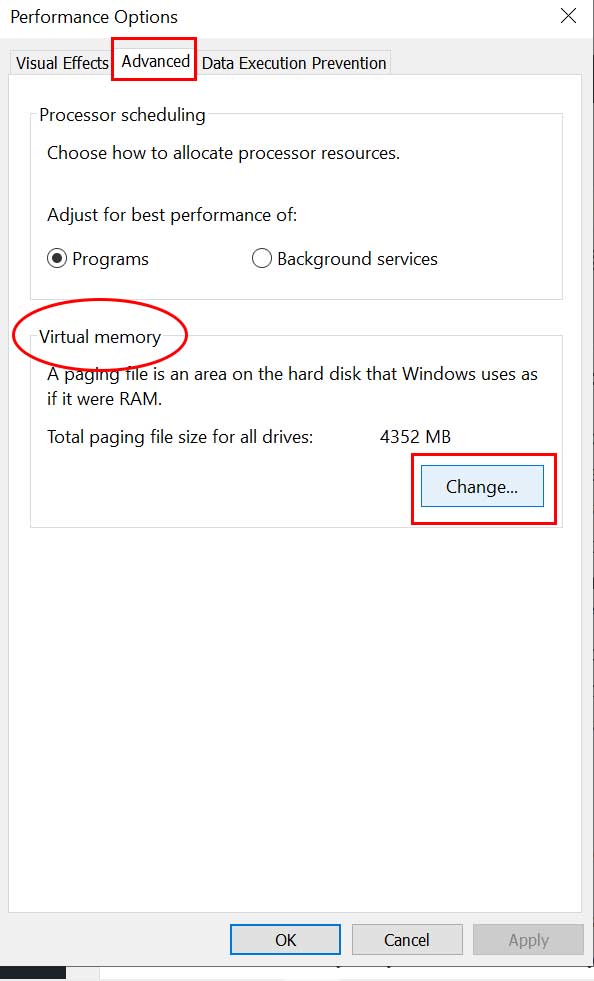
- On the Advanced tab, click on Change under Virtual Memory.
- Under Drive [Volume Label], click on the drive that contains the paging file you want to change.
- Under Paging file size for the selected drive, click on System Managed Size.
- Click on Set > If this option hasn’t been flagged previously, restart the PC after flagging it.
- If the system paging file size is used to be System Managed then under Paging file size for selected drive, click on Custom size.
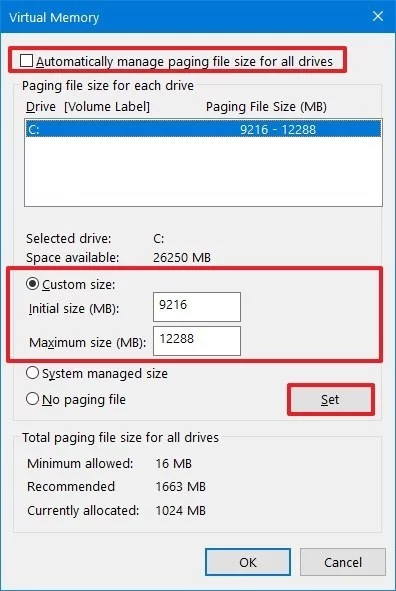
- Now, type a new paging file size in megabytes in the Initial size (MB) or Maximum size (MB) box. [It should be 1.5x-2x higher than the physical RAM]
- Click on Set and Save changes.
- Restart the PC to apply changes.
12. Enable Sysmem Fallback Policy
The chances are high that Nvidia has added a ‘Sysmem Fallback Policy’ in the Nvidia Control Panel that helps PC users resolve the Out of Video Memory error. Try enabling the Sysmem Fallback Policy by following the steps below.
- Open the Nvidia Control Panel via the Start menu.
- Go to Manage 3D Settings > Click on Program Settings.
- Select The Finals from the list.
- Scroll down to CUDA – Sysmem Fallback Policy.
- Choose Prefer Sysmem Fallback and save the changes.
13. Tweak the Config File
You can follow the steps below to tweak the configuration file of The Finals. It might help in fixing the in-game graphical conflicts and gameusersettings.ini files.
- Navigate to the %LOCALAPPDATA%/Discovery/Saved/Config/WindowsClient directory.
- Open the GameUserSettings.ini file via Notepad.
- You can use the following values respectively to tweak the configuration of your game.
[ScalabilityGroups]
- sg.ResolutionQuality=100
- sg.ViewDistanceQuality=1
- sg.AntiAliasingQuality=1
- sg.ShadowQuality=1
- sg.GlobalIlluminationQuality=1
- sg.ReflectionQuality=1
- sg.PostProcessQuality=1
- sg.TextureQuality=1
- sg.EffectsQuality=1
- sg.FoliageQuality=1
- sg.ShadingQuality=1
14. Force Use DirectX 11
The Finals game usually runs on the DirectX 12 API on the Windows system might not run properly and throws an Out Of Video Memory error if there are some conflicts. You can follow the steps below to use the game in DirectX 11 forcefully.
- Open Steam > Click on Library.
- Right-click on The Finals.
- Select Properties > Go to Launch Options.
- Type -d3d11 inside the box and run the game again.
15. Increase Shader Cache Size
In-game shaders cache may trouble you a lot with the Unreal Engine which mostly depends on shaders to improve the gaming performance. This usually brings the high fidelity visuals due to the default shader cache size. However, if the shader cache size increases over some time then you may encounter multiple issues with the game startup.
- Open Nvidia Control Panel > Go to Manage 3D Settings.
- Click on Global Settings > Scroll down to Shader Cache.
- Select 10 GB and save the changes.
16. Enable Debug Mode
Try enabling the Debug Mode on your graphics card software to get all logs related to the higher GPU or Memory clocks depending on whether your graphics card is overclocked or not. To do that:
- Open Nvidia Control Panel > Go to Help.
- Click on Debug Mode > It might help in forcefully using Nvidia’s recommended GPU and Memory clocks.
17. Delete DirectX Shader Cache
Last but not least, you should delete the DirectX Shader Cache to avoid the out-of-video memory error on The Finals game instead of the video memory (VRAM). There is nothing to worry about because the game will automatically create a new cache without any further issues. To do this:
- Press the Win+I keys to open Windows Settings.
- Go to System > Click on Storage.
- Select all Temporary Files > Choose DirectX Shader Cache.
- Click on Remove Files.
That’s it, guys. We hope you’ve found this troubleshooting guide useful. If you’ve any queries, you can comment below.
Also Read
