The team at CD Projekt RED is known for creating dark, fantasy-themed action role-playing video games, and The Witcher III is one of their most popular titles. Originally released in 2007, this series of fantasy action RPGs has received overwhelmingly positive reviews on several gaming platforms, including Xbox, Windows, PlayStation, and Nintendo Switch. However, some players have reported issues with the game not launching properly. If you’re experiencing this problem, don’t worry – you can follow this troubleshooting guide to resolve it quickly. It’s common for PC games to have bugs or errors, and The Witcher 3 is no exception. Many PC gamers have reported crashing or startup issues with the game. By identifying the root cause of the problem, you can fix it and get back to playing your favorite game.
Why Won’t The Witcher 3 Launch?
The Witcher 3 game didn’t go well with the launch because there were a bunch of bugs and connectivity errors appearing to the players no matter which gaming platform they were using. So, it’s worth mentioning that The Witcher 3 is full of issues that we can’t deny. Still, sometimes the problems at your end or even with your PC (directly or indirectly) can also trigger multiple game launching or crashing issues. So, without further ado, let’s get into it.
It may be possible that your The Witcher 3 game doesn’t launch due to an outdated game patch, an outdated graphics driver version or Windows build, missing or corrupted game files, issues with the Microsoft Visual C++ Redistributable, unnecessary background running tasks, etc. Whereas some players can encounter issuesn’t launching the game issues due to incompatible PC hardware, unnecessary background running tasks, overlay apps, and more.
Fix: The Witcher 3 is Not Loading on the PC
It seems that you’re unable to launch The Witcher 3 game on your Windows computer, or somehow the game refuses to load further, and it seems to crash after some time. In that scenario, you can follow all the provided workarounds one by one to check whether your problem has been fixed or not.
1. Check System Requirements
First of all, you’ll need to check whether your PC configuration meets the game’s system requirements or not. Sometimes an incompatible PC hardware can trigger multiple issues with the game launching.
Minimum System Requirements:
- OS: 64-bit Windows 7, 64-bit Windows 8 (8.1) or 64-bit Windows 10
- Processor: Intel CPU Core i5-2500K 3.3GHz / AMD CPU Phenom II X4 940
- Memory: 6 GB RAM
- Graphics: Nvidia GPU GeForce GTX 660 / AMD GPU Radeon HD 7870
- Storage: 35 GB available space
Maximum System Requirements:
- OS: 64-bit Windows 7, 64-bit Windows 8 (8.1) or 64-bit Windows 10
- Processor: Intel CPU Core i7 3770 3.4 GHz / AMD CPU AMD FX-8350 4 GHz
- Memory: 8 GB RAM
- Graphics: Nvidia GPU GeForce GTX 770 / AMD GPU Radeon R9 290
- Storage: 35 GB available space
2. Run the game as an Administrator
If you’re not running your video game using an administrator privilege, it may cause issues with the game launching or startup crashing, or even the game not loading, etc. So, it’s better to simply run the game exe file as an administrator on your Windows computer to check if that fixes the problem or not. To do so:
- Right-click on The Witcher 3 exe shortcut file on your PC.
- Now, select Properties > Click on the Compatibility tab.
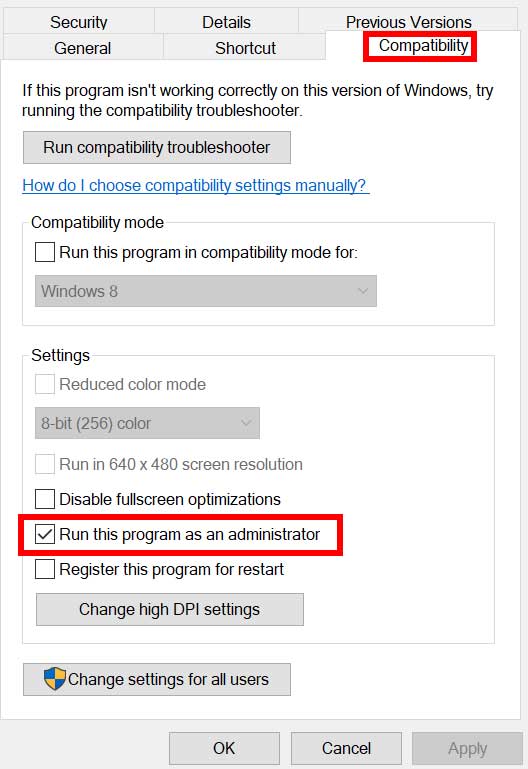
- Click on the Run this program as an administrator checkbox to checkmark it.
- Click on Apply and select OK to save changes.
3. Verify Integrity of Game Files
If, in case, your game files become corrupted or missing for some unexpected reasons, then verifying and repairing the game files using the game launcher can help you a lot. To do this:
For Steam Client:
- Launch Steam > Click on Library.
- Right-click on The Witcher 3 from the list of installed games.
- Now, click on Properties > Go to Local Files.
- Click on Verify Integrity of Game Files.
- You’ll have to wait for the process until it gets completed.
- Once done, restart your computer.
For Epic Client:
Watch our video on how to verify the integrity of game files.
4. Update Microsoft Visual C++ Redistributable
- Head over to the following path on your PC:
C:\Program Files (x86)\Steam\steamapps\common\Steamworks Shared\_CommonRedist\vcredist
- You should see the following folders:
- 2012\vc_redist.x64.exe
- 2013\vc_redist.x64.exe
- 2019\vc_redist.x64.exe
- Just make sure to run all of these executable files that are present. (If you’ve different folders, then run the vc_redist.x64.exe file in those folders)
- Finally, restart your PC to fix the issue.
5. Update DirectX
- Go to the C:\Program Files (x86)\Steam\steamapps\common\Steamworks Shared\_CommonRedist\DirectX folder path.
- Next, run the DXSETUP.exe file to reinstall/update DirectX.
- Once done, restart your computer to apply changes.
6. Update GPU Drivers
It seems that multiple affected players have reported the outdated graphics driver. If you’re also using the outdated graphics driver for a while, then make sure to check for updates by following the steps below:
- Press Windows + X keys to open the Quick Link Menu.
- Now, click on Device Manager from the list > Double-click on Display adapters.
- Right-click on the dedicated graphics card that’s active.
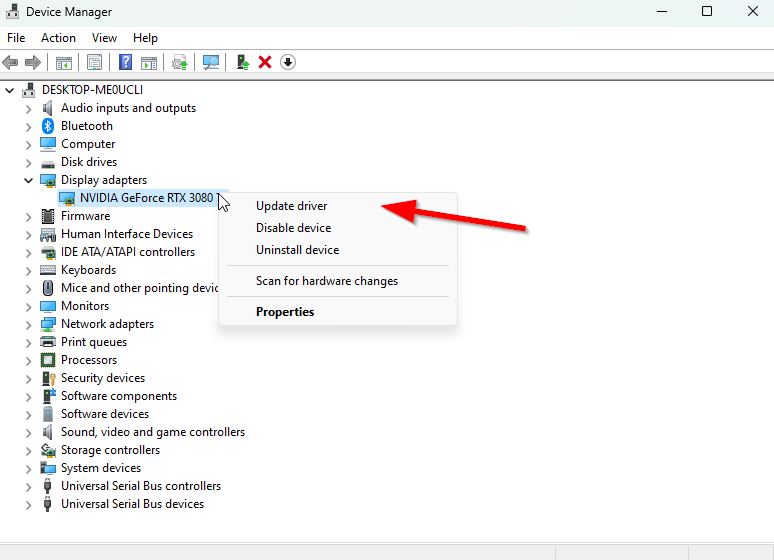
- Next, select Update driver > Choose to Search automatically for drivers.
- If an update is available, the system will automatically download & install it.
- Once done, restart the computer to apply changes.
This method should fix The Witcher 3 Won’t Launch on PC issue. If not, you can head over to the next method.
7. Disable Overlay Apps
According to some of the affected players, disabling the overlay apps such as Xbox, Discord, or any other on the Windows computer has helped them easily fix the game not launching issue. As the in-game overlay app is always running in the background whenever you launch the game client, it’s possible to have issues with the processes or system resources.
8. Install All Pending Windows Updates
It may be possible that any Windows bugs or system files somehow conflict with the game to run it properly. Sometimes an incompatibility issue can also occur when you didn’t update the software for a while. So, install all the pending Windows updates and keep it to the latest OS build whatsoever. To do that:
- Press Windows + I keys to open up the Windows Settings menu.
- Next, click on Update & Security > Select Check for updates under the Windows Update section.
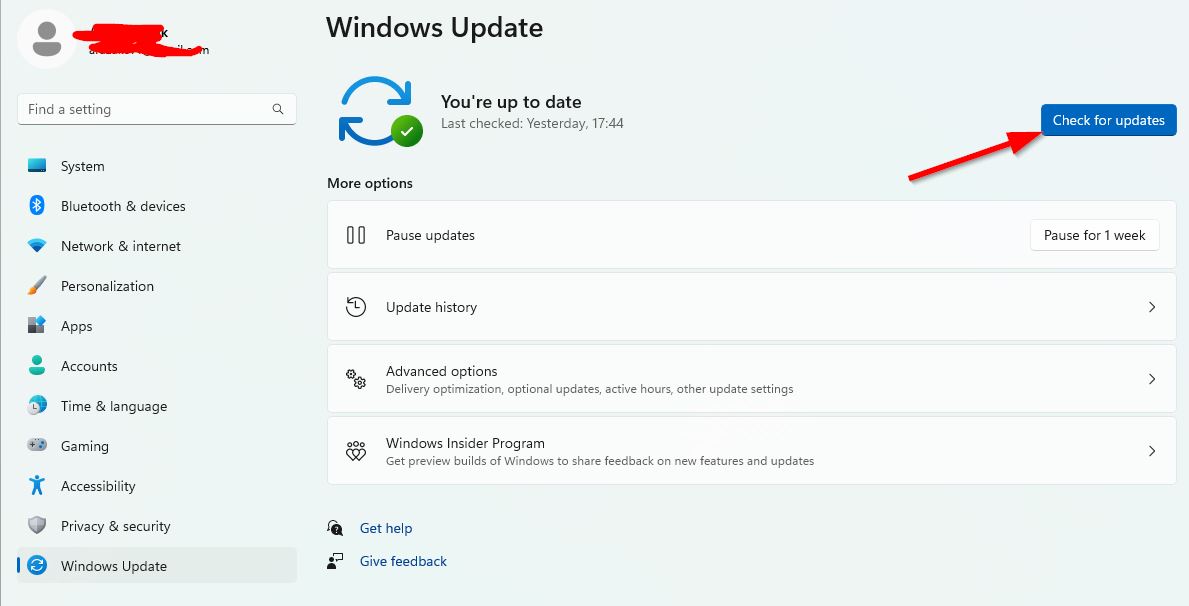
- If there is a feature update available, select Download and install.
- Wait for some time until the update gets completed.
- Finally, reboot your PC to apply changes immediately.
9. Disable Antivirus and Firewall Program
- Click on the Start menu > Type Control Panel and click on it.
- Now, type firewall in the search box > Click on Windows Firewall.
- From the left pane, click on Turn Windows Firewall on or off.
- Make sure to select Turn off Windows Firewall for the Private, Domain, and Public Network Settings.
- Finally, reboot the PC to apply changes and try checking the issue.
Now, you’ll have to disable the anti-virus protection (Windows Defender) as well by following the steps below:
- Head over to the Windows Settings > Privacy and Security.
- Now, go to Windows Security > Virus & threat protection.
- Click on Manage settings >Then turn off the Real-time Protection option.
- Once done, make sure to reboot your PC to apply changes.
If in case, you’re using any third-party antivirus program, make sure to turn it off manually.
10. Launch the Game in Windowed Mode (Steam)
Try launching the game in Windowed display mode to check if that helps you. Sometimes a computer with an average hardware specification can cause several issues with the fullscreen display mode while running the game.
- Open the Steam client and go to Library.
- Right-click on The Witcher 3 > Select Properties.
- In the General section, click on Set Launch Options.
- Next, copy & paste the following command-line argument:
-windowed -noborder
- Make sure to save changes and try running the game again to check if The Witcher 3 is launching properly or not.
11. Perform a Clean Boot
- Press Windows + R keys to open the Run dialog box.
- Now, type msconfig and hit Enter to open the System Configuration window.
- Go to the Services tab > Enable the Hide all Microsoft services checkbox.
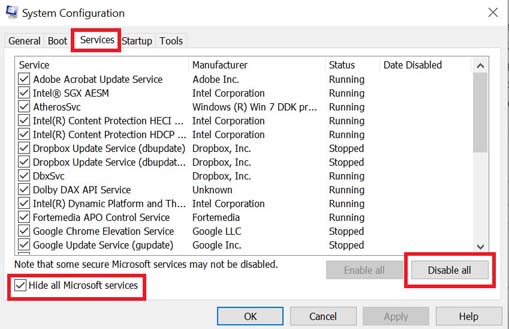
- Click on Disable all.
- Click on Apply and then OK to save changes.
- Now, click on the Startup tab > Click on Open Task Manager.
- Under the Startup tab from the Task Manager interface, click on the particular tasks which are enabled for startup boot > Click on Disable.
- Make sure to select the high-impact startup programs and disable them one by one.
- Once all is done, restart your PC to apply changes.
- Finally, check whether The Witcher 3 Won’t Launch on PC issue has been fixed or not.
12. Close Background Processes
- Press the Ctrl + Shift + Esc keys to open Task Manager.
- Click on the Processes tab > Select the task you want to close.
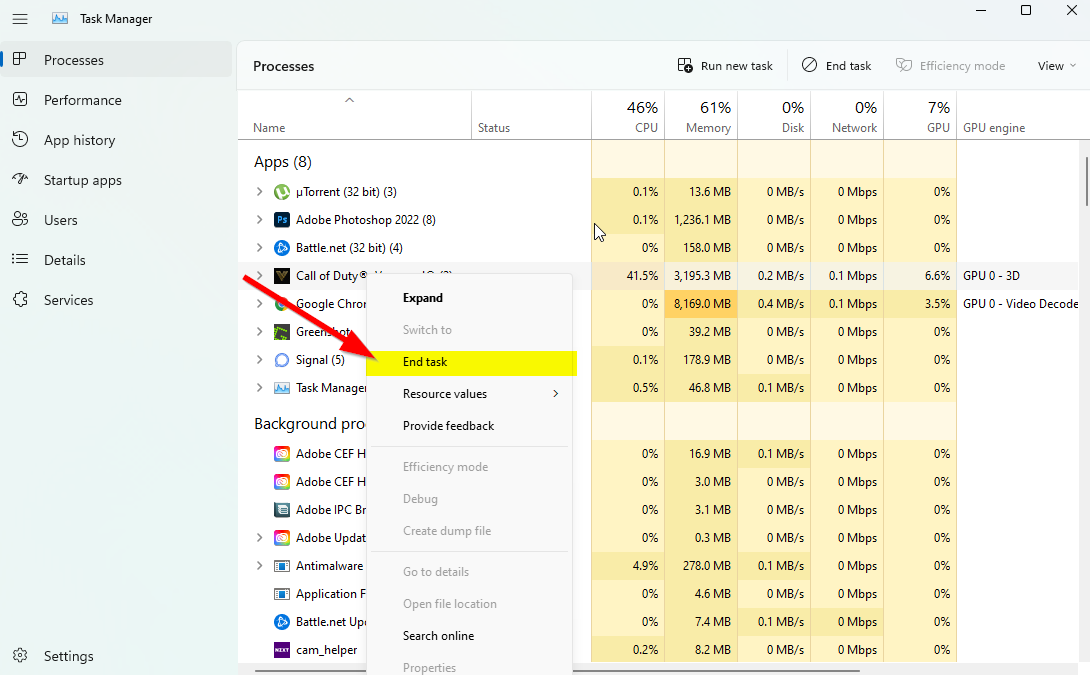
- Once selected, click on End Task. Make sure to do the steps for each task individually.
- Once done, just restart your computer to change effects immediately.
13. Reset The Witcher 3
- Press the Windows (Start) + X keys to open the Quick Link Menu.
- Select Apps and Features > Click on The Witcher 3 from the list of installed programs.
- Now, click on Advanced options > Select Reset.
- Once done, reboot your computer and try to launch the game.
14. Reinstall The Witcher 3
If none of the methods worked for you, try reinstalling The Witcher 3 game to check if that helps fix the game not launching issue. To do so:
- Launch the Steam client on your computer.
- Now, go to Library > Right-click on The Witcher 3 game.
- Head over to Manage > Select Uninstall.
- If prompted, click on Uninstall again and follow the on-screen instructions to complete the uninstallation process.
- Once done, make sure to reboot your computer to apply changes immediately.
- Open the Steam client again and install the game using the existing Steam account.
- You’re done. Enjoy! This can resolve The Witcher 3 Won’t Launch on PC issue.
That’s it, guys. We hope this guide was helpful to you. For further queries, you can comment below.
Also Read