In this tutorial, we will guide you on how to install the TWRP Recovery on Samsung Galaxy A02S SM-A025F, A025M, and A025G. TWRP recovery is probably the most used and most popular custom recovery that we all know. For those who are quite accustomed to rooting and flashing custom ROM, etc. then, they know what TWRP Recovery is. However, for naive, the TWRP Recovery allows users to install custom ROMs/mods, take a complete backup of their phone, gain root access on your phone using Magisk Manager.
However, you are required to have TWRP access before you can go ahead and root your Samsung Galaxy A02S. For flashing the TWRP recovery image, you need to follow the guide properly to avoid errors. And if you happen to own a Samsung Galaxy A02S and are looking for ways to download and install the TWRP Recovery on your phone then, you are at the right place as in this post, and we will guide you on how to download and install TWRP Recovery on Samsung Galaxy A02S and eventually root using Magisk. So, that being said, let us get straight into the article itself:

Page Contents
What is TWRP Recovery?
Team Win Recovery Project or TWRP Recovery is a useful and popular custom recovery, which is open-source software. The touch-screen-enabled interface allows users to flash third-party firmware and back up the system or data easily like never before. For Android customization lovers or developers, a custom recovery is a much-needed tool or software.
Additionally, you can install the kernel, modules, root or unroot, take Nandroid backups, etc. Meanwhile, you can wipe system partitions, internal storage, data, cache, vendor, etc. very easily.
Advantages of TWRP Recovery
- Backups of partitions in TAR or raw Image format
- Restore backups from internal storage, external SD storage, or OTG devices
- Install Custom Firmware
- Install flashable ZIPs and image files
- Partition wiping
- Delete System, Cache, Vendor, Partition, User Data, etc
- Install Root or Unroot by flashing ZIPs
- Terminal access
- ADB Root Shell
- Theme Support
- Possible decryption support depending on the device
Steps to Install TWRP Recovery on Galaxy A02S SM-A025F/M/G
Now before we go ahead and install TWRP Recovery on the Samsung Galaxy A02S SM-A025F, A025M, and A025G, let us make a list of pre-requisites that are required to unlock it:
Charge your phone
You need to make sure that your Samsung Galaxy A02S is charged to about 60% before installing TWRP recovery to avoid any boot loop issues during the unlocking process.
Take a complete backup
Before rooting, one of the most important things that you need to do on your phone is to take a complete backup of your phone. For that, you can follow the guide by clicking the link below:
Activate Developer Options
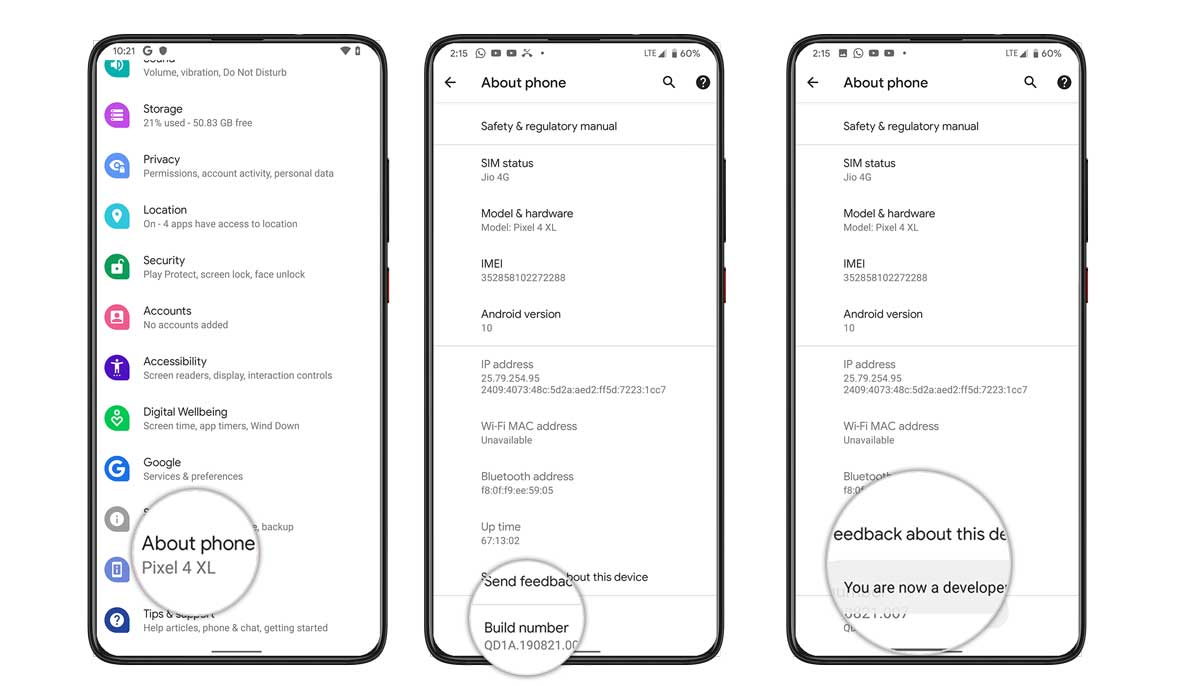
To Enable the Developer Option on your device, follow the below steps:
- Go to the Settings menu of your Android device.
- Then scroll down and go to About.
- Now you need to head to Software Information>> More.
- Here tap on Build Number 7-8 times until you see a message “You are now a developer”.

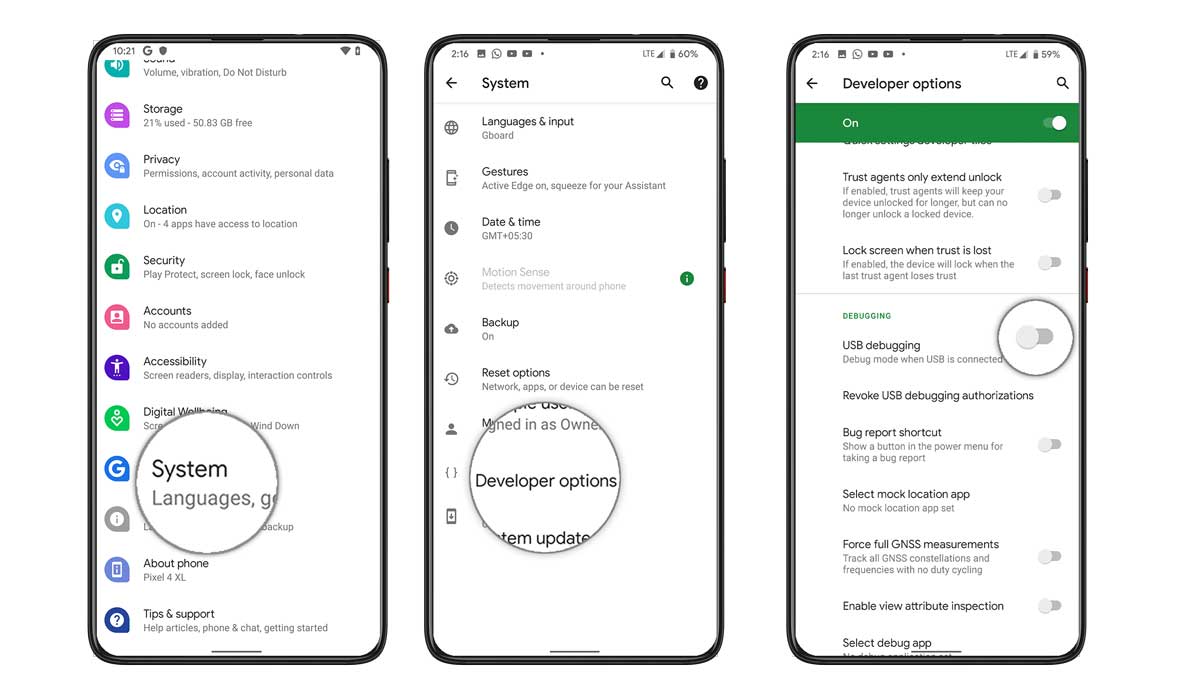
You also need to enable USB Debugging and OEM unlock option under the Developer Options menu. And to do that:
- Head over to Developer Options and toggle ON the USB Debugging option as well as the OEM unlock option.


Install ODIN tool
You need to install the latest Odin tool on your PC. For that, you can follow the link mentioned below:
Unlock the bootloader
In order to install the TWRP Recovery, you have to first unlock the bootloader on Samsung Galaxy A02S.
Warning!
Download Samsung USB Drivers
You can follow the link in order to download the correct Samsung USB drivers for Windows and Mac.
Download TWRP Recovery
Here you will find the latest and TWRP recovery for the Samsung Galaxy A02S.
| File Name | TWRP Recovery |
| Version | 3.5.1-0 |
| File Size: | 28 MB |
| Support | Unofficial |
| Device Name: | Samsung Galaxy A02S |
| Model Number | SM-A025F, A025M and A025G |
| Developer |
Instructions to Install TWRP
Follow the step by step instructions mentioned below to simply install the TWRP Recovery on your Samsung Galaxy A02S:
- Once you have downloaded, reboot your device into download mode.
- Flash the vbmeta_disabled_R.tar in the USERDATA slot and click start.
- Now the device will boot into recovery mode prompting you to wipe data.
- Wipe data and reboot to download mode again
- Open Odin and add the TWRP Tar file in the AP slot and click start to flash.
- Once it is done, you can reboot to recovery via recovery key combo (Vol UP + Power button + USB connected).
- In your TWRP Recovery menu, disable encryption:
- Go to Advanced > Terminal, type:
multidisabler.
- Go to Advanced > Terminal, type:
- If the vendor complains about free space left on the device, will attempt to resize the vendor. and it asks to
- Run multidisabler again!. - Type:
multidisableragain and you will see- Finished.when done. - Go back to Wipe > Format Data > type
yes.
You can check out our full-depth tutorial video as well:
Watch Our Tutorial Video- Once the device booted into TWRP Recovery mode, you need to decrypt the data partition. In order to do it: Go to Wipe > Format Data and follow the on-screen instructions.
- Then reboot to recovery mode again.
- Now, flash the Samsung multidisabler zip and then flash the DM Verity Force Disabler (To avoid some issues, like the Reboot thing)
- That’s it. Reboot to the system finally. Enjoy!
Root Samsung Galaxy A02S Using Magisk
- Now you need to install the Magisk Manager APK on your phone.
- Place it in the internal memory on your device.
- Then head over to recovery by pressing the Volume up + Power button together.
- Make sure you have created a backup of your Samsung Galaxy A02S.
- In TWRP, select Install and locate Magisk.zip and select the file.
- Swipe to Install and flash it.
- Restart your device.
- Voila!
So, there you have it from my side in this post. I hope you guys liked this post and were able to install the TWRP Recovery and root your Samsung Galaxy A02S smartphone. Let us know in the comments below if you faced any issues while installing the TWRP recovery on your phone and then rooting it using Magisk. Until the next post…Cheers!

the file for the multi disabler reads “file not found” could you please help me out with the download and link?