Super People could be known as a PUBG knock-off that is better than PUBG in many ways (PUBG PC). Anyway, talking about this game, it is a next-generation based battle royale FPS game specially made for PC users. Well, this amazing game is recently released with twelve different playable classes, each with unique skills and diverse abilities.
But, somehow, it looks like the game still has some bugs or stability issues. However, there are some unfortunate users who recently updated to the new Windows 11 system encountered some errors due to which they are unable to install GeeGee Launcher on their PC.
Although the reason why you are unable to update or install your launcher is still a matter of discussion. But, even if you are facing the issue, check out the troubleshooting methods we have mentioned here in this guide.
Also Read
Page Contents
- How To Fix Unable To Install GeeGee Launcher From My PC
- Fix 1: Reboot Your Device
- Fix 2: Check Your Internet Connection
- Fix 3: Power Cycle Your Router
- Fix 4: Reset Network Adapter Driver
- Fix 5: Flush DNS
- Fix 6: Disable The Antivirus
- Fix 7: Reset the TCP/IP Log
- Fix 8: Disable VPN Service
- Fix 9: Disable The Proxy server.
- Fix 10: Check Your System’s Date & Time
- Fix 11: Delete the GeeGee and Super People folder.
- Fix 12: Change DNS Settings
- Fix 13: Reset Network Settings
- Fix 14: Try Installing in Clean Boot Mode
- Fix 15: Verify If The Update is Still There Or Not
- From Author’s Desk
How To Fix Unable To Install GeeGee Launcher From My PC
Well, for those who don’t know, GeeGee Launcher is the official launcher that is used to play the Super People, which is again developed by the Wonder People. So, if ever you encounter any issue due to which you are unable to install the GeeGee launcher, then make sure to note down these fixes as these fixes have the potential to resolve this type of issue. Then, let’s take a look at them:
Fix 1: Reboot Your Device
Before trying any of the given methods, don’t forget to reboot your system. This will not only fix the temporary cache data and glitches but also give your system a new start to perform well without having any issues. Also, sometimes, what we see is not necessarily to be true; therefore, there’s a chance you do not have to perform any of the fixes, and the issue may get resolved just by rebooting your device.
Fix 2: Check Your Internet Connection
Your internet connection plays an important role when it comes to installing something. So, it is very important to have a proper internet connection speed while installing the GeeGee launcher on our PC. Therefore, to verify if you have a good network connection or not, go to the Ookla speed tester website and check your connectivity speed.
Fix 3: Power Cycle Your Router
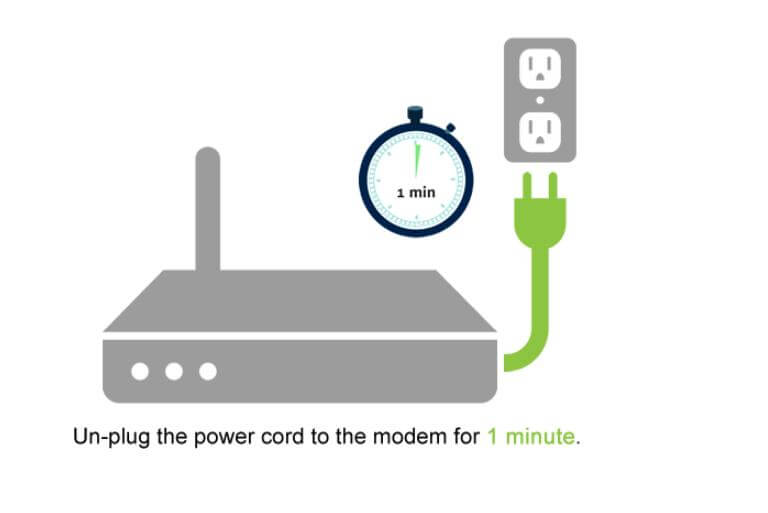
Well, in case after checking your connection speed you’d notice that your WiFi router isn’t providing you a good internet connection, then make sure to power cycle your router once as this will remove all the temporary problems causing bugs and glitches from your router in order to provide you a good connection speed.
However, go to the speed tester website again and check the speed once done. If still, you are facing a poor connection issue, hover to the ISP provider and ask them to fix it.
Fix 4: Reset Network Adapter Driver
So, did you try this before? Well, this also has the potential to fix network issues. There are chances that the issue may not be from your WiFi router as your network settings on your PC may get corrupted, which will be fixed by resetting the network adapter drivers. So, here are the needy steps for that:
- Firstly, open the Run Box by pressing the Win+R button simultaneously.
- Then, search for devmgmt.msc. This will open the Device Manager.
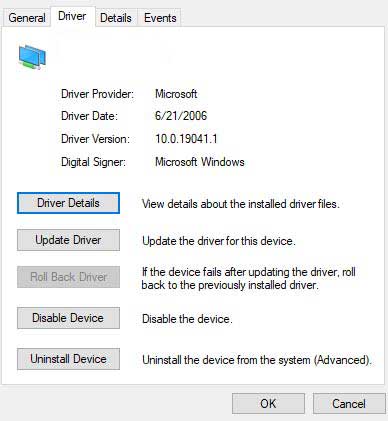
- After, expand the Network Adapter tab. Thereafter, right-click on the Wireless adapter and select the Properties option.
- Then, switch to the Driver tab and hit the Uninstall Device button. After that, to reinstall the driver, you can simply restart your Windows 11 PC.
Fix 5: Flush DNS
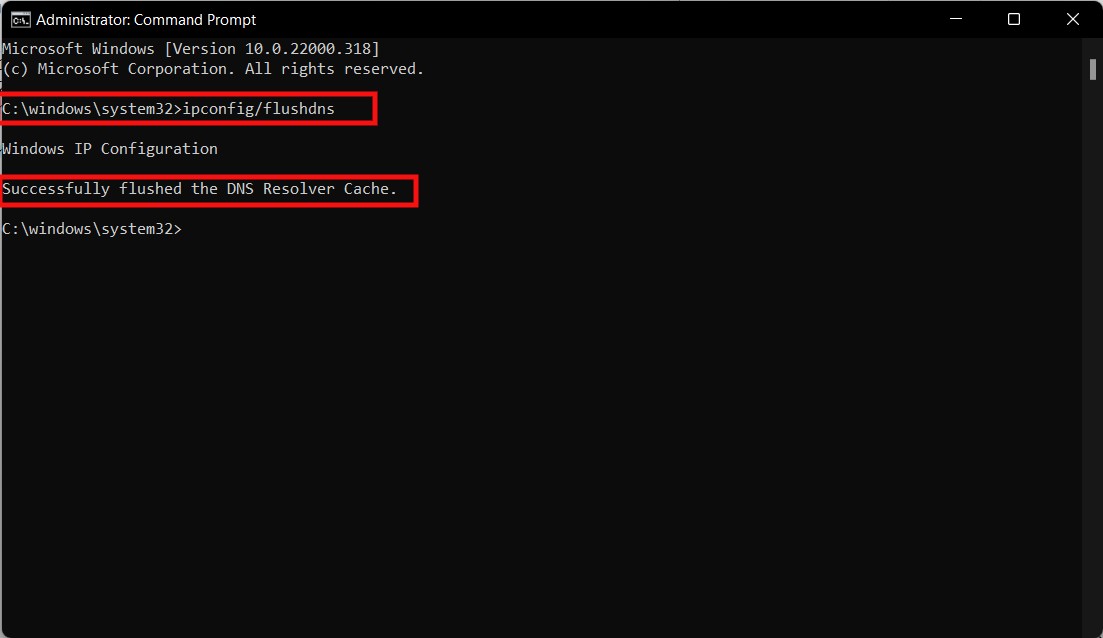
Flushing the DNS will also help many users to fix the GeeGee launcher not installing issue. Therefore, you should also try this out and let us know if it helps:
- Initially, open the command prompt using admin rights on your Windows PC.
- Then, execute the command:
ipconfig/flushdns
Fix 6: Disable The Antivirus
Many of you don’t know, but sometimes our antivirus may also come up as the main culprit behind this error. This is because it starts blocking the app to install on your PC due to security reasons. So, to install it without any issue, you have to disable the antivirus, and in that journey, these steps will help you.
- Initially, press the Win+I button. This will open the Windows Settings app.
- Then, hover to the Privacy & Settings tab and click on the Windows Security option.
- Now, hit the Open Windows Security and toggle the button to turn it off.
Fix 7: Reset the TCP/IP Log
The TCPIP or DHCP parameter will be rooted as the main cause behind this error that forces your WiFi router to abruptly terminate the connection. Well, this needs to be fixed, and here are the steps that will help you do so:
- Open the cmd using admin privileges.
- Then, execute the command:
netsh int ip reset c:\resetlog.txt
Fix 8: Disable VPN Service
In case you are using a VPN service while installing the GeeGee launcher on your PC, then we suggest you disable it. So, here are some easy instructions that will help you do so:
- First of all, search for ms-settings:network-vpn using the Run box.
- Now, inside the Settings app, go to the VPN tab.
- Finally, hit the remove button to delete it from your PC.
Fix 9: Disable The Proxy server.
Using a proxy server may also be the reason why you are unable to install the GeeGee launcher on your PC. So, it is highly recommended that disable the proxy servers while installing this, and here are the steps for that:
- Initially, search for ms-settings:network-proxy using the Run box.
- Now, inside the Settings app, open the Proxy tab.
- After that, hover to the Manual Proxy Server section.
- Finally, uncheck the box beside the Use a Proxy Server For LAN, and click on the Ok button.
Fix 10: Check Your System’s Date & Time
Your system’s date & time may also be the reason behind this error. Therefore, we suggest you check if your Windows 11 PC’s date & time is correct according to your time zone. After that, again, try installing the GeeGee launcher on your PC. You’ll find that now the launcher is installed successfully like magic.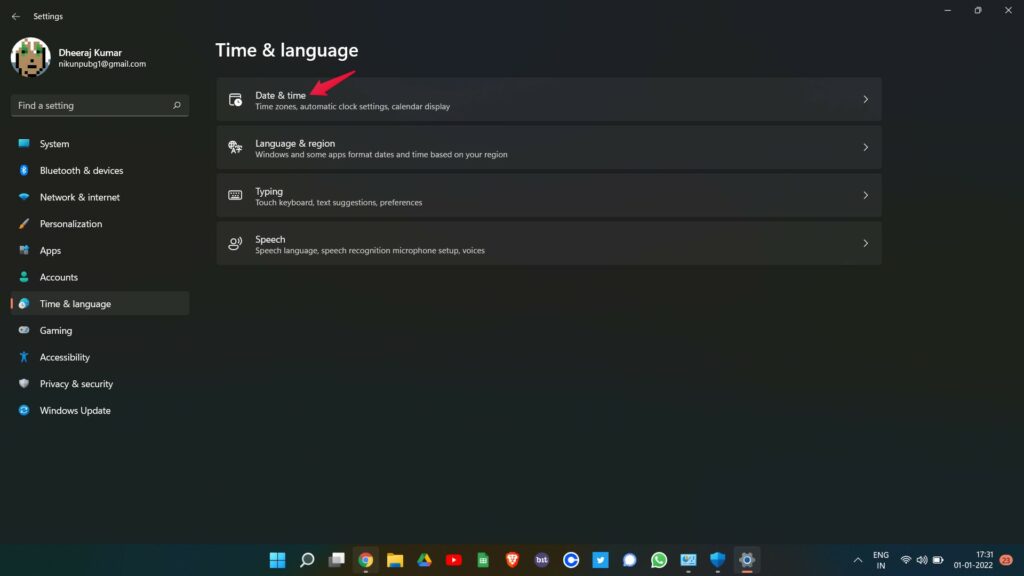
Fix 11: Delete the GeeGee and Super People folder.
If you previously installed the GeeGee launcher on your device and uninstalled it for some reason. But the fact is the relics of these apps aren’t removed completely. So, you need to delete them manually from your device because if you’re not doing this, then you may not be able to install the GeeGee launcher on your device. So, here are the steps for that:
- Initially, press the Win+R button and search for %LOCALAPPDATA% in the Run box.
- After that, locate the GeeGee and Super People-related folders and delete them.
Fix 12: Change DNS Settings
Changing the DNS settings will also help you fix this issue, as previously it helped many users. So, let’s take a look at how you change the DNS settings on your PC:
- First of all, search for ncpa.cpl using the Run box to open the Network Connections window.
- Then, right-click on the network name that is currently connected and click on the Properties option from the drop-down menu.
- After that, click on the Networking tab on the network properties window.
- Then, tick mark the box located in front of the Internet Protocol Version 4 (TCP / IPV4) located inside the This connection uses the following items section.
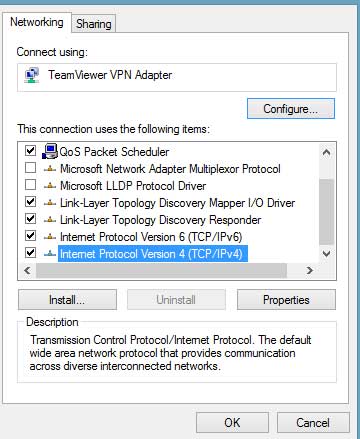
- Now, select the Properties button, and hover to the general tab.
- Now, tick mark the box located beside the Use the Following DNS server address and use these DNS addresses:
-
- For Prefered: 8.8.8.8
- For Alternative: 8.8.4.4
Fix 13: Reset Network Settings
So, did you change the DNS settings? Well, if so but still getting the same error, then here are the steps that will help you fix the network issue:
- Firstly, open the command prompt using the admin rights.
- After that, execute the given commands one by one:
ipconfig /flushdns
nbtstat -R
nbtstat -RR
netsh int reset all
netsh int ip reset
netsh winsock reset
Fix 14: Try Installing in Clean Boot Mode
If nothing helps, then installing the GeeGee launcher in clean boot mode will help you fix if you are unable to install the GeeGee launcher on your Windows 11 PC. To do so, here are the needy steps:
- Initially, press the Win+R button simultaneously to open the Run box.
- After that, search for the msconfig to open the system configuration window.
- Then, shift to the Services tab, tick the box beside the Hide all Microsoft Services, and select the disable option followed by the Ok.
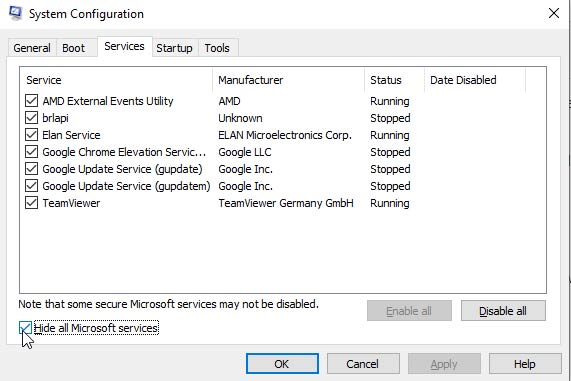
- After that, launch the Task Manager, and go to the Startup tab.
- After that, select all the high-impacted programs and disable them.
That’s it. Once you have successfully followed the above steps, simply reboot your system and check if you are now able to install the GeeGee launcher or not.
Fix 15: Verify If The Update is Still There Or Not
If any of the above-mentioned methods work for you, then there’s a chance that the update may not be available anymore. Sometimes, it just happens as the patch version may contain some bugs, due to which developers roll it back, and after some time fixing the bugs, they again roll out the update. So, you should verify if the update is still there or not.
Also Read: How to Fix Super People Can’t Change Graphics Settings Error
From Author’s Desk
So, that’s all on how to fix if unable to install the GeeGee launcher on your PC. We hope the above-mentioned methods worked for you. For more information, comment below.
