With the help of the given instructions in this guide, you can now easily unlock the bootloader on your OnePlus smartphone. This tutorial is valid for all OnePlus devices. To give your device a fresh new outlook, there are quite a few things that might already be trying out. These include improving the UI of your device by installing themes and icon packs. You could also install many types of custom launchers, or apply different text styles as well. However, these are just the everyday tweaks, your Android device is capable of doing much more.
You could install a custom recovery like TWRP which allows you to flash ZIPs and IMG files, and create Nandroid backup, among others. Likewise, installing an entirely new OS based on Android in the form of custom ROMs is also a possibility. Well, that is not all, you could even get administrative-level privileges and carry out system-level modifications. Generally, this is known as rooting your device and could be carried out via Magisk.
Owing to an excellent custom development scene, the OEM lets you have a shot at all the above tweaks easily. However for all these tweaks to be carried out, there is just one prerequisite for your device to be met. That is, your device should be having an unlocked bootloader. As soon as that happens, it opens the gates to the plethora of customizations for your device.
Therefore, in this guide, we will show you how to unlock the bootloader on your OnePlus device. It doesn’t matter which variant of OnePlus you have or the underlying Android OS version. It is a universal guide for all OnePlus devices. But before that, let’s check out what is a Bootloader and the perks and associated risks of unlocking it. Let’s begin.

Page Contents
What is a Bootloader
A bootloader is a software program that tells the Android OS what all applications does it need to start at the boot. Furthermore, it also helps in boosting your device to recovery. By default, near about all the OEMs ships their device with a locked bootloader out of the box. According to them, they only want the users to try out the stock OS experience that they have provided. But here is the thing. Not everyone is a fan of the stock OS experience.
For some, the UI and theme just don’t meet their taste, for others, the device is filled with unnecessary apps or bloatware. Apart from that, there are other benefits as well that are just not possible in a locked bootloader. So they look out for the escape route. Thankfully, most of the OEMs leave a slight window of opportunity open for the tech geeks.
With the help of a few lines of commands, they make unlocking the bootloader possible. So this leaves us to a pretty important question- is it worth taking a risk, and what are these “risks” in the first place? Lets,’s check it out. After which we will show you how to unlock the bootloader on your OnePlus device.
Also Read
OnePlus Display Showing Green Line After OTA Update, How to Fix?
Remove Bloatware From Any OnePlus Device | All OxygenOS Tomatot Debloater
Download the Latest OnePlus USB Drivers for Windows and Mac
2 Ways to Enable 5G on OnePlus Smartphones in 2023
How to Block Spam Calls or Messages on Any OnePlus Smartphone
How to Uninstall Facebook Services Installed As System Apps on OnePlus device
Advantages and Downsides of an Unlocked Bootloader
Right after unlocking the bootloader, you could replace your stock recovery with a custom recovery like TWRP. This will give you the opportunity to try out tons of Custom ROMs for your device. Furthermore, you also get the ability to install numerous mods,and frameworks, and even govern the device CPU via kernels. The icing on the cake is the ability to root your device via Magisk. Well, we could go one and in listing out the benefits, but let’s paint the complete picture. There are a few caveats associated with an unlocked bootloader.
To begin with, unlocking the bootloader might make the warranty of your device null and void. All the data on your device will also be wiped off. Furthermore, your device might now also be more prone to attacks. Some banking apps like Google Pay or games like Pokemon Go might also not work. Likewise, Netflix will also not be able to play HD videos owing to the Widevine Certification issues. So with this, we have listed all the perks and downside of unlocking the bootloader on your OnePlus device. if you are ready to proceed ahead, then follow the below-given instructions.
How to Unlock the Bootloader on any OnePlus device
Before we provide you with the said instructions, please go through the below requirements section and make sure your device qualifies all of them.
Warning
Prerequisites
- First off, create a complete backup of your Android device.
- Next, download and install the Android SDK and Platform Tools. This is needed so that we could execute the fastboot commands between your device and PC.
- Also, download and install the latest OnePlus USB drivers.
- Keep your device sufficiently charged. Minimum 50% is recommended so that it doesn’t turn off midway.
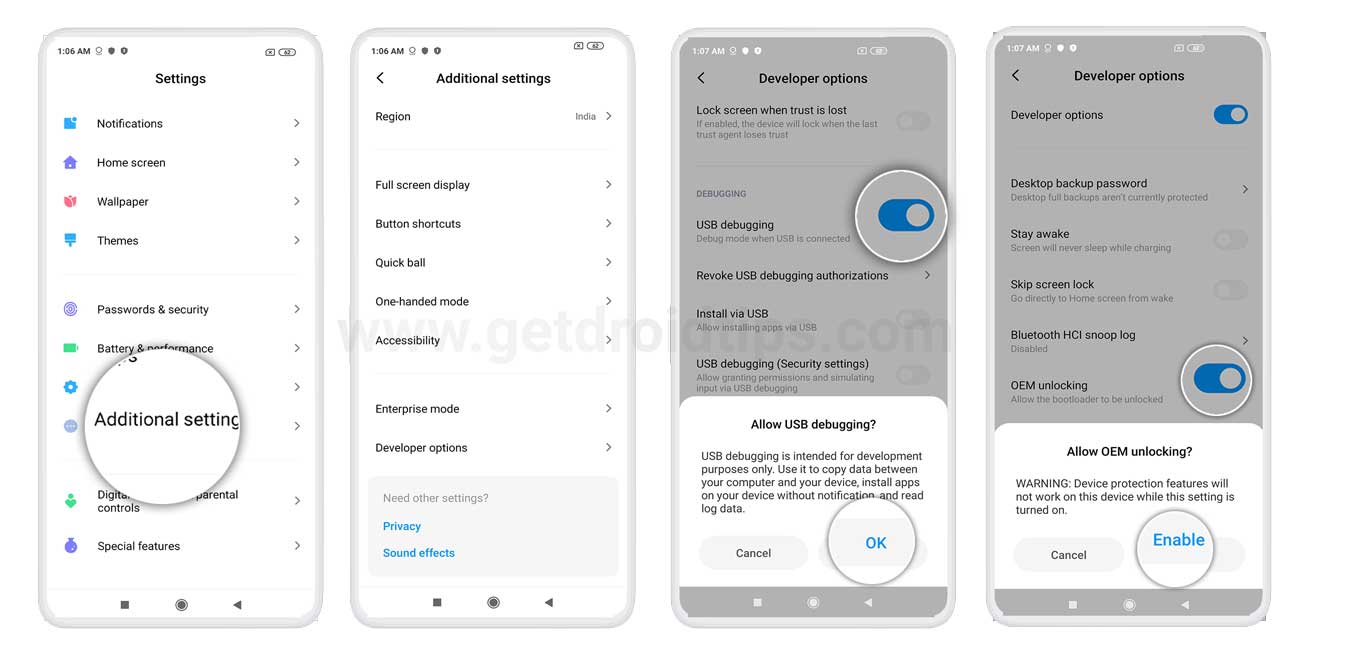
- Finally, enable USB Debugging and OEM Unlocking on your device. The former is needed so that your device recognizes the ADB Commands. The latter, on the other hand, helps you to unlock the bootloader on your OnePlus device. So to enable them, head over to Settings on your device. Then go to About Phone and tap on Build Number 7 times. Go back to Settings > System >Advanced > Developer Options > Enable the USB Debugging and OEM Unlocking toggle.

That is it. Now follow the below steps to unlock the bootloader on your OnePlus device.
Supported devices:
| OnePlus Device Model | Instructions Page |
| OnePlus One | Instructions Page |
| OnePlus X | Instructions Page |
| OnePlus 2 | Instructions Page |
| OnePlus 3 | Instructions Page |
| OnePlus 3T | Instructions Page |
| OnePlus 5 | Instructions Page |
| OnePlus 5T | Instructions Page |
| OnePlus 6 | Instructions Page |
| OnePlus 6T | Instructions Page |
| OnePlus 6T McLaren | Instructions Page |
| OnePlus 7 | Instructions Page |
| OnePlus 7 Pro | Instructions Page |
| OnePlus 7T | Instructions Page |
| OnePlus 7T Pro | Instructions Page |
| OnePlus 7T Pro 5G McLaren | Instructions Page |
| OnePlus 8 | Instructions Page |
| OnePlus 8 Pro | Instructions Page |
| OnePlus 8T | Instructions Page |
| OnePlus 9 | Instructions Page |
| OnePlus 9 Pro | Instructions Page |
| OnePlus 9R 5G | Instructions Page |
| OnePlus 9RT 5G | Instructions Page |
| OnePlus 10 Pro | Instructions Page |
| OnePlus 10T | Instructions Page |
| OnePlus 11 | Instructions Page |
| OnePlus 11R | Instructions Page |
| OnePlus Nord | Instructions Page |
| OnePlus Nord 2T | Instructions Page |
| OnePlus Nord 2 5G | Instructions Page |
| OnePlus Nord N100 | Instructions Page |
| OnePlus Nord N10 5G | Instructions Page |
| OnePlus Nord CE 5G | Instructions Page |
| OnePlus Nord N200 5G | Instructions Page |
| OnePlus Nord N20 5G | Instructions Page |
| OnePlus Nord N20 SE | Instructions Page |
| OnePlus Nord N300 | Instructions Page |
| OnePlus 10R | Instructions Page |
| OnePlus Nord CE 2 Lite 5G | Instructions Page |
| OnePlus Ace | Instructions Page |
| OnePlus Ace Pro | Instructions Page |
| OnePlus Ace Racing | Instructions Page |
| OnePlus Ace 2 | Instructions Page |
| OnePlus Ace 2V | Instructions Page |
| OnePlus Nord CE 2 5G | Instructions Page |
| OnePlus Nord CE 3 Lite | Instructions Page |
| OnePlus Pad | Instructions Page |
| OnePlus Nord Watch | Instructions Page |
| OnePlus Nord 3 | Instructions Page |
| OnePlus Nord CE3 | Instructions Page |
| OnePlus Ace 2 Pro | Instructions Page |
| OnePlus Pad Go | Instructions Page |
| OnePlus Open | Instructions Page |
| OnePlus 12 | Instructions Page |
| OnePlus Ace 3 | Instructions Page |
Instructions Steps
- Connect your device to PC via USB cable. Make sure USB Debugging and OEM Unlocking is enabled.
- Head over to the platform-tools folder, type in CMD in the address bar, and hit Enter. This will launch the Command Prompt.
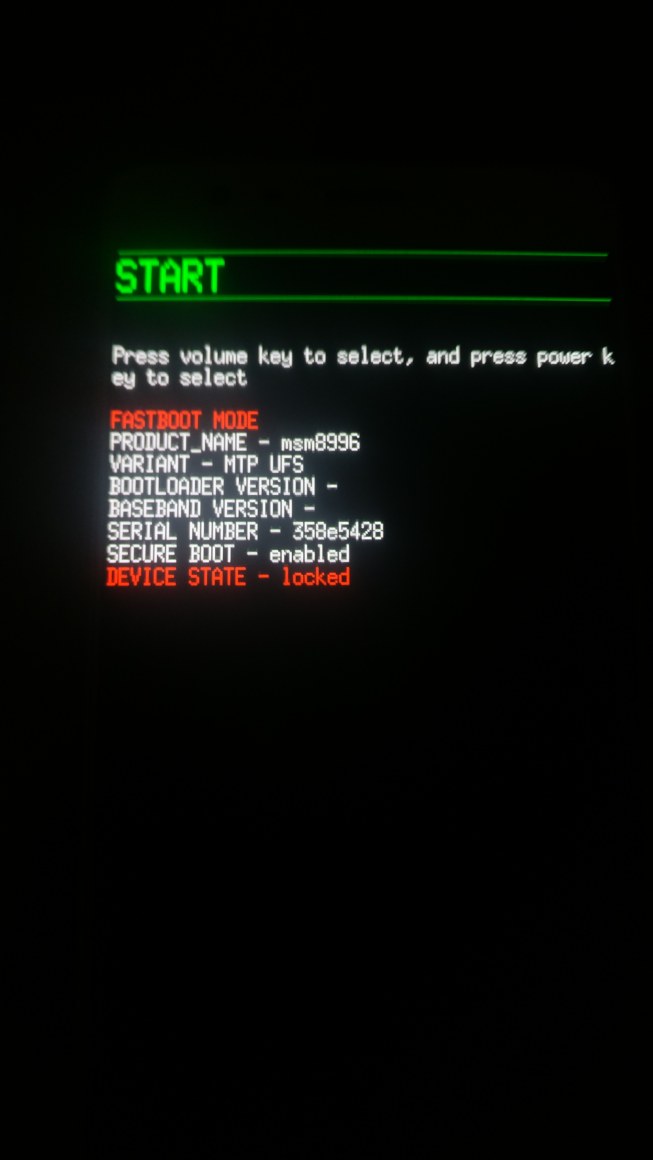
- Now enter the below code in the CMD window to boot your device to Fastboot/Bootloader mode.
adb reboot bootloader

Source: OnePlus Forum - Execute the below-given command and if the results show an alphanumeric string followed by the fastboot text, it means you have successfully booted your device to fastboot mode.
fastboot devices
- Finally, enter the following command to unlock the bootloader on your OnePlus device. Do note that this command will wipe off all the data present on your device:
fastboot oem unlock
- Onc the above command is executed, you should get a confirmation message on your device. Use the Volume keys to select the “Unlock the Bootloader” option and the Power button to confirm it.

- Your OnePlus device should now boot to the system if that doesn’t use the below code to do so:
fastboot reboot
- That is it. The process is now complete. You could remove your device from the PC. And with this, you have successfully unlocked the bootloader on your OnePlus device. The first boot might take up some time, which is completely normal. Furthermore, you will also have to set up your device from scratch as a reset has been taken place. With that said, let us now shift our attention towards how you could relock the bootloader on your OnePlus device. Follow along.
How to Relock the Bootloader on your OnePlus device
If unlocking the bootloader has done more harm than good, or its disadvantages are too much to deal with, then the best and perhaps the only option is to relock it. For some the unlock bootloader warning message is one of the major reasons to do so. Or the Widevine L3 Certification also concerns a major chunk of the users. In all these cases, relocking is the best bet forward.
Warning
Requirements
To start, please refer to the above Prerequisite section and make sure to follow all the four requirements (device backup, device charged, installation of Platform Tools, and the USB Drivers). Once that is done, proceed with the below instructions to relock the bootloader on your OnePlus device.
More importantly, make sure that your device’s partition is not tweaked. That is, you should be running the stock Oxygen OS, not rooted, with the stock recovery. In other words, there shouldn’t be any custom or GSI ROM installed, no Magisk, and no TWRP Recovery. Once you have the said things, follow the below steps. If that’s not the case, then please remove the above modifications. Otherwise, there are extremely high chances of your device getting bricked. With that said, if you have your device in the stock mode, then here is what needs to be done:
Instructions Steps
- With USB Debugging enabled, connect your device to PC via USB cable.
- Now head over to the platform-tools folder and type in CMD in the address bar. Hit Enter and this will launch Command Prompt.
- Type in the below code in the Command window to boot your device to fastboot mode:
adb reboot bootloader
- Then enter the below command to verify that your device has been booted to fastboot and that your PC recognizes it.
fastboot devices
- Once done, you could now easily relock the device bootloader by executing the below command:
fastboot oem lock
- In this instance, you will get a popup on your device. Use the Volume Keys to select Relock the Bootloader and the Power key to confirm it. That’s it. The process is complete. Your device will now boot to Android OS if it doesn’t use the below command:
fastboot reboot
So with this, we conclude the guide on how to unlock and relock the bootloader on any OnePlus device. The first boot after each of these processes will take some time. Furthermore, you will also have to set up your device from scratch, considering a reset might have taken place. On that note, if you have any queries concerning any of the above-mentioned steps, do let us know in the comments sections. Rounding off, here are some iPhone Tips and Tricks, PC tips and tricks, and Android Tips and Trick that you should check out as well.

So to enable them, head over to Settings on your device. Then go to About Phone and tap on Build Number 7 times. Go back to Settings > System >Advanced > Developer Options > Enable the USB Debugging and OEM Unlocking toggle.
How can we follow above steps, if the screen is stuck at QualComm CrassDump Mode