From this tutorial, you could easily unlock the bootloader and then install TWRP Recovery on your Realme 6 Pro. Unlocking the bootloader gives you a plethora of opportunities. From installing custom ROMs like LineageOS and HavocOS to rooting your device and hence obtaining administrative privileges, the possibilities are endless. Likewise, there is a plentitude of modules, frameworks, and other tools waiting for your device. Furthermore, if you also install the TWRPR recovery after unlocking the bootloader, the opportunities get further expanded. You could install various ZIP files, install IMG files, root your device via Magisk, create android backup among others.
Also Read
Therefore in this guide, we will list out detailed instructions set to unlock the bootloader and then install TWRP Recovery on your Realme 6 Pro device. The process is different from other OEMs. First of all, you will have to validate the bootloader of your Realme device using the device-specific app. This is also known as the In-Depth test. After this, the next step involves disabling the disable Android Verified Boot on your device. Once that is done, you could proceed with the installation of the TWRP Recovery. Here are the complete instructions for all the three above-mentioned things. Follow along.

Page Contents
Unlock Bootloader on Realme 6 Pro
The thing is that many OEMs ships their device with a locked bootloader. The logic on their part is simple- they want you to only use the stock OS that they have shipped, without any modifications. While it makes sense on their part from the security point of view, however not every user seems to like this stock OS. Furthermore, they also wish to get higher privileges by rooting their devices and accessing the system partition. In this regard, the OEMs leave a window of opportunity for those who wish to unlock their device’s bootloader. And in this guide, we will be making full use of this opportunity. But keep in mind unlocking Realme devices requires some additional steps in the form of In-Depth tests. So follow the steps very carefully.
Warning
STEP 1: Prerequisites
- First of all, create a backup of your entire device.
- Download and install the Android SDK and Platform Tools on your PC.
- Likewise, download the latest Realme USB Drivers and install them on your PC.
- Download and install the Depth-Test app specifically designed for Realme 6 Pro. Thanks to XDA members barakcodam and Rizezky for the file.
- UPDATE: The official Unlock Tool for Realme 6 Pro is now available. You could download and install it from below. So rather than the XDA build, it is recommended you go ahead with the official app. Download: Realme 6 Pro Bootloader Unlock Tool APK
STEP 2: Enable USB Debugging and OEM
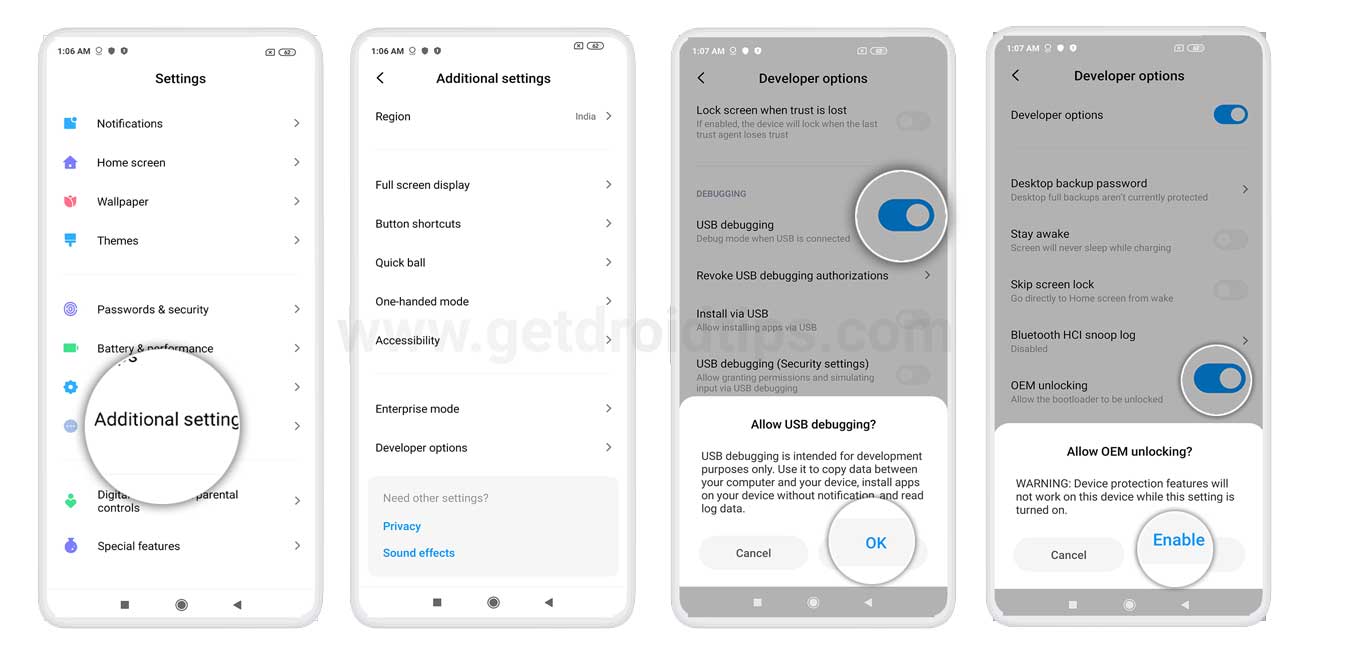
To establish a successful ADB connection between your device and PC, enabling USB Debugging is needed. Furthermore, OEM unlocking allows you to unlock the bootloader of your device. Therefore, enable both of them as follows:

- Head over to Settings and scroll to the About Phone.
- Tap on Build Number 7 times. You should get the toast message indicating Developer Options have been enabled.
- Go back to Settings > System > Advanced > Developer Options.
- Under Developer Options, enable both the USB Debugging and OEM Unlock toggle.
STEP 3: Unlock Bootloader
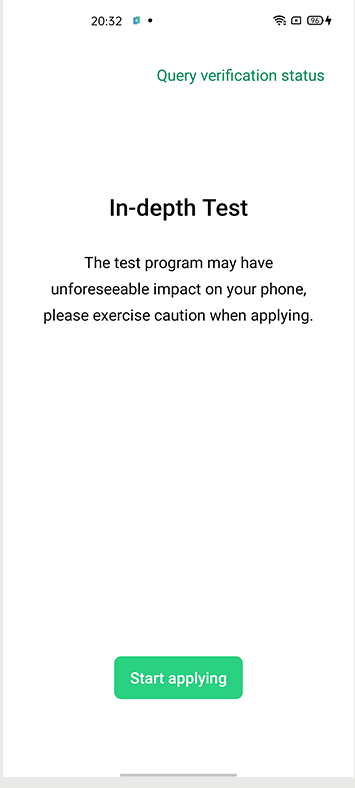
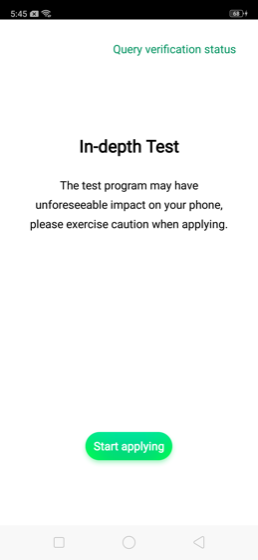
- Launch the In-Depth App on your Realme device. Apply for the in-depth test.

- When that is done, again open In-depth test and tap “Query verification status” on the top corner.

- Then click on “Start the in-depth test”. Your device will then be booted to the Bootloader/Fastboot Mode.

- Connect your device to PC via USB cable and head over to the platform-tools folder.
- Within that folder, type in cmd in the address bar and hit Enter. This will launch the Command Prompt.
- Enter the below code in the CMD window:
fastboot flashing unlock - You will now receive a prompt on your device, tap on Yes. With this, the data wipe process will now start and the bootloader on your Realme 6 Pro will also be unlocked. The first boot might take some time, it is completely normal. Furthermore, you will also have to set up your device from scratch.
Now we should turn our attention towards installing the TWRP on your Realme 6 Pro device. But for that, you will have to disable the Android Verified Boot. This is needed since we are booting a custom boot partition (for TWRP). If you don’t disable it, you won’t be able to boot your device. So follow the below steps to disable the AVB.
Disable Android Verified Boot on Realme 6 Pro
- Download the patched-vbmeta-v2.img and transfer it to the platform-tools folder.
- Enable USB Debugging on your device. It might have been disabled upon unlocking the bootloader. Follow the above-given instructions to re-enable it.
- Now connect your device to PC via USB cable. Go to the platform-tools folder and type in cmd in the address bar.
- This will launch the Command Prompt. In the same window, enter the below command to boot your device to bootloader/fastboot mode:
adb reboot bootloader
- Finally, execute the below command to disable AVB:
fastboot --disable-verity --disable-verification flash vbmeta vbmeta.img
With this, you have disabled the Android Verified Boot. We could now proceed ahead with making modifications to the device. In this regard, here are the steps to install TWRP on your Realme 6 Pro.
TWRP Recovery for Realme 6 Pro
As of now, there exists an unofficial build of the TWRP recovery for your device. While most of the features work just fine, one or two might need a look. Here is the complete information regarding the same:
Working Features
- TWRP boots
- /data decryption is working
- system and vendor partitions are mountable but you can’t modify them
- You can flash magisk and modules, or custom kernel (if that’s even existed since our kernel source is a total mess and broken)
- Flashing stock ROM.zip works
- USB OTG works now
Not Working
- Partition formatting doesn’t works (upstream)
Download TWRP
- Status: Stable
- Current Stable Version: 3.3.1-3
- Stable Release Date: 2020-06-08
- Download: Link (thanks to XDA member nullxception for the recovery).
Installation Steps
- Download the TWRP Recovery and place it in the platform-tools folder. Rename the recovery to just twrp. The complete name will then be twrp.img
- Connect your device to PC via USB cable.
- Head over to the platform-tools folder and type in cmd in the address bar to launch Command Prompt.
- Now execute the below code to boot your device to fastboot/bootloader mode:
adb reboot bootloader
- Type in the below command to flash the TWRP Recovery on your Realme 6 Pro device:
fastboot flash recovery twrp.img
- Now you will have to reboot your device to the newly installed TWRP Recovery. if you don’t do so, the first boot will replace the TWRPm with stock recovery. Hence execute the below command to boot your device to custom recovery:
fastboot reboot recovery
- Once your device boots to TRWP, you could now reboot your device to the OS. For that, from TWRP, go to Reboot > System. That is it.
With this, we conclude the guide on how to unlock the bootloader, disable AVB, and install TWRP recovery on Realme 6 Pro. make sure not to skip any of the above-mentioned steps. On that more, if you face any issues while executing the above steps, do drop in your queries in the comments. Rounding off, here are some iPhone Tips and Tricks, PC tips and tricks, and Android Tips and Trick that you should check out.
