It seems that recent Windows 10 updates are not so stable and bug-free when it comes to performance. If you have recently installed a new update on your computer, the chances are high enough that you’re facing the Windows Update Error 0x80073701 after installing the KB3206632 for Windows 10 Version 1607 update. Luckily, we’ve mentioned a couple of possible methods to resolve such an issue.
The Windows update error 0x80073701 basically blocks Microsoft Cumulative updates which isn’t expected at all. Although running the Windows Update Troubleshooter can help you to quickly fix the issue, there are some other workarounds mentioned below that should work for you. It’s also worth mentioning that this particular error may also occur due to corrupted system files.

Fix: Windows Update Error 0x80073701
So, without wasting any more time, let’s jump into the guide below.
1. Run Windows Update Troubleshooter
Running the Windows Update Troubleshooter option on your computer can automatically fix the update-related error easily. To do this:
- Press Windows + I keys to open Windows Settings.
- Click on Update & Security > Click on Troubleshoot from the left pane.
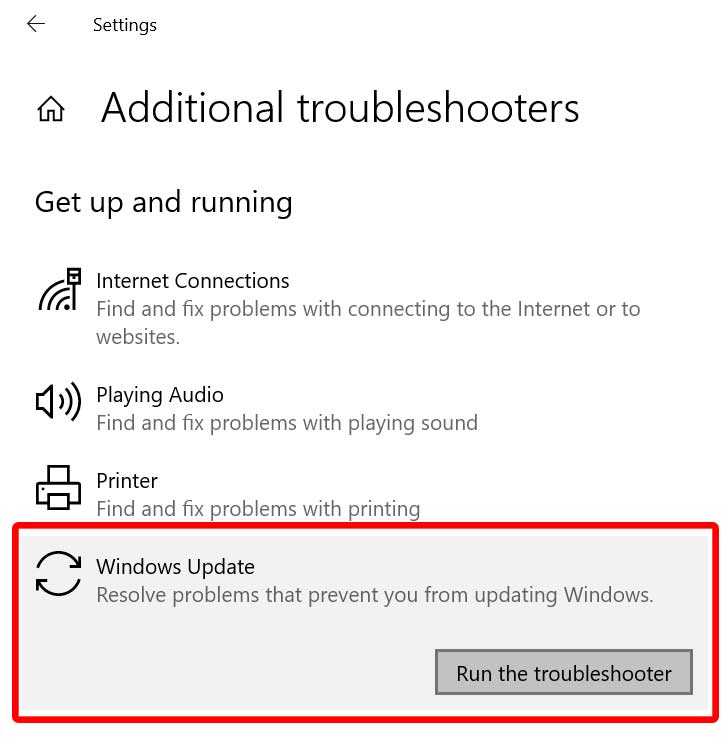
- Click on the Additional troubleshooters option > Make sure to click on Windows Update.

- Select Run the troubleshooter > Wait for the process to complete.
- Once done, you can reboot your computer to apply changes.
2. Restart Windows Update Service
Sometimes the chances are high that your Windows Update Service is somehow getting blocked or disabled without your information. So, it’s always better to manually restart your Windows Update Service on the computer. To do this:
- Press Windows + R keys to open the Run dialog box.
- Type services.msc and hit Enter to open the Services interface.

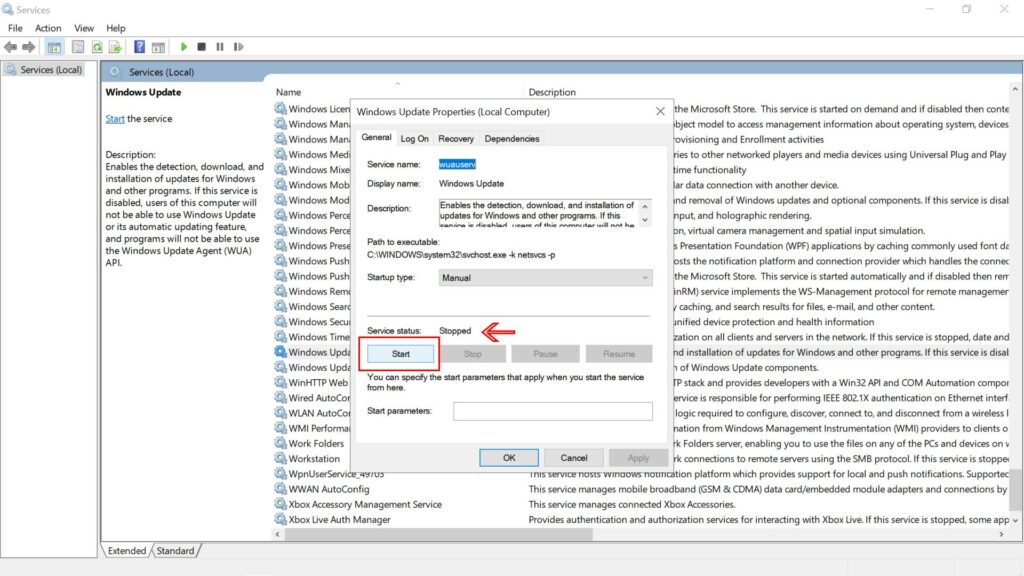
- Now, scroll down the page and double-click on Windows Update to open the Windows Update Properties (Local Computer) interface.
- Then click on Stop and close the window.
- Finally, double-click on the service again and select Start.
- Once done, make sure to restart your system.
3. Set Date and Time Correctly
It’s worth mentioning that using an incorrect date and time on your Windows system can basically cause several issues with the system update. Although most Windows computers run on the correct timezone and date, you should cross-check it once.
- Right-click on the time & date display from the Taskbar.
- Select Adjust date/time > Here you’ll need to select the Timezone manually.
- You can also turn on the Set time zone automatically toggle.
- Additionally, you can choose Sync now from the ‘Synchronize your clock’ option.
- Once done, restart your computer once to check whether the Windows Update Error 0x80073701 has been fixed or not.
4. Reset Windows Update Components
- Click on the Start Menu > Type cmd.
- Right-click on Command Prompt from the search result.
- Now, select Run as administrator > Click on Yes from the UAC permission prompt.
- Copy and paste the following commands and hit Enter to execute: [Do one by one]
net stop wuauserv
net stop cryptSvc
net stop bits
net stop msiserver
- Next, rename the SoftwareDistribution folder by entering the following command:
ren C:WindowsSoftwareDistribution SoftwareDistribution.old
- Execute the following command to rename the Catroot2 folder to Catroot2.old title:
ren C:WindowsSystem32catroot2 Catroot2.old
- Run the following command to edit the SoftwareDistrbution folder title:
C:WindowsSoftwareDistribution SoftwareDistribution.old
- Now, restart the stopped services by executing the following commands one by one:
net start wuauserv
net start cryptSvc
net start bits
net start msiserver
- Once done all, close the command prompt window, and restart your computer to apply changes.
5. Run SFC
System File Checker (SFC) is a utility tool in Microsoft Windows that allows users to scan for corrupted Windows system files and restore them automatically. This method should fix the error completely.
- Click on the Start Menu and type cmd.
- Now, right-click on Command Prompt from the search result.
- Select Run as administrator > If prompted, click on Yes to give admin privileges.
- Once the command prompt window opens, type the following command and hit Enter to execute it:
SFC /scannow
- Now, wait for the process to complete.
- Make sure to restart your computer to apply changes.
6. Use DISM
Deployment Image Servicing and Management (DISM) is a command-line tool that can be used to mount and service Windows images before deployment. It becomes so much useful in most scenarios and can be performed by following the steps below:
- Click on the Start Menu and type cmd.
- Now, right-click on Command Prompt from the search result.
- Select Run as administrator > If prompted, click on Yes to give admin privileges.
- Once the command prompt window opens, type the following command and hit Enter to execute it:
DISM /Online /Cleanup-Image /CheckHealth
- Type the following command and press Enter:
DISM /Online /Cleanup-Image /RestoreHealth
- Now, wait for the process to complete and exit the command prompt.
- Finally, restart your computer once and try checking the 0x00000008 Stop Error | IRQL NOT DISPATCH LEVEL.
That’s it, guys. We hope you’ve found this guide useful. For further queries, you can comment below.