In this tutorial, we will help you to unlock the bootloader of your Poco X4 Pro 5G. The device sports a triple camera setup which houses a 108-megapixel primary camera. It is powered by a Qualcomm Snapdragon 695 SoC under the hood and runs on a 5,000mAh battery.
If you are new to rooting, then you must understand that first, you need to unlock the bootloader of the device and then install a custom recovery like TWRP to root the device. So, that being said, let us get straight into the article itself:
Also Read

Page Contents
Poco X4 Pro 5G Device Overview:
The Poco X4 Pro 5G features a 6.67 inches AMOLED panel with a 120 Hz refresh rate. It is an FHD+ panel with a resolution of 1080 x 2400 pixels and an aspect ratio of 20:9. The screen has a peak brightness of 1200 nits. Under the hood, we get the Qualcomm Snapdragon 695 5G processor built on a 6nm manufacturing process. It is an octa-core processor with two Kryo 660 Gold cores clocked at 2.2 GHz and six Kryo 660 Silver cores clocked at 1.7 GHz. For handling the graphics-intensive tasks, we have the Adreno 619. The smartphone comes with Android 11 out of the box with MIUI 13 skin running on it.
In terms of optics, we get a triple camera setup at the rear and a single selfie camera at the front. The triple rear camera setup consists of a 108MP primary sensor paired with an f/1.9 lens, a 64MP wide sensor paired with an f/1.8 lens, and a 2MP macro sensor paired with an f/2.4 lens. The selfie camera at the front is a 16MP primary sensor paired with an f/2.5 lens. Both the front and rear camera systems are limited to 1080p video recording.
The smartphone comes in four storage options: 64GB internal storage + 6GB RAM, 128GB internal storage + 6GB RAM, 128GB internal storage + 8GB RAM, and 256GB internal storage + 8GB RAM. We also get a hybrid microSD slot for storage expansion. In terms of communications, we get Wi-Fi 802.11 a/b/g/n/ac, Bluetooth 5.1, GPS, NFC, Infrared port, FM radio, and USB Type-C 2.0. And for sensors, we get a side-mounted fingerprint sensor, accelerometer, gyro, proximity, and compass. Powering it all is a 5000 mAh battery that can be topped up quickly using a 67W power adapter. The company claims the phone goes from 0 to 70% in 22 minutes and 0 to 100% in 41 minutes. The smartphone is available in three color options: Laser Black, Laser Blue, and Poco Yellow.
What is Bootloader Unlock?
A bootloader is a program that is the first thing that boots up in your device whenever you turn ON your device. It commands the device to run the appropriate programs in order to run smoothly and provide better performance. Moreover, the bootloader is stored away from the reach of the user and is stored at a stable memory so that the user could not hamper the files. However, there are methods and ways via which you can safely unlock the bootloader of the device and go ahead with flashing a custom recovery to root your device. But, you should make sure to follow a reliable guide and follow the steps correctly in order to avoid any permanent damage to your phone.
Why do we need to unlock the bootloader?
Once you have unlocked the bootloader on your phone, then you can root your phone. It allows the user to go ahead and install restricted apps, mod apps, install custom OS like Lineage OS, etc on the device. Note that the unlocking of the bootloader will void the warranty of your device. So, it is better to allow the warranty period to get over and then unlock it.
Advantages of bootloader unlock
- You can install any custom ROM like Lineage OS, Resurrection ROM, etc.
- You can also root your device.
- Install a custom recovery like TWRP.
Disadvantages of bootloader unlock
Below are the disadvantages of the bootloader unlock that you need to keep in mind before you go ahead and actually unlock the bootloader of your phone:
- After unlocking the bootloader, it voids the warranty of your device.
- You will no longer receive the official OTA updates.
- You can brick your device if you do not follow the steps carefully.
Pre-requisites
Now before we go ahead and unlock the bootloader of Poco X4 Pro 5G, let us make a list of pre-requisites that are required to unlock it:
Charge your phone
You need to make sure that your Poco X4 Pro 5G is charged to about 60% before operating it for unlocking the bootloader to avoid any boot loop issues during the unlocking process.
You need a PC or Laptop
We would be running certain ADB and Fastboot commands that can be executed via PC or a laptop. So, we would need a computer in order to unlock the bootloader.
Download USB Drivers
In order to make your Poco X4 Pro 5G recognized by your PC, you need to have proper USB Drivers appropriate to your phone installed on your computer. And for that, you can follow the link below to download the correct Xiaomi USB Drivers on your PC.
Download Mi Unlock Tool
Mi Unlocker Tool is used for unlocking the bootloader of any Xiaomi device after getting permission From MIUI’s official website. You can download the latest Mi Unlock Tool by clicking the link below:
Enable USB Debugging and OEM Unlock
To unlock the bootloader, first, you need to enable the USB Debugging and OEM unlock to interact with your PC or Laptop via the Mi Flash tool.
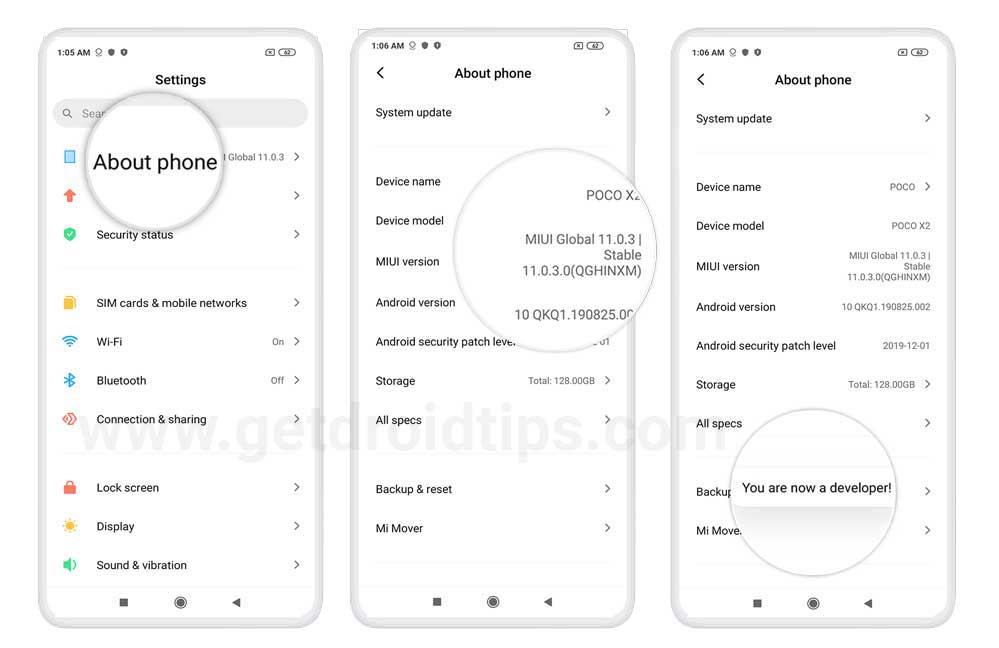
- On your phone, Open the Settings app
- Look for the About Phone menu and Tap on it
- You may see the device build number or software version detail, tap on it multiple times until the confirmation of developer options enabled flashes on the screen.

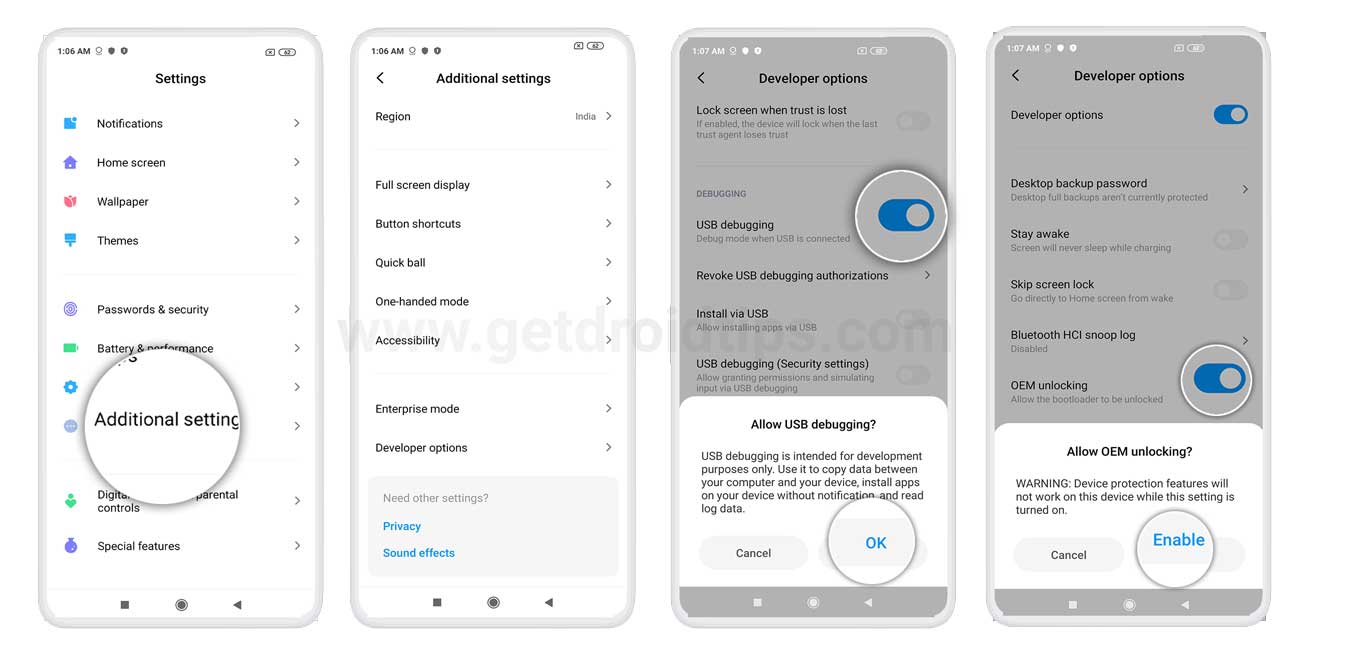
Now as the developer options are enabled on Xiaomi Poco X4 Pro 5G, this will appear inside settings. You can enable USB debugging by accessing developer options. The steps to do this are:
- If you have enabled the developer option, now go back and tap settings again
- Open the Additional Settings menu – Developer option
- Enable the USB Debugging and OEM unlock

Bind your Mi Account
In order to unlock the bootloader on your Poco X4 Pro 5G, you are first required to bind your Mi Account to your phone. This can be easily done via the Mi Unlock Status menu that is located within the Developer Options. Follow the steps below to bind your Mi Account with your Poco X4 Pro 5G:
- Make sure that you have a Mi Account. If not then, it can be easily created by visiting the official page.
- You need to insert the SIM card with the same number that you used to create the Mi account.
- Now, you need to use your mobile internet connection and disconnect from the WiFi for further process.
- Then, head over to Settings>>Additional Settings>>Developer Options>>Add account and device and log in with your account.
- You will be greeted with a toast message stating “Added successfully. Mi account is associated with this device now.“
- That’s it!
Note that you should not try to bind your account, again and again, to avoid getting blocked temporarily by Mi.
Steps to Unlock Bootloader on Poco X4 Pro 5G
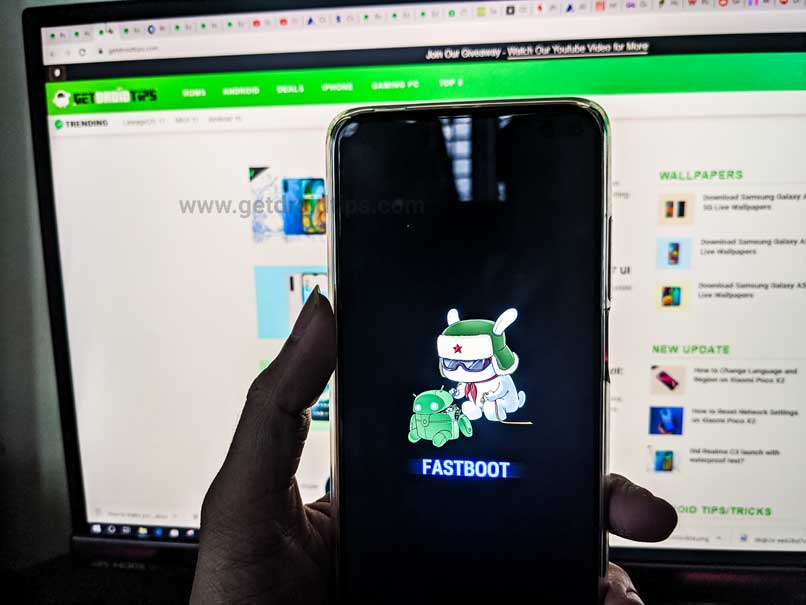
- Turn off your phone and boot into the Fastboot mode.

- You need to connect your device to your PC/Laptop with the help of USB Cable while in Fastboot mode.
- Download the Mi Unlock Tool from the above section.
- Extract the contents of the zip file and open the miflash_unlock.exe file.
- Log in to the Mi account within the tool.
- The tool will now verify whether your phone is eligible for bootloader unlocking.
- Once the phone is verified, the tool will show that the “Phone connected“.
- Now click the Unlock button within the tool.
- You will be prompted with a new message where you need to click on the Unlock anyway button.
- This will commence the unlocking process and once the process is complete, you will see a message stating Unlocked successfully.
- Click on the Reboot phone button. This will reboot your phone into the OS and you will be treated with an unlocked bootloader message confirming that the Poco X4 Pro 5G is unlocked.
- That’s it.
If not, you can check our video tutorial for the same guide.
So, there you have it from my side in this article. I hope that this guide will help you with the unlocking of your Poco X4 Pro 5G easily and in a safe and official way. Please let us know in the comments if this guide was helpful and also comment down below if you have faced any issues with any of the above-mentioned steps. Until the next post…Cheers!
