Xiaomi Redmi 8 (codename: olive) launched in October 2019 which came out of the box with Android 9.0 Pie. In this tutorial, we will show you how to install the AOSP Android 11 on Redmi 8. Recently, Google released its latest stable Android 11 for the general public. And with that, many OEMs were quick to adopt the same. First in the line were the Pixel devices, which were anyways along the expected lines. Later Google released the AOSP source code for Android 11 which is undoubtedly the main ingredient to compile Android 11-based custom ROMs.
Also Read
Page Contents
Android 11 and Its Features:
Well, Android 11, Google’s 11th iteration looks similar to Android 10 but with a handful of new features and changes. The update brings notification history, Chat bubbles, Conversation notifications, screen recorder, new media controls, smart device controls, one-time permission, improved dark theme with the scheduling system, app suggestions, wireless android auto, and many more. For more, check out our article Android 11 supported list, Android 11 Custom ROM list, best Android 11 features, and many more.
Xiaomi Redmi 8 features a 6.22 inches IPS LCD display with a screen resolution of 720 x 1520 pixels. The display is protected by Corning Gorilla Glass 5. The device is powered by Qualcomm SDM439 Snapdragon 439 12 nm Processor. The handset packs 64GB variant with 4GB of RAM. Xiaomi Redmi 8 sports a Dual rear camera with 12MP + 2MP camera and Selfie camera with 8MP depth camera. The smartphone is running on Android 9.0 Pie under MIUI 9 software package and backed by 5000 mAh battery. It has a fingerprint reader on the back.

How to Install AOSP Android 11 on Redmi 8:
With such a long list of goodies to offer, no doubt you will want to try out the AOSP Android 11 on Redmi 8. But before we list out the installation steps, please go through the prerequisites section. Make sure your device meets all the mentioned requirements. After this, go through the working features and the list of known issues present in this ROM. Once you have gone through all the requirements sections, you may then proceed with the installation steps.
Prerequisites
- Tested only on Xiaomi Redmi 8
- First and foremost, create a complete device backup.
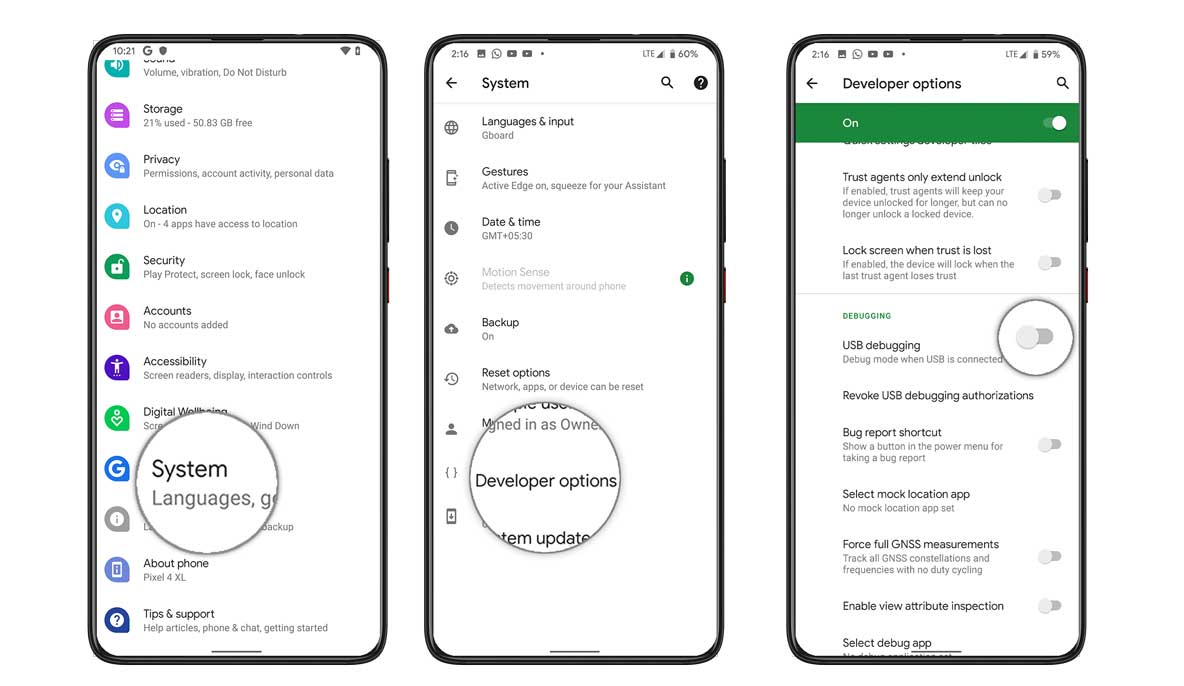
- Next time, enable USB Debugging on your Redmi 8. This will make your device recognizable by your PC in ADB mode. So head over to Settings > About Phone > Tap on Build Number 7 times > Go back to Settings > System > Advanced > Developer Options > Enable USB Debugging.

- Your device also needs to have the bootloader unlocked. If you haven’t done so, then refer to our detailed guide on How To Unlock Bootloader On Xiaomi Redmi 8.
- Next up, you will also need to install the TWRP Recovery on your device. This will be needed to flash the AOSP Android 11 on your Redmi 8. You could refer to our comprehensive tutorial on how to Install TWRP Recovery For Xiaomi Redmi 8.
Download AOSP Android 11
Before you download the firmware file, there is a pretty important worth mentioning. You should only use the proper vendor and firmware of your device of stable ROM.
- LineageOS 18.1: Download Link
- Download Android 11 Gapps
Once you have downloaded the above files, transfer them to your device. Then proceed with the below steps to install AOSP Android 11 on your Redmi 8 device.
Warning
Install AOSP Android 11 on Xiaomi Redmi 8
- Connect your device to the PC via USB cable. Make sure USB Debugging is enabled.
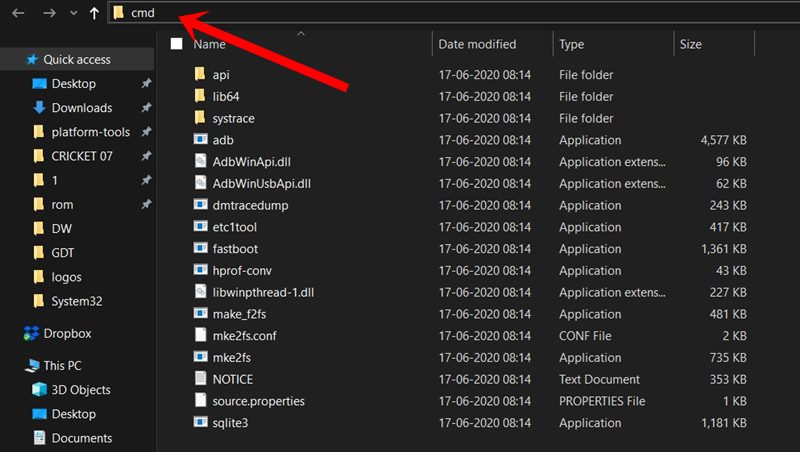
- Then head over to the platform-tools folder, type in CMD in the address bar, and hit Enter. This will launch the Command Prompt.

- Execute the below command in the CMD window to boot your device to TWRP Recovery:
adb reboot recovery
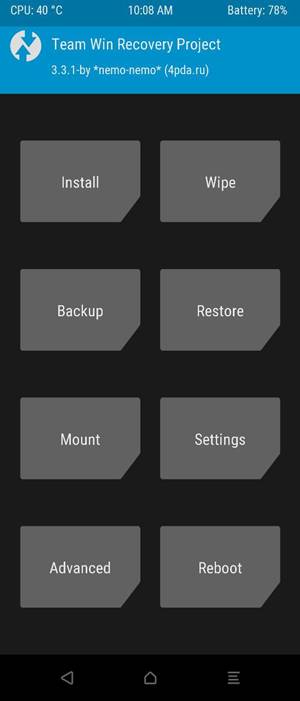
- Now head over to the wipe section and format system, data, and cache. Perform a right swipe to complete the format.

TWRP Home - It’s now time to flash the AOSP Android 11 ROM onto your Redmi 8. For that, head over to Install, select the AOSP ROM ZIP file and perform a right swipe to install the file.
- If you want Google Apps as well, then you need to flash it at this instance itself. Go to Install, select the GApps ZIP file, and perform a right swipe to flash this file.
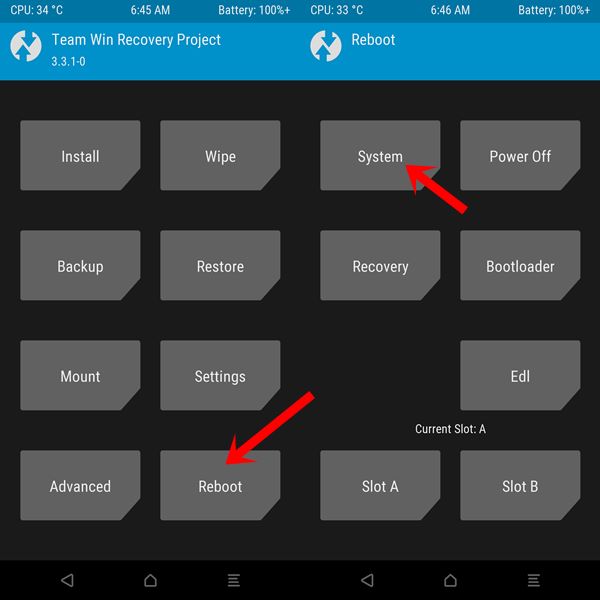
- When that is done, you may reboot your device. Head over to Reboot and select System.

Your device will now boot to the newly installed OS. With this, we conclude the guide on how to install the AOSP Android 11 on Redmi 8. Do keep in mind that the first boot might take up some time and you might have to set up your device from scratch.
Furthermore, once you have installed the ROM, do share your opinions about the same in the comments section. Rounding off, here are some iPhone Tips and Tricks, PC tips and tricks, and Android Tips and Trick that you should check out as well.

Used for 2 days.
wifi not working. – not turning on.
audio not getting routd to bluetooth