The newly released Baldur’s Gate 3 becomes so much popular in very quick time as interested fans are eager to explore the forgotten realm in this title. However, as a new title there are plenty of bugs and errors present that we can’t deny. Meanwhile, several players started reporting that they were unable to install the game due to its slow download speed which becomes a headache. A vast number of players have downloaded this and somehow Baldur’s Gate 3 Slow Download Speed is frustrating.
Now, if you’re also one of the victims to encounter such an issue then make sure to follow this troubleshooting guide to resolve it. Even after a couple of days from release, the download speed is still slow and there is no improvement at all. This specific issue is bothering a lot of PC version players stuck at the percentage suddenly irrespective of the region or internet connection. Well, there might be a chance of having internet issues or server downtime for some players that can be fixed.
Also Read

Page Contents
- Baldur’s Gate 3 Slow Download Speed Fix
- 1. Restart the PC
- 2. Check Your Internet Connection
- 3. Set a Different Download Region
- 4. Power Cycle the Networking Device
- 5. Update the Network Driver
- 6. Update the Game
- 7. Scan and Repair the Game Files
- 8. Use Google DNS
- 9. Clear Steam Download Cache
- 10. Disable Windows Firewall
- 11. Try Resetting Network Settings
Baldur’s Gate 3 Slow Download Speed Fix
Luckily, there are a couple of possible workarounds mentioned below that should come in handy. So, without wasting any more time, let’s jump into it.
1. Restart the PC
First of all, you can try rebooting the PC to ensure there is no issue with the temporary system glitch or cache data. Sometimes a normal restart of the system can resolve multiple issues with the system performance or internet connection. As rebooting the PC doesn’t take too much time, you can try it out.
2. Check Your Internet Connection
You should check your internet connection properly to ensure there is no issue with the network’s stability or speed. A slow internet speed or unstable network can eventually cause several issues whatsoever. If you’re using a wired (ethernet) connection then try using a wireless (Wi-Fi) connection or vice versa to check for the issue. You can also try using a different network to cross-check it.
3. Set a Different Download Region
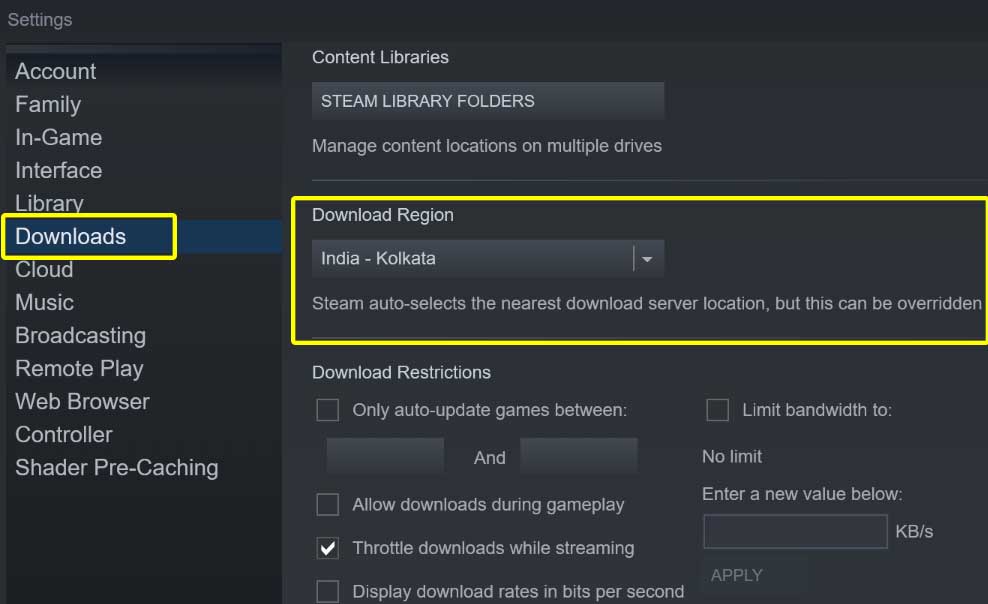
It’s highly recommended to change the download region server from Steam by following the steps below. Choose the nearest server region to get better results depending on your current country.
- Launch the Steam client > Click on Steam from the top-left corner.
- Go to Settings > A new smaller window will appear.
- Click on the Downloads section from the left pane.

- Now, click on the Download Region drop-down box.
- Select your preferred region according to your nearest location.
- Once done, click on OK to save changes.
- Finally, try downloading or updating the game again.
4. Power Cycle the Networking Device
You can also try performing the power cycle method to your Wi-Fi router manually to refresh the networking glitch up to some extent. The power cycle method helps a lot when the normal restart of the networking device doesn’t work.
- Turn off the Wi-Fi router first > Then ensure to turn off LED indicators completely.
- Now, disconnect the power cable from the Wi-Fi router.
- Wait for around 30 seconds or more > Reconnect the power cable again.
- Finally, turn on the router > Connect to the internet and check for the issue.
5. Update the Network Driver
You should also update the network driver on the PC to ensure there is no issue with the network connectivity. A corrupted or missing networking device driver on the machine can trouble you a lot. To do this:
- Press the Win+X keys to open the Quick Link Menu.
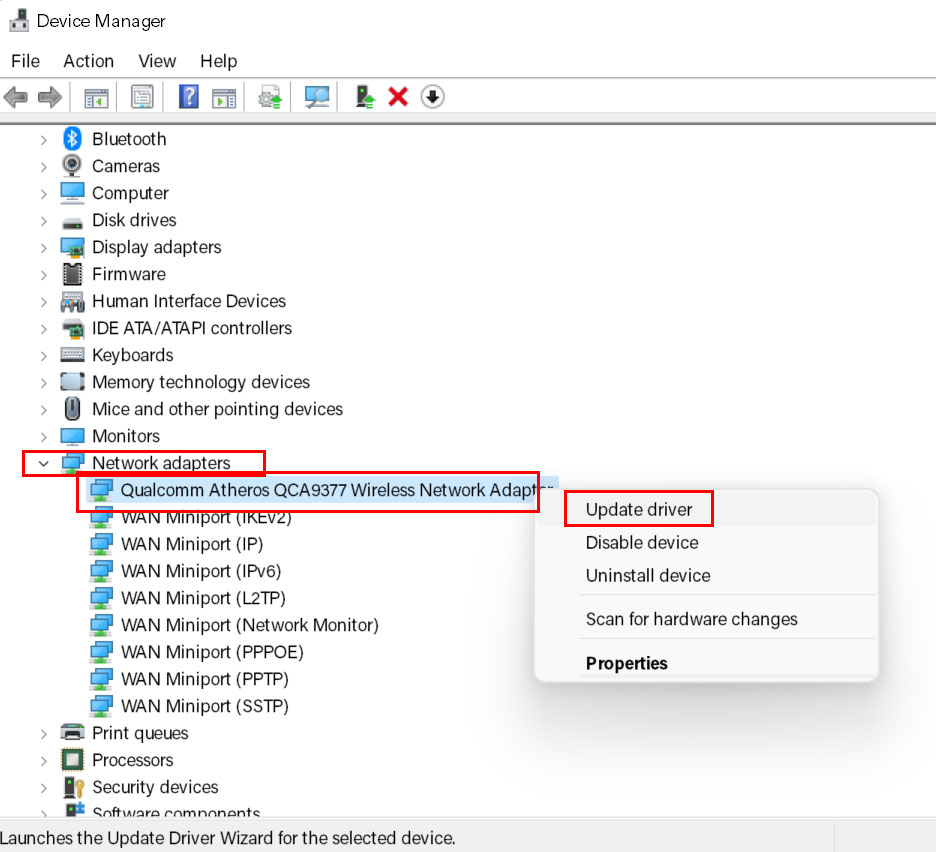
- Click on Device Manager > Double-click on Network Adapters to expand the list.

- Now, right-click on the active networking device > Select Update driver.
- Click on Search automatically for drivers > If there is an update available, it’ll automatically get installed.
- Wait for it to complete > Once done, restart your computer.
6. Update the Game
Mostly an outdated game patch version might trouble you a lot with the errors. You can check for the game updates to the latest version to ensure there is no issue with downloading or installing the game patch. Make sure to follow the steps below to do so:
- Open the Steam client > Go to Library.
- Click on Baldur’s Gate 3 from the left pane.
- Now, Steam will automatically search for the available update.
- If there is an update available, click on Update.
- Wait for a couple of minutes to complete the update.
- Once done, close Steam, and reboot your PC to apply changes.
7. Scan and Repair the Game Files
Sometimes there might be an issue with the installed game files like corrupted or missing game files on the PC. It eventually causes game launching or slow download speed issues even if your internet speed is fast enough.
- Launch the Steam client > Click on Library.
- Right-click on Baldur’s Gate 3 from the list of installed games.
- Click on Properties > Go to the Local Files files.

- Click on Verify Integrity of Game Files.
- You’ll have to wait for the process until it gets completed.
- Once done, restart your computer.
8. Use Google DNS
It’s also highly recommended to change the current DNS address on your PC to a public DNS address (such as Google DNS) for better reachability and faster connectivity speeds. Google DNS address is so popular and widely used by gamers or streamers worldwide as a public DNS. Sometimes your specific DNS address provided by your internet service provider may have some blocking issues that eventually trigger online server connectivity errors.
Please Note: You should write down your existing DNS server address from the screen as a backup. If anything goes wrong, you can change it to the previous DNS address and save the changes.
- Open the Start menu > Go to Control Panel.
- Click on Network and Internet > Select Network and Sharing Center.
- Select Change adapter settings > Right-click on the active network connection.
- Click on Properties > Select Internet Protocol Version 4 (TCIP/IPv4) in the list.
- Click on Properties > Select Use the following DNS server addresses.
- Enter 8.8.8.8 for the Preferred DNS Server addresses.
- Next, enter 8.8.4.4 for the Alternate DNS Server addresses.
- Once done, click on OK to save changes, and restart the PC.
9. Clear Steam Download Cache
Another thing you can do is simply clear the Steam download cache from the settings menu to ensure there is no corrupted cache stored on the client side. It can cause game downloading or installing issues. You can check the following steps to do so:
- Launch the Steam client > Click on the Steam tab from the top left menu.
- Click on Settings > Head over to the Downloads section.
- Click on Clear Download Cache > If prompted, click on OK to confirm.
- Finally, click on OK to save changes, and restart the Steam client.
10. Disable Windows Firewall
Sometimes conflicts with the Windows Firewall protection on the system might occur several issues like slow downloading speed or slow installation speed with the game application. It’s better to manually turn off Firewall temporarily and check for the issue again.
- Click on the Start Menu > Search and open Windows Defender Firewall.
- Now, click on Turn Windows Defender Firewall on or off from the left pane.
- Select the Turn off Windows Defender Firewall (not recommended) option for both the Private & Public Network Settings.
- Once selected, click on OK to save changes.
- Finally, restart your computer to apply changes.
11. Try Resetting Network Settings
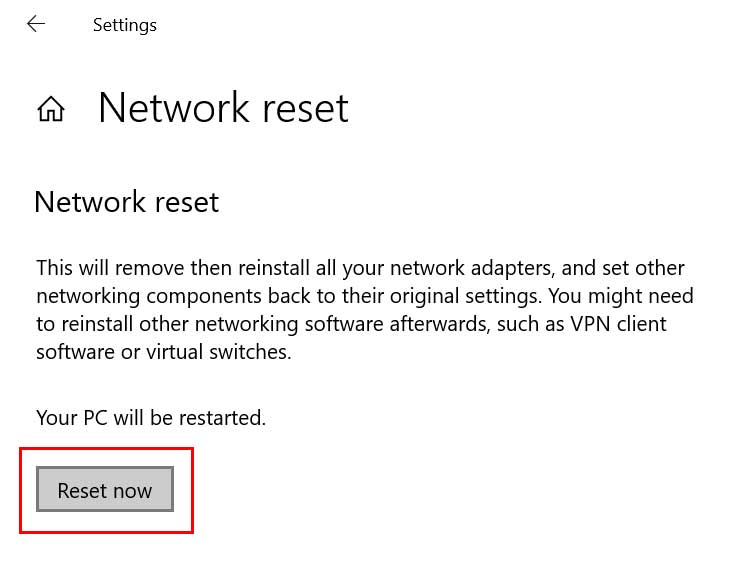
If none of the workarounds did come in handy then make sure to perform the network settings reset on the PC by following the steps below to restore it to the factory defaults. This method will help in fixing several networking connectivity glitches or slow speed issues up to some extent.
Please Note: Resetting the network settings will delete all the saved Wi-Fi connections, manual DNS configurations, VPNs, etc. If you’re using a Wi-Fi network, just remember the Wi-Fi password before doing this method so that you can connect to Wi-Fi later.
- Press the Win+I keys to open Windows Settings.
- Go to Network & Internet > Scroll down the Status page to the bottom.

- Click on Network Reset > Click on the Reset Now button.
- Wait for the process to complete.
- Finally, restart the PC, and connect to the respective Wi-Fi network again.
That’s it, guys. We hope this guide was helpful to you. For further queries, you can comment below.
Also Read
