Blue Screen of Death errors can appear on every Windows OS version that you can’t really stop it. But it’s highly appreciated that Windows 10 system regarding BSoD errors can be fixed easily by following some of the troubleshooting steps. Although sometimes several affected users become unable to diagnose such kinds of issues properly. If you’re one of them, check out this guide to Fix: BUGCODE ID DRIVER Error in Windows 10.
Now, coming to the topic, BUGCODE_ID_DRIVER error can appear whenever the Windows system is getting ready to start. This is one kind of Blue Screen of Death error that also throws out an error code something like STOP 0x000000D2 during the windows startup or whenever the computer reboots.
To be very specific, this error can happen due to the failure of the NDIS device driver apart from the software issues or networking hardware issues. Luckily, we’ve provided a couple of workarounds that should work for you.
Also Read

Page Contents
Fix: BUGCODE ID DRIVER Error in Windows 10
If your computer doesn’t load the Windows system properly then you should try booting your computer in the Safe Mode first.
1. Use Safe Mode
Safe Mode basically boots your Windows system with a minimum number of required drivers along with the necessary stock apps. To boot your computer in Safe Mode:
- Click on the Start Menu (Windows icon) > Click on Power.
- Press and hold the Shift key and click on Restart.
- Click on the Troubleshoot option > Select Advanced options.
- Go to ‘Advanced options’ > Click on Start-up Settings.
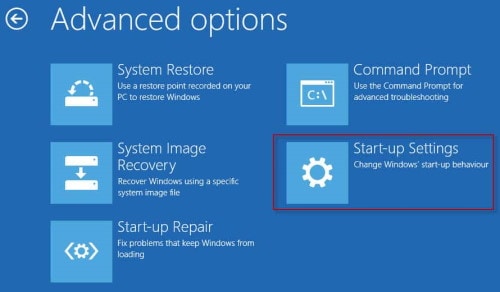
- Under the ‘Start-up Settings’, click on Restart.
- Now, you can select an option by pressing one of the numbers or function keys F4, F5, or F6. (Safe Mode numbers are 4, 5, or 6)
- Once your Windows boots in the Safe Mode, you can check for the possible reasons behind the Bugcode ID Driver error.
Now, if you want to turn off the Safe Mode again, you can follow the steps below.
- Press Windows + R keys to open the Run dialog box.
- Type msconfig and click on OK to open System Configuration.
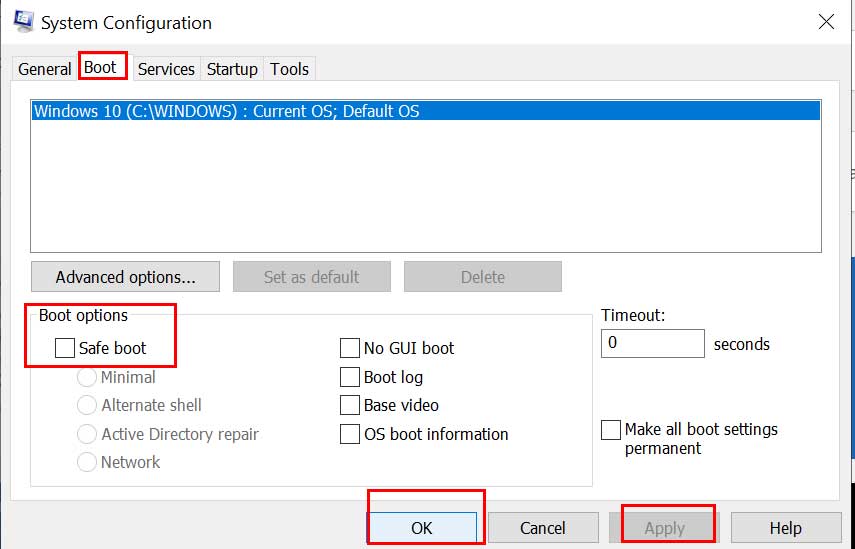
- Click on the Boot tab > Uncheck the Safe boot checkbox to turn it off.
- Once done, click on Apply and OK to save changes.
- Finally, you can restart your computer normally, and check for the error again.
2. Check Your Hardware
Well, the Blue Screen of Death errors can appear quite often by any kind of hardware-related issue something like RAM. So, you can check out whether the RAM sticks or RAM slots are faulty or not.
If in case, your RAM is working well, make sure to check other hardware components like CPU, GPU, cooling fans, etc. Additionally, you should also check whether the hardware components have dirt/dust or not. If yes, clean it gently using the air blower or a brush. Meanwhile, overheating issues can also increase the temperature which basically conflicts with Windows performance.
3. Update Windows OS Build
Well, Windows OS build also needs to be updated periodically to keep your system running properly. Additionally, you’ll get improved features, bug fixes, the latest security patch, and all of your apps will run smoothly. To do so:
- Press Windows + I keys to open Windows Settings.
- Click on Update & Security > From the Windows Update section, click on Check for Updates.
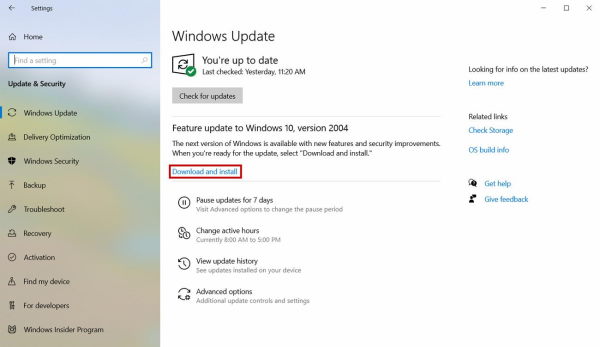
- If there is an update available, make sure to click on Download and Install.
- Once done, reboot your computer to apply changes.
- Finally, you can check for the error again.
4. Update Display Driver
Updating the display driver is really necessary if your Windows 10 system is having blue screen-related errors which can happen due to the outdated graphics driver version or an incompatible graphics driver. To do this:
- Press Windows + X keys to open the Quick Access Menu.
- Now, select Device Manager > Double-click on Display adapters to expand it.
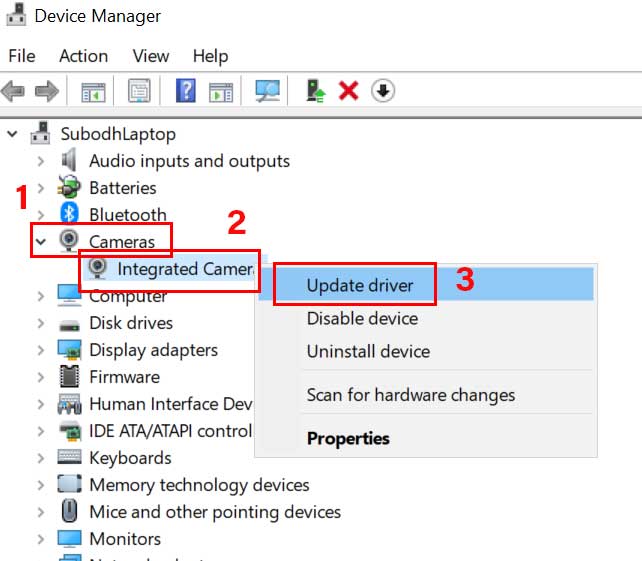
- Right-click on the active or dedicated graphics card > Select Update driver.
- Choose Search automatically for drivers > If there is an update available, it’ll automatically download and install the update.
- So, let the process to complete. Once done, restart your system.
5. Run Blue Screen Troubleshooter
Obviously, if you’re encountering BSoD errors then it’s highly recommended to run the Blue Screen Troubleshooter utility on your Windows 10 system to check for the issue and fix it automatically. To do that:
- Press Windows + I keys to open Windows Settings.
- Click on Update & Security > Now, click on Troubleshoot from the left pane.
- Choose the Blue Screen option > Click on Run the troubleshooter.
- Follow the on-screen instructions to complete the process.
- Once done, make sure to restart your computer to apply changes.
6. Run Windows Memory Diagnostic Tool
It’s a built-in utility tool that checks and trying to repair any kind of Windows memory-related issues automatically. This method is highly recommended to quickly resolve the memory-related BSoD error.
- Click on the Start Menu > Type Windows Memory Diagnostic.
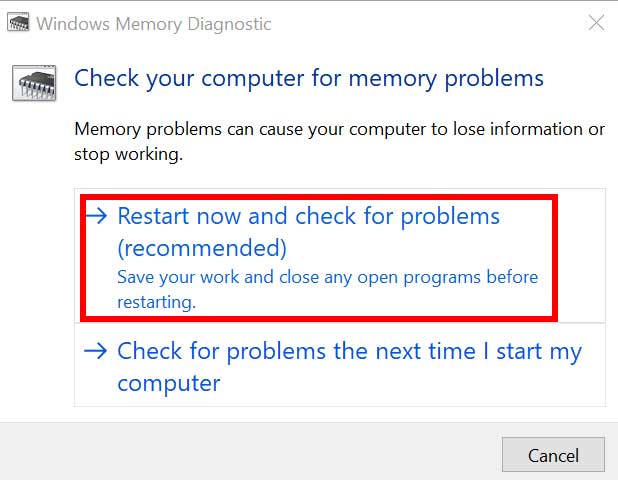
- Now, open it from the search result > Choose Restart now and check for problems.
- Your Windows system will restart automatically and try scanning then repairing the memory issues by itself.
- This process may take some time. So, have some patience until the system starts up and completes the diagnosis.
7. Perform a Clean Boot
It can possible that any of your installed third-party programs are conflicting with the system functionalities that can cause blue screen errors or memory-related errors whatsoever. So, it’s highly recommended to perform a clean boot in order to disable third-party programs from running in the background. To do this:
- Press Windows + R keys to open the Run dialog box.
- Now, type msconfig and hit Enter to open the System Configuration window.
- Go to the Services tab > Tick the Hide all Microsoft services checkbox to enable it.
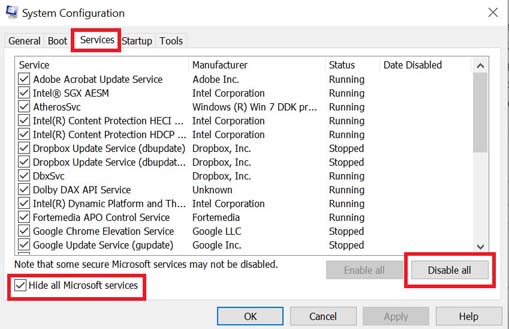
- Check all the services from the list and click on Disable all.
- Click on Apply and then OK to save changes.
- Now, click on the Startup tab > Click on Open Task Manager.
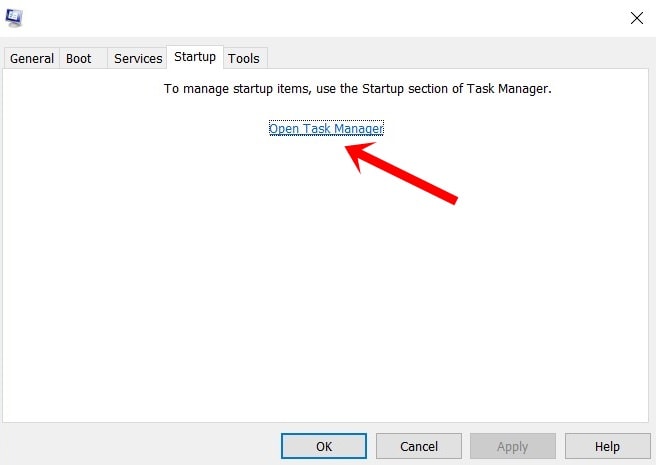
- Under the Startup tab, click on each program which are consuming higher system resources and click on Disable. (Select and disable individually)
- Finally, close all programs which are currently opened.
- Reboot your computer to apply changes.
8. Use DISM
Deployment Image Servicing and Management (DISM) is a command-line tool that can be used to mount and service Windows images before deployment. To do so:
- Click on the Start Menu and type cmd.
- Now, right-click on Command Prompt from the search result.
- Select Run as administrator > If prompted, click on Yes to give admin privileges.
- Once the command prompt window opens, type the following command and hit Enter to execute it:
DISM /Online /Cleanup-Image /CheckHealth
- Then type the following command and press Enter:
DISM /Online /Cleanup-Image /RestoreHealth

- Now, wait for the process to complete and exit the command prompt.
- Finally, restart your computer once and try checking the BUGCODE ID DRIVER Error in Windows 10 again.
9. Run SFC
System File Checker (SFC) is a utility tool in Microsoft Windows that allows users to scan for corrupted Windows system files and restore them automatically. To do that:
- Click on the Start Menu and type cmd.
- Now, right-click on Command Prompt from the search result.
- Select Run as administrator > If prompted, click on Yes to give admin privileges.
- Once the command prompt window opens, type the following command and hit Enter to execute it:
SFC /scannow

- Now, wait for the process to complete.
- Make sure to restart your computer and you’re good to go.
10. Reset This PC
It seems that none of the methods worked for you and that’s why you’re following the final workaround in order to fix the BUGCODE ID DRIVER Error in Windows 10 on your Windows 10 computer. Well, it’s none other than restoring your Windows 10 firmware to its default factory state.
It can be performed whenever your Windows system seems to experience multiple performance issues or any kind of driver or memory-related issues.
- Press Windows + I keys to open Windows Settings.
- Click on Update & Security > Click on Recovery from the left pane.
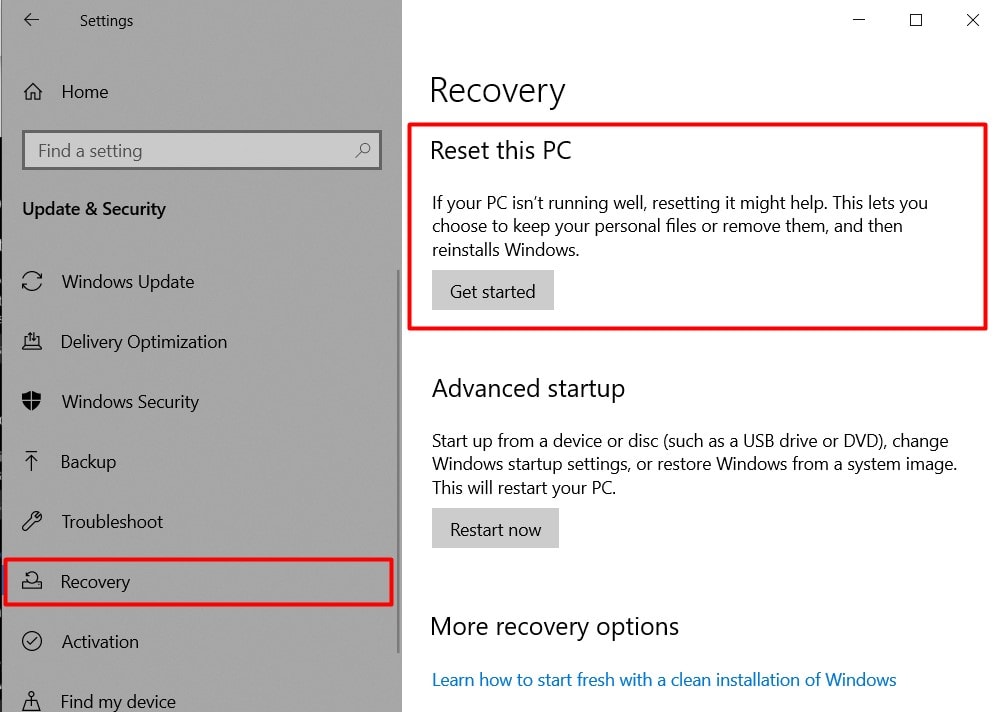
- Now, click on the Get started button under the Reset this PC option.
- Make sure to choose Reset everything.
- If required, you’ll need to insert the Windows 10 installation media.
- Choose Only the drive where Windows is installed > Select Just remove my files.
- Click on the Reset button and follow the on-screen instructions to complete the process.
- Once done, restart your computer > You’re done.
We assume this guide was helpful to you. For further queries, you can comment below.
