In this tutorial, we will show you how to disable the on-screen keyboard on your Windows 11/10 PC. There are quite a lot of features that this OS from Microsoft beholds. Likewise, it has also incorporated some additions for the ease of user access. These include the Narrator, Magnifier, and an On-Screen Keyboard. The latter might come in handy if your keyboard isn’t working. Similarly, if you have a touch screen laptop, then also these keys on your screen might prove to be useful. However, for some, it is turning out to be an unpleasant experience.
As soon as their laptop starts or even when they are about to type in something, this keyboard pops up all of a sudden. This is not a one-time experience but happens every time when you are about to enter your credentials in the boot-up screen or while dealing with documents. If you are also facing such issues, then this guide will come in handy. Today, we will list out all the reasons for the said issue. Then we will also show you how to disable the on-screen keyboard on Windows 11/10. Well, the answer to this question is already been looked upon by quite a few users across the Microsoft Forum, their doubts will also be cleared by the below-mentioned steps.
Also Read

Page Contents
- How to Disable On-Screen Keyboard on Windows 11/10
- Method 1: Using the Ease of Access Center
- Method 2: Tweaking the On-Screen Keyboard options
- Method 3: Disable On-Screen Keyboard Via Registry Editor
- Method 4: Disable On-Screen Keyboard Via the Services Menu
- Method 5: Disable On-Screen Keyboard Using Command Prompt
- Method 6: Disable or Uninstall Conflicting Apps
How to Disable On-Screen Keyboard on Windows 11/10
Talking about the reason for the aforementioned issues, there could be quite a few ones. To begin with, it might be the case that you have assigned this onscreen keyboard to a third-party app and that app is has been assigned to launch at start-up. So as and when your PC boots up, so will be the app and hence the keyboard as well. For other users, the issue might just be related to the Ease of Access Center settings. So to rectify this issue and hence to disable the on-screen keyboard on Windows 11/10, we will be listing out six different types of fixes. Try out each one of them until you achieve success.
Method 1: Using the Ease of Access Center
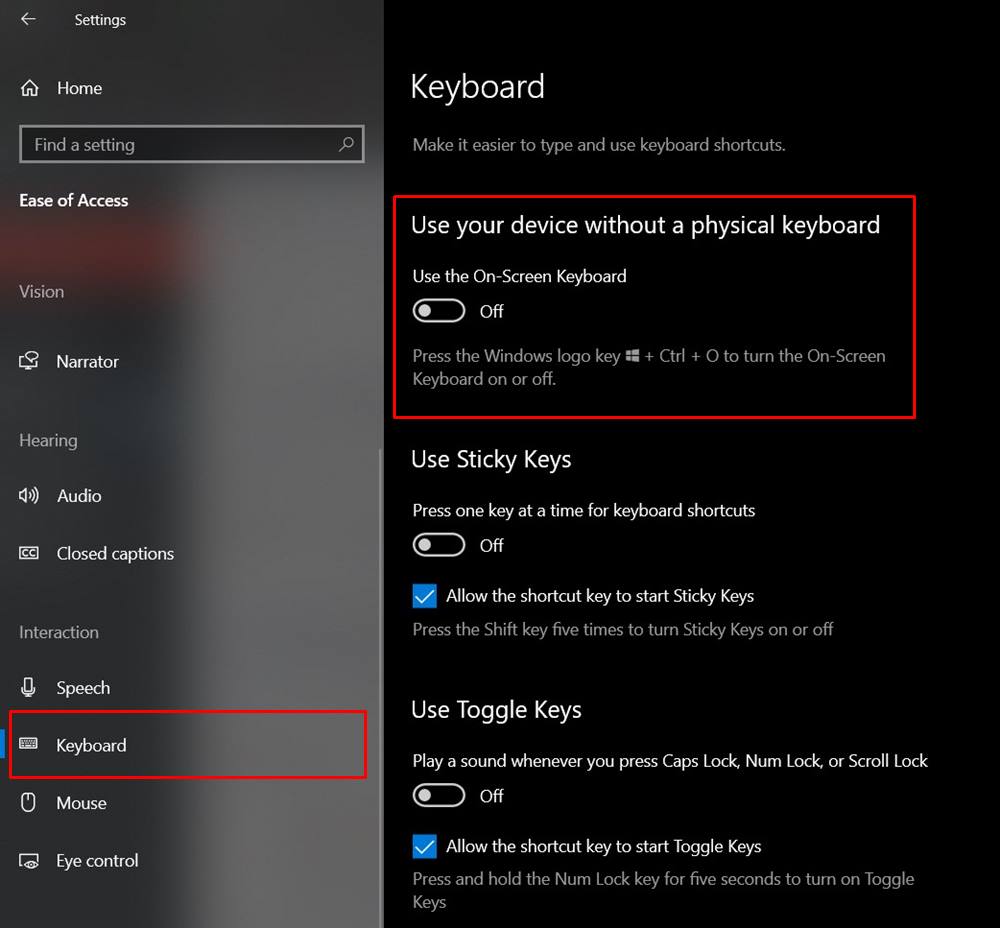
- For this, you need to launch the Ease of Access Center. There are quite a few ways of doing so. The easiest of which is to use the Windows+U shortcut key combination.
- Within that, head over to the Keyboard section from the left menu bar.
- Then just disable the Use On-Screen Keyboard toggle and that is it.
Method 2: Tweaking the On-Screen Keyboard options
In this method, we will be making use of a baked-in feature inside the On-Screen keyboard itself settings itself. Here is what needs to be done:
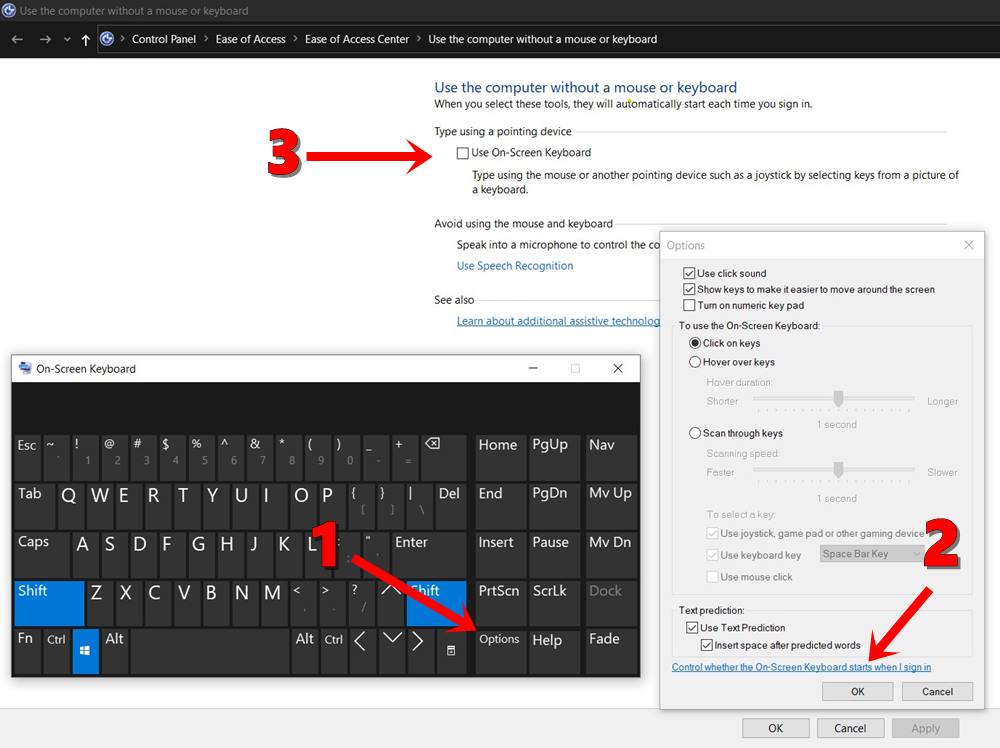
- Use the Windows+R shortcut key to launch the Run dialog box.
- Type in osk and hit Enter. This will launch the On-Screen Keyboard
- At the bottom right of the keyboard, this will be an Options button, tap on it.
- Then from the Options dialog box, click on Control whether the On-Screen Keyboard starts when I sign in. This option should be situated at the bottom.
- Then uncheck the Use On-Screen Keyboard and hit Apply followed by OK. That is it. You have successfully closed the On-Screen keyboard.
Method 3: Disable On-Screen Keyboard Via Registry Editor
You should try out this method if the keyboard is popping out while entering passwords in the login screen. However, dealing with Registry Editor files might be risky and hence you should proceed with caution.
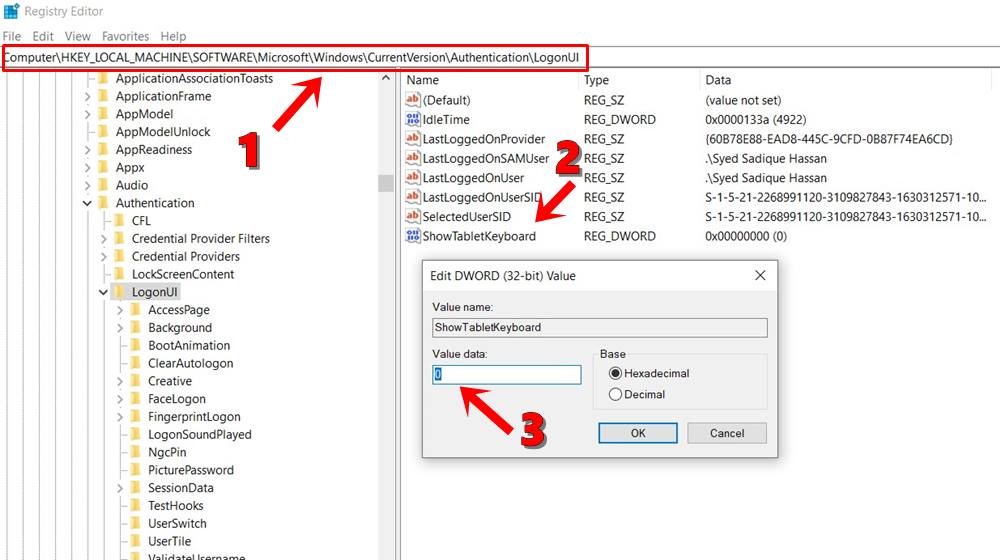
- Launch the Run dialog box using the Windows+R shortcut.
- Type in regedit and hit Enter. This will launch Registry Editor.
- Now copy-paste the below-given location in the address bar:
HKEY_LOCAL_MACHINE\SOFTWARE\Microsoft\Windows\CurrentVersion\Authentication\LogonUI
- Open the ShowTabletKeyboard which should be a REG_DWORD file. If that file doesn’t exist, then right-click on an empty region and click on New > REG_DWORD > Name it ShowTabletKeyboard.
- Then open that file, and under the Value Data field, type 0 and click on OK. This will disable the On-Screen keyboard on your Windows 11/10 setup.
Method 4: Disable On-Screen Keyboard Via the Services Menu
You might also disable the Touch screen keyboard running services to stop the random keyboard popping issues. Follow the below steps for this fix:
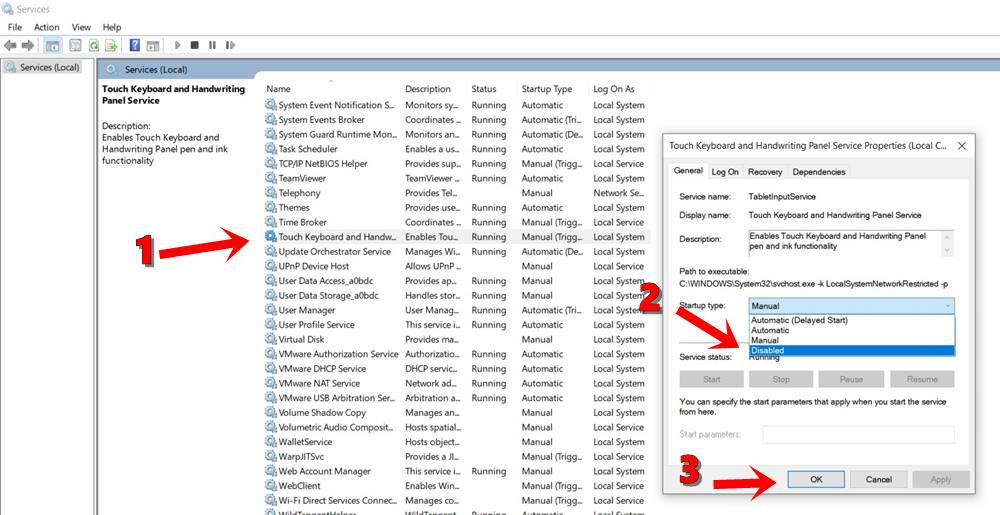
- Launch the Run dialog box from the Start menu or by using the Windows+R buttons.
- Type services.msc and hit Enter. The Services menu will then be opened.
- Navigate to the Touch screen keyboard and handwriting panel and right-click on it.
- First off, select the Stop option. Then again right-click on it and this time, select Properties
- Under the General tab of Settings, change the startup type from automatic to disabled.
- When that is done, restart your PC once, and with that, the steps to disable On-Screen keyboard on Windows 11/10 via Services menu is also done and dusted. Let’s now turn our attention towards the fifth method of doing so.
Method 5: Disable On-Screen Keyboard Using Command Prompt
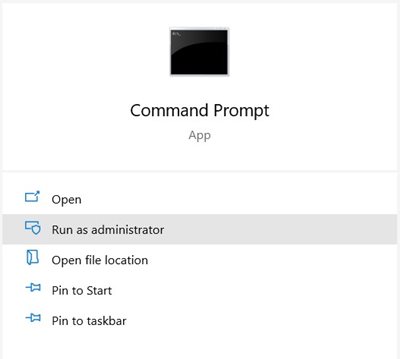
- Head over to the Start menu and search for Command Prompt. Make sure to launch it as an Administrator.
- Copy-paste the below command and hit Enter:
sc config “TabletInputService” start= disabled
- After this, execute the following command:
sc stop “TabletInputService”
- With this, you have disabled the on-screen keyboard on your Windows 11/10 PC. If at any point in time, you wish to rever the said changes, simply use the below command:
sc config “TabletInputService” start= autosc start “TabletInputService”
Method 6: Disable or Uninstall Conflicting Apps
The last option involves uninstalling the app that might be launching the keyboard at different points in time. However, if you cannot completely remove the app from your PC, then consider disabling it.
- To uninstall an application from your PC, head over to Control Panel.
- Then go to Programs > Programs and Feature.
- Right-click on the desired app and select Uninstall.
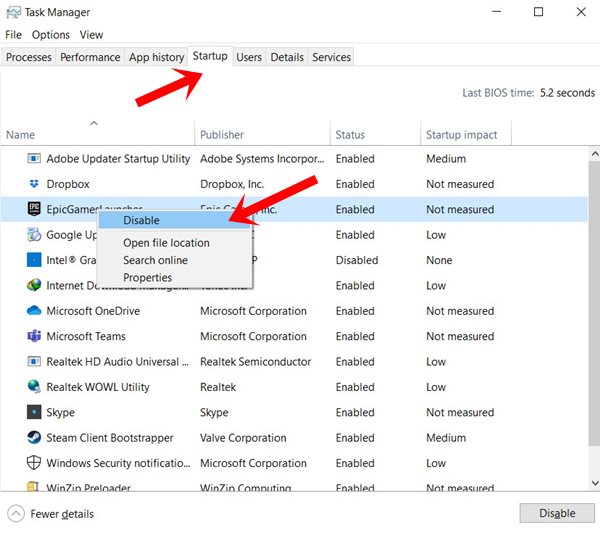
- On the other hand, to disable any app, use the Ctrl + Shift + Esc shortcut key combination. This will launch the Task Manager.
- Then head over to the Startup tab and disable the services for the app that is causing issues with the keyboard.
With that, we conclude the guide on how to disable the on-screen keyboard on Windows 11/10. We have shared six different methods for the same, any one of which should do the job for you. Do let us know which of the fixes managed to rectify the issue. Rounding off, here are some iPhone Tips and Tricks, PC tips and tricks, and Android Tips and Trick that you should check out as well.

“TabletInputService” doesnot exist