Windows 11 is the latest operating system from Microsoft that’s the successor of the Windows 10 OS. The stable build is quite good for daily usage but when it comes to bugs or issues, there can always be a chance to have that in certain aspects. Several users have reported that the Keyboard is not working in Windows 11 unexpectedly. You can follow this guide to fix it if you’re also facing the same.
It seems that the keyboard is one of the essential peripherals for computers, and it may face connectivity issues or doesn’t register input issues in some cases. Windows OS may disconnect or refuse connectivity with the keyboard due to the driver issue, port issue, faulty keyboard, or any other potential errors. Make sure to double-check the connectivity by unplugging and replugging again.
Also Read
Fix: Keyboard Typing Wrong Letters
How to Fix Laptop Hotkeys Not Working on Windows 11
Fix: Touchpad Not Working After Windows 11 Update
Fix: Windows 11 Clipboard History Not Working
Fix: Miracast Not Working on Windows 11 and 10
How To Fix External Hard Drive I/O Device Error in Windows 11/10
How to Fix if 4K Videos Not Playing on Windows 11
How to Fix If Brightness Slider Missing on Windows 11 and 10
TranslucentTB Windows 11 Not Working, How to Fix?
Page Contents
Fix: Keyboard Not Working in Windows 11
Here we’ve provided a couple of possible workarounds that should help you out. Now, without wasting any more time, let’s jump into it.
1. Restart Windows 11 System
You should restart your Windows 11 computer to check for the system glitch or cache data issues whatsoever. A simple reboot to the system can fix multiple temporary issues in a jiffy. So, click on the Start menu icon > Click on the Power icon > Select Restart.
2. Try Using Another USB Port
It can also be possible that somehow the existing USB port has some issues or the connectivity doesn’t fit properly with the keyboard’s USB cable. Try connecting the USB to another port to check for the issue.
3. Try Using Another Keyboard
You should also try using another keyboard on the Windows 11 computer to cross-check whether there is an issue with the system or the keyboard itself. If the secondary keyboard also doesn’t work that means you’ll have to deeply check with the system configuration or driver issue by following the next methods one by one.
Also Read
4. Turn Off On-Screen Keyboard Feature
The chances are also high that your Windows 11 system is using the on-screen keyboard because it has been enabled by mistake or you have done it unexpectedly. So, there is nothing to worry about because you can easily turn off the on-screen keyboard feature on your Windows 11. To do so:
- Press the Windows + I keys to open Windows Settings.
- Click on Accessibility from the left pane > Scroll down the right pane window.
- Click on Keyboard > Click on the On-screen keyboard to turn off the toggle. (If it’s already turned on)
- If it’s already turned off then make sure to turn it on and then turn it off again to refresh the system glitch.
Also Read
5. Update Keyboard Driver
It’s quite common to Windows users that an outdated or corrupted device driver can cause several issues with the connectivity or stability, and so the keyboard driver. Just try updating the keyboard driver if you haven’t updated it for a while. To do this:
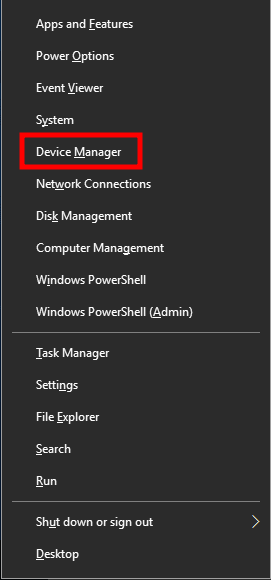
- Press the Windows + X keys to open up the Quick Link Menu.

- Now, select Device Manager by clicking on it.

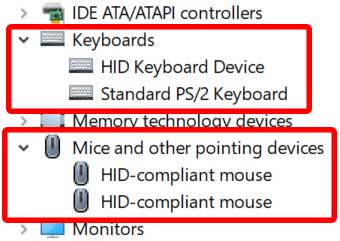
- Once the Device Manager interface opens, look for ‘Keyboards’.
- Double-click on the Keyboard option to expand the list > Right-click on the connected keyboard.
- Select Update driver > Choose Search automatically for drivers.
- If there is any update available, it’ll automatically download and install it.
- Finally, restart your computer to apply changes.
- Do the same steps for your connected mouse from ‘Mice and other pointing devices’.
- Make sure to reboot your PC/Laptop to apply changes once all done.
6. Reinstall Keyboard Driver
If the above method didn’t work for you, try reinstalling the keyboard driver on the PC to check for the issue again. To do so:
- Press the Windows + X keys to open up the Quick Link Menu.
- Click on Device Manager > Double-click on the Keyboard option to expand the list.
- Right-click on the connected keyboard > Select Uninstall Device.
- Follow the on-screen prompts to complete the uninstallation process.
- Finally, reboot your computer to automatically reinstall the keyboard driver.
However, if the keyboard driver doesn’t get installed automatically, then head over to the manufacturer’s website and download the latest keyboard/trackpad driver for your specific computer model then install it.
7. Turn Off Filter Keys, Sticky Keys, and Toggle Keys
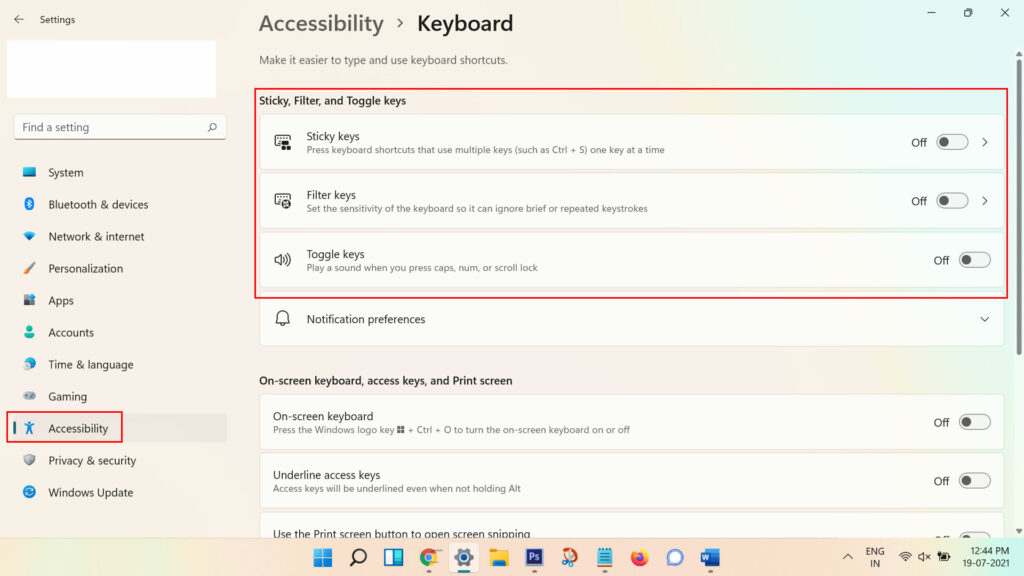
Make sure to disable filter keys, sticky keys, and toggle keys to check for the issue again. To do so:
- Click on the Windows Settings menu (cogwheel icon) from the taskbar or Start menu.
- Now, go to Ease of Access > Click on Keyboard.

- Scroll down the list and turn off all the Filter Keys, Sticky Keys, and Toggle Keys one by one.
- Finally, reboot your computer to apply changes.
That’s it, guys. We assume this guide was helpful to you. For further queries, you can comment below.

I got it worked!
None of this worked. I am going to lose it. Ever since my computer updated to 11, the “e,” “p,” and “enter” keys take about 40-60 presses to work one time. Many of the numbers on the number pad do the same. My wireless keyboard works on other computers, just not mine. The latest update (KB5014668) did not help. I have to press the “e” and “p” continually until I get them to show up the first time, and then copy and paste every “e” and “p” in this message box. pLeASe SOMeONe HeLp Me!!!