If you have recently updated your BIOS and your PC is not booting up, then this article is just made for you. There are various reasons your PC can cause problems, and if it is not the hardware issue, you can fix all of them by yourself. This is a critical issue, and in the worst case scenario, it can brick your motherboard. In this article, we are going to give out various steps you can try by yourself to fix Windows 11 Won’t Boot After Bios Update issue.
Windows 11 is one of the latest and sweetest operating systems released by the Microsoft OS team. The Operating system promises a modern yet enhanced user experience. However, just like any other operating system, Windows 11 has its own set of issues where sometimes the OS doesn’t boot after a successful BIOS update. BIOS, also known as Basic Input & Output System, is a set of predefined instructions that initialises the hardware and software links of a computer. Updating the BIOS of your personal computer and laptop is a good practice to ensure system stability, compatibility, and security.
Unfortunately, with Windows 11, many users do face a plethora of issues after updating their computer’s BIOS. When Windows 11 won’t boot after a BIOS update, it can be a frustrating situation. But do not worry, as there are multiple troubleshooting methods that can help you to solve the issue easily.
Also Read

Page Contents
Why My Windows 11 Won’t Boot After Bios Update
Before we go into the solution, you should understand the cause of the issue; if you are unable to boot your PC after the BIOS update, it might be because of various reasons. Here are the possible reason due to which you are facing this issue.
Unsupported Version: If your BIOS version is not supported, it is noted by the users that it might completely ruin the booting process.
Third Party Applications: If you have tried the BIOS updated with third party software, you can face this issue as such software may not be compatible with the hardware.
Interruptions: This is a very common issue for any updating process. If your BIOS update is interrupted, you might get stuck at this issue as the complete BIOS setting are not installed properly.
Fix: Windows 11 Won’t Boot After Bios Update
Below are some troubleshooting methods to address any concerns with Windows after a successful BIOS update. Please note that some of the instructions in the below methods may vary depending on your computer’s system configuration. So for any confusion, it is a good idea to consult your device’s manufacturer or device documentation before tampering with BIOS settings.
Method 1: Reset CMOS
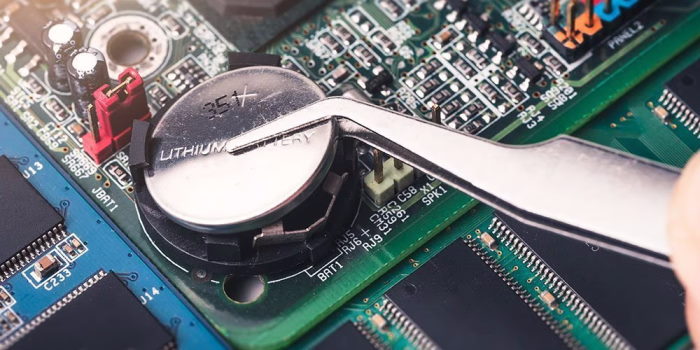
CMOS is watch shape battery that is fitted into your PC/Laptop. This is used to power the BIOS setting while your PC boots up. You have to reset this CMOS battery to fix any Windows boot related issues.
- Shut Down your PC and unplug the power.
- Now, to completely discharge your PC, hold the power button for more than a minute.
- Make sure to remove any static electricity by making contact with a metal surface.

- Remove the CMOS battery (It is a battery that is also used in the Wristwatch).
- Now, insert it again at the given slot and insert your battery back. Turn On your PC.
Method 2: Adjust BIOS settings
If you know your motherboard, just google your motherboard model to get the BIOS adjustment for your PC. You can look for the preferred settings for your motherboard. There are no fixed settings for the BIOS, and it is different for the different motherboards. If there is any confusion, it is a good idea to consult your device’s manufacturer or device documentation before tampering with BIOS settings.
Method 3: Try Booting into Safe Mode
If your problem persists, you can try the below steps.
- Insert a bootable drive into your PC (Pendrive, CD/DVD).
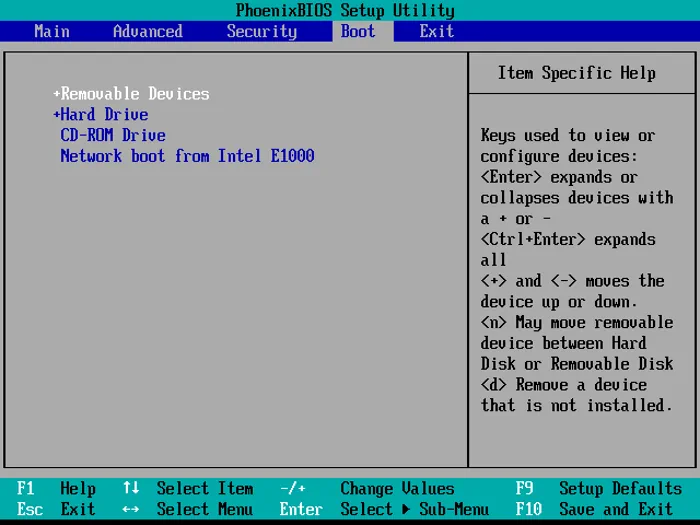
- Access the boot menu by pressing the function key (this is different for different manufacturer).

- Navigate to the Boot section using your arrow keys, and change the boot order to start with a bootable drive.
- Installation file will load up; now select your preferences.
- Hit next and select “Repair your computer” option from the left corner

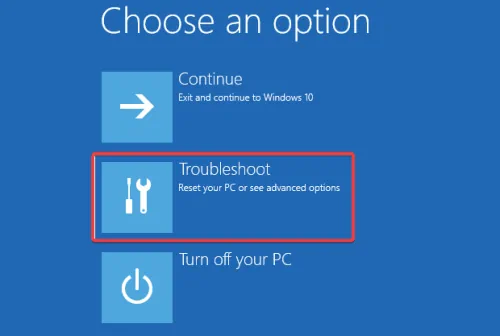
- Now open troubleshoot and go to the advanced section.
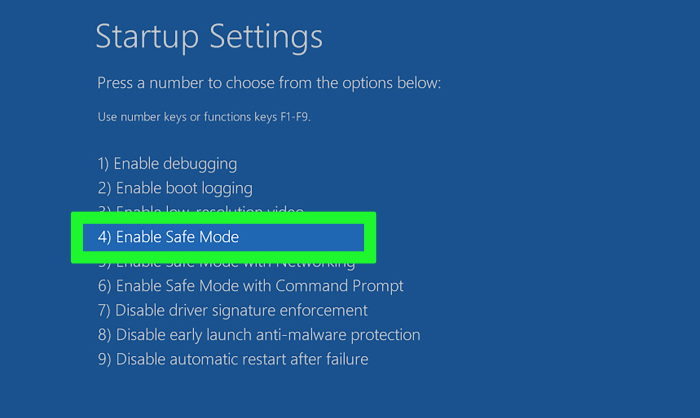
- Choose Startup Settings and enable safe mode here.

- When the PC restart, Press the functions key F4 to boot in the safe mode option.
Method 4: Flash BIOS again
If you have already flashed the BIOS once to update it and your PC is not getting started, you should try flashing the BIOS again. This might sound odd, but it is a great way to solve this issue.
This is very helpful for the people who got ahead of the BIOS screen but got stuck on the Windows loading screen. Flashing the BIOS again fixed the issue for them. Just try to be careful with all the steps you take to avoid the risk of bricking your Motherboard.
Method 5: Reinstall the System
Reinstall the Windows 11. If your BIOS update failed and you can not restart your PC. You should reinstall Windows 11 again. These are very easy steps, and you can easily fix this issue by replacing the old OS with a brand-new OS. You can find a good instruction video on how to install Windows 11 from the BIOS menu and follow those steps carefully.
Method 6: Replace Motherboard
If everything fails, then there might be a chance that your Motherboard is at fault. This is not a good news but this is a hardware solution to the software problem. If you have bricked your motherboard, this is the only solution.
There are technicians who can repair a Motherboard too. If you live nearby a good technician, you can ask them to repair your Motherboard or purchase a new one.
Conclusion
This brings us to the end of this guide for fixing the Windows 11 Won’t Boot After Bios Update issue. We understand that encountering a situation where Windows 11 not booting after a BIOS update can be challenging, but it’s not a hopeless scenario. Multiple other steps and fixes are available on the Internet, but we have compiled the best methods to fix the issue for you. Just follow the above given steps carefully and get your PC fixed. In case of any confusion or any help, please comment below.
