Windows 11 is the latest operating system by Microsoft since Win10 did release back in 2015. Now, plenty of users have already switched to the latest OS version but somehow multiple users are encountering issues with the Windows 11 Clipboard History Not Working. If in case, you’re also facing the same issue then you can follow this troubleshooting guide completely to fix it. Clipboard history is one of the most useful features on Windows for copy-pasting.
This specific feature allows users to save up to 25 data clips to be copied and it can also offer multiple items to be copy-pasted from the clipboard history. While some users are getting this particular issue quite recently on Windows 11, some are unfortunate enough to encounter the clipboard history not working issue since Windows 10. That means they’ve received the clipboard issue in the heritage but it can be fixed by following the methods below.
Also Read
Fix: Miracast Not Working on Windows 11 and 10
How to Fix if 4K Videos Not Playing on Windows 11
Fix: Windows 11 Taskbar Not Hiding in Full Screen
How to Fix If Brightness Slider Missing on Windows 11 and 10
How to Fix Scanner Not Working Issue on Windows 11
How to Fix If Alt+Tab Shortcut Not Working on Windows 11
Fix: Windows 11 Context Menu Is Slow, Missing Item, and Not Working
TranslucentTB Windows 11 Not Working, How to Fix?
Fix: Windows 11 Multi Display Not Working
Fix: Mouse Scroll Wheel Jumps Up and Down on Windows 10, 11

Page Contents
- Fix: Windows 11 Clipboard History Not Working
- 1. Enable Clipboard History
- 2. Update Windows 11 OS Build
- 3. Check for Optional Updates on Windows
- 4. Restart Windows File Explorer
- 5. Clear Clipboard Data
- 6. Enable Clipboard History in Group Policy Setting
- 7. Tweak Registry Editor
- 8. Perform a Clean Boot
- 9. Sync Clipboard History
- 10. Clear Clipboard Data
- 11. Try Using Another Windows Clipboard Manager
Fix: Windows 11 Clipboard History Not Working
However, we should mention that not everyone is facing the copy-pasting issue or not every time it occurs. Users might be able to copy and paste single items individually from the clipboard but the issue is appearing while copy-pasting multiple items. Microsoft’s new desktop feature offers multiple other tabs and options to easily clear all from the clipboard history interface. It also includes new Emoji and Kaomoji emoticon tabs.
Users can easily select different emoticons and then adds them to documents & text editors inside the Microsoft Word program and web browsers. Additionally, there’s a useful new Symbols tab in the revamped clipboard history of Windows 11. It offers special symbols and characters that users can select to add geometric, mathematical, language, Latin symbols to documents, and more. It also includes a GIF tab.
So, if the clipboard history not working then you’re obviously going to miss out on plenty of additional features and most importantly copy-pasting the multiple items. Now, without wasting any more time, let’s jump into the guide below.
1. Enable Clipboard History
The first thing is to check whether the clipboard history option is turned on or not. If it’s not enabled, make sure to turn it on before going to any conclusion. To do so:
- Press the Windows key or click on the Windows icon to open the Start menu.
- Click on the Settings icon > Select the Clipboard option.
- Click on the Clipboard History toggle to turn it on. [If it’s already turned on, make sure to turn it off and turn it on again]
- You can press the Windows + V keys to open the clipboard history interface.
- Now, you should try copy-pasting multiple items by pressing the Ctrl+C and then Ctrl+V keys on Windows 11.
2. Update Windows 11 OS Build
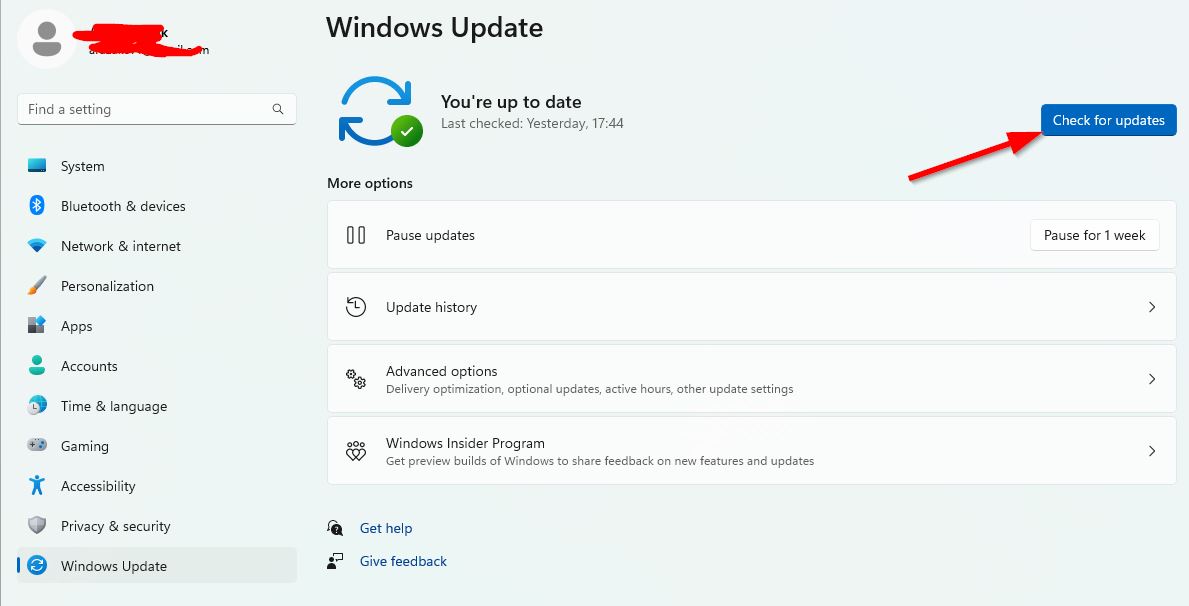
Make sure to check for the Windows 11 build updates on your computer because an outdated build can trigger some issues or it may not have the latest features whatsoever. Issues with the stability or system bugs may trigger multiple conflicts with the clipboard history function not working on Win11. To do that:
- Press Windows + I keys to open up the Windows Settings menu.
- Next, click on Update & Security > Select Check for updates under the Windows Update section.

- If there is a feature update available, select Download and install.
- It may take a while to complete the update.
- Once done, restart your computer to install the update.
3. Check for Optional Updates on Windows
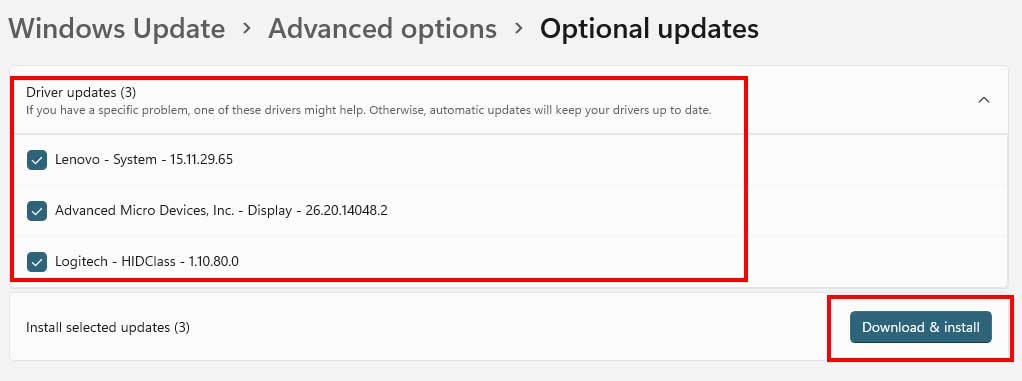
It’s also recommended to check for optional updates on Windows 11 because not every update will gonna appear on the Windows update page. The optional updates option can offer additional driver or software updates for your specific PC build. You can follow the steps below to check the same:
- Click on the Start menu and open Windows Settings.
- Click on Windows Update > Click on Advanced options.
- Now, head over to Optional updates (under Additional options) > Click on Driver updates to expand the list.

- If there is an update available for any drivers or applications, simply select the necessary ones.
- Finally, click on Download & install then wait for the update process to be completed.
- Once done, make sure to reboot your PC to apply changes.
Also Read
4. Restart Windows File Explorer
You should try restarting the Windows File Explorer function on the Win11 computer because it can easily help you to fix the clipboard history issue. To do this:
- First of all, press the Ctrl + Shift + Esc keys to open the Task Manager interface.
- Click on the Processes tab > Select Windows Explorer from the list.
- Click on the Restart button at the bottom right side and wait for it.
5. Clear Clipboard Data
If in case, your clipboard history isn’t working properly on the Windows 11 computer then you can proceed to the steps below to check for the issue. To do that:
- Open the Settings menu by pressing the Win+I keys on the keyboard.
- Then select Clipboard on the System tab from the left pane.
- Click on the Clear button and open the Start menu.
- Now, click on the Power menu and select Restart.
6. Enable Clipboard History in Group Policy Setting
It’s also suggested to enable the clipboard history option under the Group Policy Setting menu by following the steps below: [It’s only applicable for Windows N-edition users]
- Press the Windows + R keys to open the Run dialog box.
- Now, type gpedit.msc and hit Enter to open Group Policy Editor.
- Double-click on the Computer Configuration and Administrative Templates on the left side of Group Policy Editor.
- Next, select System then click on OS Policies > Double-click on the Allow Clipboard History setting.
- Click on the Enabled radio button on the Allow Clipboard History Policy window.
- Select Apply to save the new policy > Press the OK button to exit it.
7. Tweak Registry Editor
Sometimes issues with the Registry Editor menu can eventually trigger conflicts and you should adjust or tweak the data value of clipboard history. You can follow the steps below to do so:
- Press the Windows + R keys to open the Run dialog box.
- Now, type the following line and hit Enter to open Registry Editor.
regedit.msc
- Inside the Registry Editor interface, you will have to search for the following path:
Computer\HKEY_LOCAL_MACHINE\SOFTWARE\Policies\Microsoft\Windows\System
- Right-click on System on the left side > Select the New context menu option.
- Select the DWORD (32-bit) Value option > Set the name to AllowClipboardHistory.
- Next, make sure to double-click on the AllowClipboardHistory option to open it.
- You should enter 1 inside the Value data text box and click on OK.
- Finally, click on the Start menu > Select the Power menu and click on Restart.
8. Perform a Clean Boot
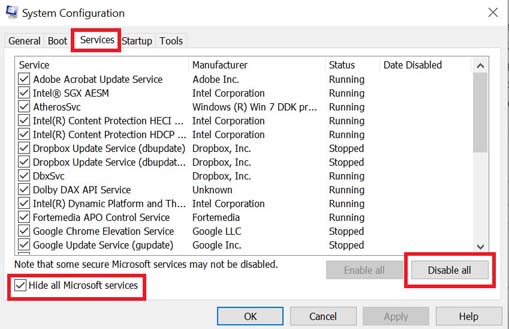
If the above methods didn’t work for you then make sure to perform a clean boot on the Windows 11 PC to ensure there is no issue with the system performance or temporary cache data whatsoever. Sometimes the background running programs (third-party) can trigger performance-related issues that should be fixed. To do so:
- Press Windows + R keys to open the Run dialog box.
- Now, type msconfig and hit Enter to open System Configuration.
- Go to the Services tab > Enable the Hide all Microsoft services checkbox.

- Click on Disable all > Click on Apply and then OK to save changes.
- Now, click on the Boot tab > Make sure to select the particular OS drive where you’ve installed Windows 11 OS.
- Then click on the Safe boot checkbox to mark it > Click on Apply and click on OK.
- You’ll be prompted to reboot your computer > Accept the prompt and the PC will automatically reboot into Safe Mode. [Most of the advanced features and third-party access will be disabled in Safe Mode to cross-check if a problem appears due to a third-party app or something else]
Note: Once the problem has been recognized and fixed, make sure to undo the Safe boot changes by following the same steps above, uncheck the Safe boot option then apply changes.
9. Sync Clipboard History
If you’re having issues with accessing the clipboard data across your synced devices then you should try syncing the clipboard history data across all devices manually. Though this process may take some time, it can eventually fix the clipboard history not working on Windows 11 issue. Keep in mind that your PC is connected to the internet and you’ve successfully signed in to your Microsoft account.
- Open the Settings menu by pressing the Windows + I keys.
- Now, select System from the left pane > Click on Clipboard.
- Select Manually sync text that I copy.
- Next, open up the clipboard manager by pressing the Windows + V keys.
- Click on the three horizontal dots icon next to the required data.
- Click on the Sync button and wait for it to complete.
- Finally, cross-check if the clipboard history is working or not.
10. Clear Clipboard Data
You can also try clearing the clipboard data on your Windows 11 computer to check for the issue. To do so:
- Open the Settings menu by pressing the Windows + I keys > Search for Clipboard and select it.
- Now, click on the ‘Clear’ button next to the “Clear clipboard data” option.
- Once done, make sure to restart the PC to change the effects.
11. Try Using Another Windows Clipboard Manager
If none of the methods worked for you then make sure to use another alternative Windows clipboard manager software on the PC. You can find out plenty of them online.
That’s it, guys. We assume this guide was helpful to you. For further queries, you can comment below.
