Bethesda Softworks and id Software have done an excellent job by releasing Doom Eternal which is a gore violent action first-person shooter video game. It seems that in this epic single-player title players can conquer demons to prevent humanity’s destruction. Though the game is doing really well for a couple of years, some players are experiencing the Doom Eternal Failed to Allocate Video Memory Error on the Windows computer while trying to launch it.
Well, this specific error appears whenever the total VRAM usage on the Windows system exceeds the maximum limit or the available VRAM. Here Virtual Memory comes into the light and it basically allows a certain program to allot a limited amount of the memory which is available on the system. If in case, your virtual memory limit isn’t sufficient for the particular program to run properly then you may encounter the failed to allocate video memory error.
Also Read

Page Contents
Fix: Doom Eternal Failed to Allocate Video Memory Error
Mostly the VRAM amount falls short enough of whatever is required for the particular program. So, increasing the virtual memory or updating the GPU driver, etc workarounds may help you a lot. However, if you’re 100% sure that the available VRAM limit is enough to run the Doom Eternal game on your PC quite efficiently then you should have to adjust in-game graphics settings manually so that the game can use lower resources on the PC. So, let’s get in.
1. Update Doom Eternal
First of all, you should try updating the Doom Eternal game version to ensure that there is no outdated game version is conflicting with the video memory allocation error. To do this:
- Open Steam > Go to Library.
- Click on Doom Eternal > It’ll automatically search for the available update.
- If there is an update available, click on Update.
- Wait for some time to complete the update process.
- Once done, make sure to reboot the PC to apply changes.
2. Disable Fullscreen Optimizations
It’s also recommended to try disabling the full-screen optimization and DPI settings for the specific Doom Eternal executable application file on the PC. By default, both the options come enabled but these settings might conflict with the game running in most cases. To do so:
- Search the installed Doom Eternal game directory on the PC.
- Now, right-click on the doometernal.exe application file.
- Select Properties > Click on the Compatibility tab.
- Make sure to checkmark the Disable Full-Screen Optimizations checkbox to select it.
- Click on Change high DPI setting > Tick mark the Override high DPI scaling behavior option.
- Select Application from the drop-down menu.
- Click on Apply and then OK to save changes.
3. Update GPU Drivers
You should also check for the graphics driver update on the PC if you haven’t updated it for a while. An outdated graphics driver can trigger multiple issues with the graphics-intensive programs whatsoever. To do that:
- Right-click on the Start Menu to open the Quick Access Menu.
- Click on Device Manager > Double-click on the Display adapters to expand it.
- Right-click on the dedicated graphics card > Select Update driver.
- Click on Search automatically for drivers.
- If an update is available, it’ll automatically download and install the latest version.
- Once done, reboot your computer to apply changes.
If there is no update available for you then make sure to directly go to the manufacturer’s website of the respective graphics card then download & install the latest GPU driver for your particular GPU card model.
4. Set Borderless Window Mode
Make sure to set the borderless window mode from the in-game settings menu to ensure the game is running on the borderless screen which might reduce the requirements of the video memory. To do that:
- Launch the Doom Eternal game.
- Head over to the Video/Graphics Settings menu.
- Now, set the Borderless Window mode to fix the Doom Eternal Failed to Allocate Video Memory Error.
5. Increase Virtual Memory
It is also possible that somehow your game files are running out of the video memory which is allocated by the system. So, it’s required to increase the virtual memory on the system manually by following the steps to virtually allocate higher memory for the game. The paging file size should be higher than the actual RAM capacity to get better results. You can follow the steps below to increase the virtual memory size on your PC.
Please Note: You must be logged on as an administrator or a member of the Administrators group to complete this process. If your computer is connected to a network, the network policy settings may also cause such issues.
- Click on the Start menu > Click on Control Panel.
- Click on Performance and Maintenance > Go to System.
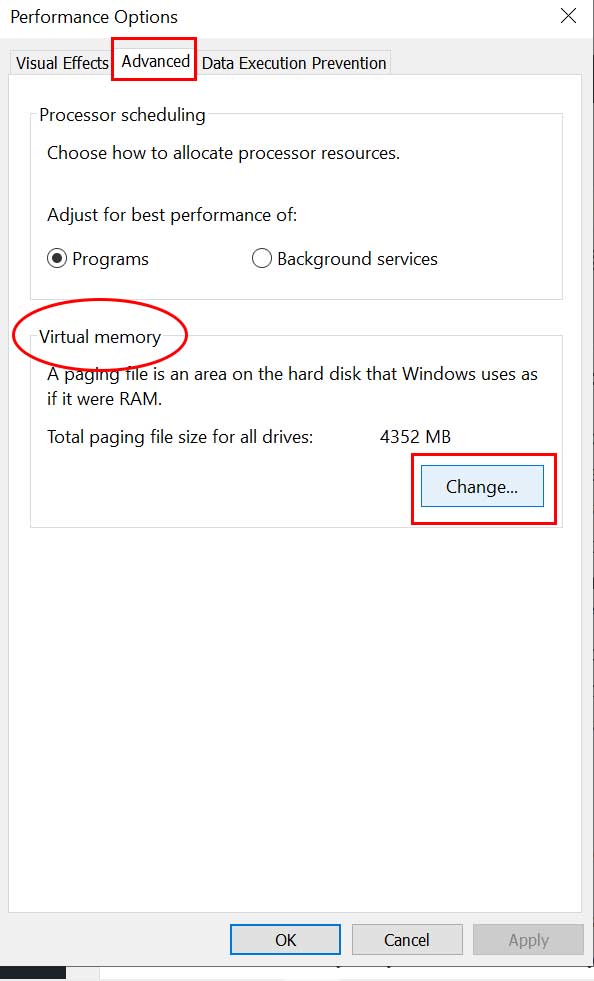
- From the Advanced tab, click on Settings under Performance.

- On the Advanced tab, click on Change under Virtual memory.
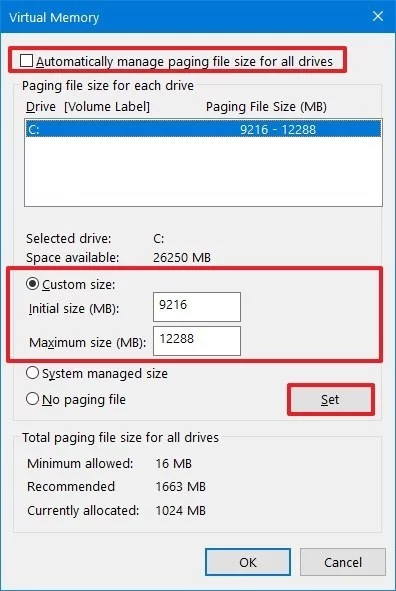
- Under Drive [Volume Label], click on the drive that contains the paging file you want to change.
- Under Paging file size for the selected drive, click on System Managed Size > Click on Set.
- If this option hasn’t been flagged previously, restart the PC after flagging it.
- If the system paging file size is used to be System Managed then under Paging file size for selected drive, click on Custom size.

- Now, type a new paging file size in megabytes in the Initial size (MB) or Maximum size (MB) box. [It should be 1.5x-2x higher than the physical RAM]
- Click on Set and save changes > Restart the PC to apply changes.
This specific method should help you a lot. However, if the problem persists then make sure to head over to the next method.
6. Verify and Repair Game Files
If none of the methods worked for you then make sure to verify and repair the installed game files on the PC by following the steps below. Sometimes issues with the corrupted or missing game files may trigger several conflicts with the launching or running. To do so:
- Launch Steam > Click on Library.
- Right-click on Doom Eternal from the left pane.
- Click on Properties > Go to the Local Files tab.
- Now, click on Verify Integrity of Game Files.
- Wait for the process to complete and then reboot the PC to apply changes.
That’s it, guys. We hope this guide was helpful to you. For additional queries, you can comment below.
