In Windows 10, Microsoft takes the copy and paste features to another superior level, i.e., Clipboard. This feature allows you to add or copy your various items such as text, images, HTML code, anything that is modifiable. In addition, clipboard history will present a list of content that you have copied before in order to use later. But, if you want to use this amazing feature on your Windows 10 PC. Then, you first need to enable it.
Ever you lost your data due to the crashing of your specific application due to some sort of reason? Clipboard plays a vital role in this kind of scenario as when you enabled it and copied something from, let’s say, your browser. But, due to technical issues, your browser crashes, Clipboard history makes its way and saves the content that you were copied before crashing occurs. Anyway, today, here we will tell you about the three best ways to enable Clipboard history in Windows 10. So, let’s get started.
Also Read

Page Contents
3 Best Ways To Enable Clipboard History in Windows 10
Today the methods I’m going to discuss here will be one of the best options that you can use to enable your Clipboard history in Windows 10. So, let’s start with the first method:
#1. Enable It Through Windows Settings
- Press the Windows + I button from your keyboard in order to invoke the Windows settings and hover to the System.
- Now, navigate through the System and locate the Clipboard option. Once get it, click on it.
- After that, you’ll notice a toggle button on the next page under the Clipboard history section. So, just toggle it to the On position to enable it if it is disabled.
- Then, once you enabled this option, close the windows. After that, press and hold Windows + V key from your keyboard to invoke the Clipboard.
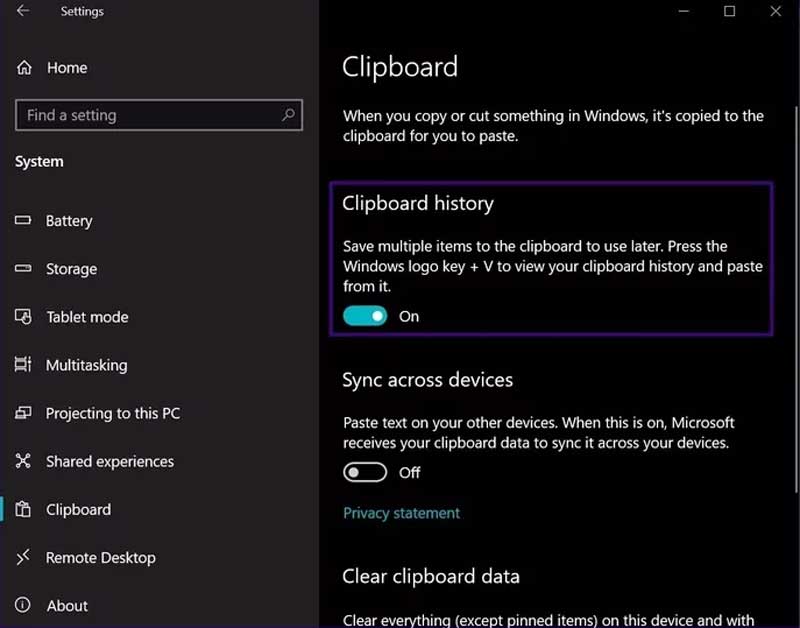
That’s it. Currently, it is a blank page. But, once you started copying items, this page filled accordingly.
#2. Enable it Using Keyboard Shortcut
- You can simply press and hold the Windows + V key using your keyboard.
- Now, as we stated earlier, by pressing these combinations, the Clipboard history prompt appears. But, as this is currently disabled, so it will show you a button to turn this feature On.

Also Read: Windows 11 ISO Insider Preview | Download
#3. Enable Via Windows Registry
If you know about editing the registry file, we recommend you go with this method. Also, try this method only when the other two mentioned methods won’t work because while editing your registry, much care and knowledge are required. A single mistake can make your Windows PC unstable.
- Invoke the Run prompt box by pressing Windows + R key simultaneously.
- Thereafter, type in Regedit in the text field and hit the enter key.
- Now, click on the Computer option inside the Registry editor menu to access the drop-down menu.
- Then, select the HKEY_CURRENT_USER.
- Now, again from the opened drop-down menu, select the Software option.
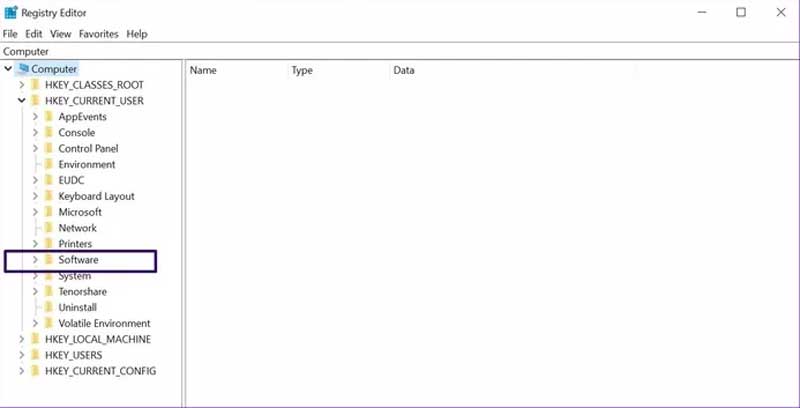
- After that, navigate through it and click on Microsoft, followed by AuthCookies.
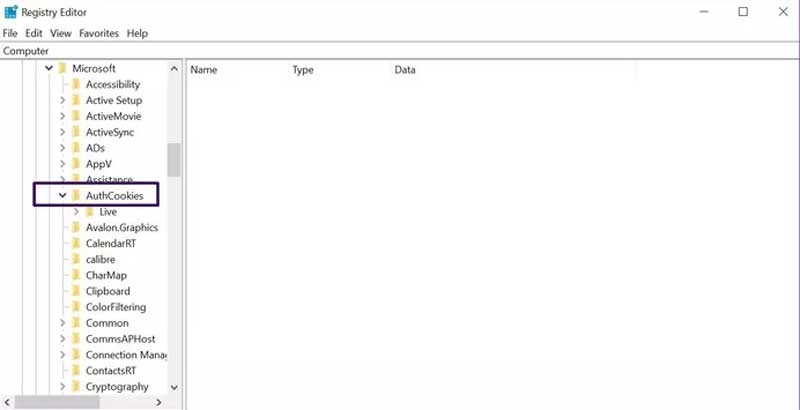
- Now, click on Clipboard, and you’ll see the option to enable it on the right side of the window. Meanwhile, if the option is not there, then follow the further steps mentioned below.
- Inside the AuthCookies, right-click on the Clipboard to get the list of options and choose the new option from that drop-down menu.
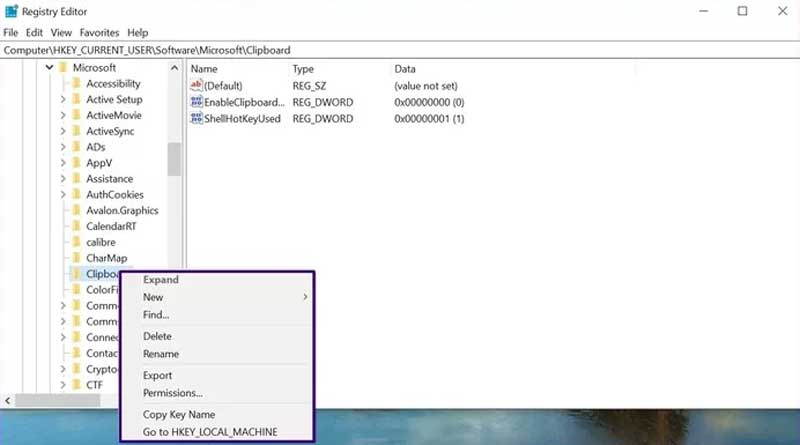
- Now, again from the pop-up drop-down menu, choose the DWORD (32-bit) Value and name it EnableClipboardHistory.
- Double-click on it and fill 1 inside the Value data option, and hit the Ok button.
- After that, once you have performed all the mentioned steps, simply reboot your PC to make sure the settings that you have changed are saved.
So, these were some steps that you need to take to enable the Clipboard history on your Windows PC. I hope you are now able to enable this on your PC after reading this guide. Meanwhile, if you really like this guide, don’t forget to leave a supportive comment for us as this boost our morale.
