Blue Screen of Death (BSoD) is one of the most popular and fatal system errors on the Windows platform. It’s also known as Blue Screen error that indicates the system crash and Windows detects it then trying to force close the system to prevent additional damage. The reports are coming out that Chrome Causing BSOD Errors on Windows 10 while watching YouTube videos.
If you’re also one of the victims, make sure to follow this troubleshooting guide to fix it. Although Windows tries to restart the system to fix the issue in that scenario, you may need to resolve it manually in most cases. However, if the particular BSoD error is appearing on your Chrome browser that means your browser settings or cache data is troubling you.
Also Read
Page Contents
Fix: Chrome Causing BSOD Errors on Windows 10
It’s also worth mentioning that Google Chrome causes a BSOD Memory Management error that eventually leads your system to crashes. It’s highly recommended to try resolving the BSOD error as early as possible to prevent hardware damages. Luckily, we’ve mentioned a couple of possible workarounds that should help you out.
1. Run Blue Screen Troubleshooter
If in case, you’re experiencing BSoD errors then we’ll highly recommend you to run the Blue Screen Troubleshooter utility on your Windows 10 system to check for the issue. To do this:
- Press Windows + I keys to open Windows Settings.
- Click on Update & Security > Now, click on Troubleshoot from the left pane.
- Choose the Blue Screen option > Click on Run the troubleshooter.
- Follow the on-screen instructions to complete the process.
- Once done, make sure to restart your computer to apply changes.
2. Update Windows
If in case, the above method doesn’t work for you, make sure to check for Windows updates by following the steps below:
- Press Windows + I keys to open Settings.
- Click on Update & Security > Click on Check for updates.
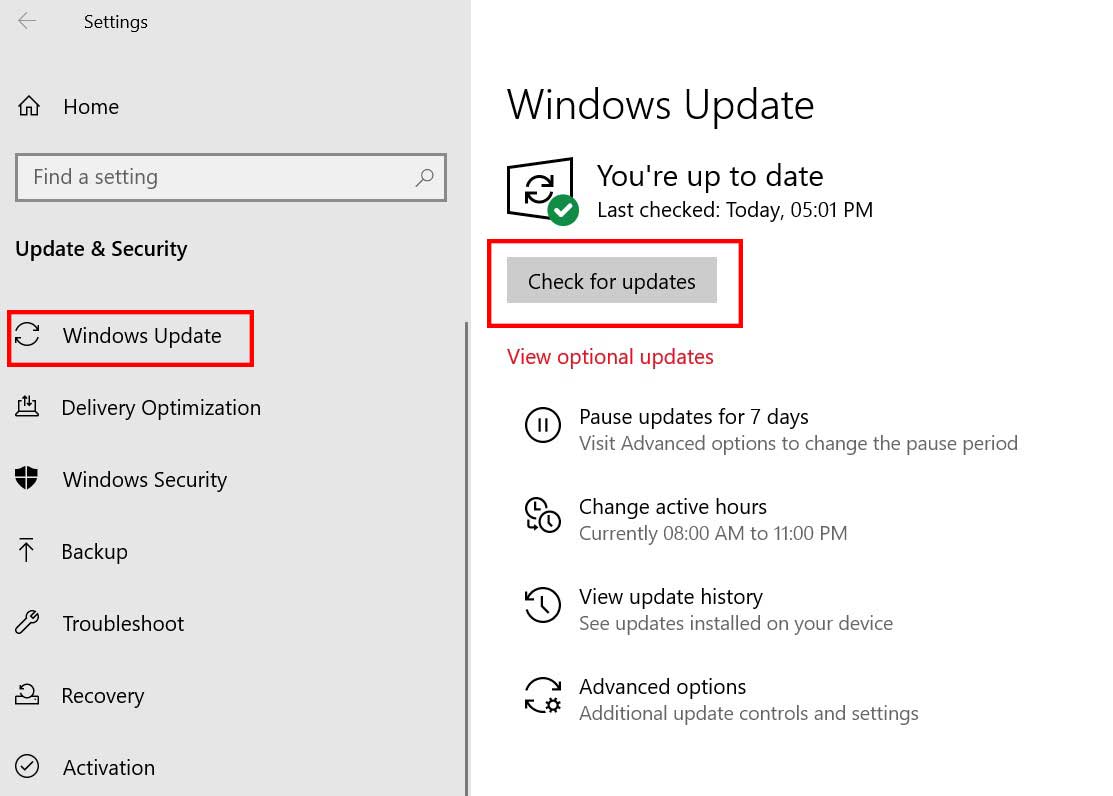
- If there is an update available, you can click on Download and Install it.
- Let the system install and restart your computer to apply the update.
3. Update Chrome
Updating the Google Chrome browser can also fix multiple issues on your computer that includes BSOD errors, system crashes, etc. To update the browser:
- Launch Google Chrome > Click on the Menu (three vertical dots icon) from the top-right corner.
- Click on Settings > Select About Chrome from the left pane.
- The Chrome system will automatically check for available updates. If there is an update available, it will automatically download and install the update.
- Once done, simply restart your Chrome browser.
4. Disable Hardware Acceleration on Chrome
Hardware Acceleration is a kind of feature that allows the system to use the computer’s hardware at its full capacity in order to perform more efficiently. To do that:
- Open Chrome browser > Click on the Action Menu button (three vertical dots icon) from the top-right corner.
- Click on Settings > Select Advanced.
- Now, click on System from the left pane.
- Make sure to Turn off the Use hardware acceleration when available toggle.
- Launch the Chrome browser again and check for the BSOD Errors on Windows 10.
5. Run SFC
System File Checker (SFC) is a utility tool in Microsoft Windows that allows users to scan for corrupted Windows system files and restore them automatically. This method should fix the error completely.
- Click on the Start Menu and type cmd.
- Now, right-click on Command Prompt from the search result.
- Select Run as administrator > If prompted, click on Yes to give admin privileges.
- Once the command prompt window opens, type the following command and hit Enter to execute it:
SFC /scannow

- Now, wait for the process to complete.
- Make sure to restart your computer to apply changes.
6. Use DISM
Deployment Image Servicing and Management (DISM) is a command-line tool that can be used to mount and service Windows images before deployment. It becomes so much useful in most scenarios and can be performed by following the steps below:
- Click on the Start Menu and type cmd.
- Now, right-click on Command Prompt from the search result.
- Select Run as administrator > If prompted, click on Yes to give admin privileges.
- Once the command prompt window opens, type the following command and hit Enter to execute it:
DISM /Online /Cleanup-Image /CheckHealth
- Type the following command and press Enter:
DISM /Online /Cleanup-Image /RestoreHealth

- Now, wait for the process to complete and exit the command prompt.
- Finally, restart your computer once and try checking the Chrome BSOD Errors on Windows 10 issue again.
7. Tweak Power Options
Turning off the fast startup option on your Windows 10 computer may help you in most cases. To do so:
- Click on the Start Menu > Type Control Panel and click on it from the search result.
- Now, click on Hardware and Sound > Click on Power Options.
- Select Choose what the power button does from the left pane.
- Click on Change settings that are currently unavailable.
- Uncheck the ‘Turn on fast startup (recommended)’ checkbox.
- Once done, click on Save changes and reboot your computer.
8. Perform a Clean Boot
The chances are high enough that some of the installed third-party programs are conflicting with the system functions that can trigger blue screen-related errors on Windows. So, it’s highly recommended to perform a clean boot in order to disable the third-party programs and performing the clean boot. To do this:
- Press Windows + R keys to open the Run dialog box.
- Now, type msconfig and hit Enter to open the System Configuration window.
- Go to the Services tab > Enable the Hide all Microsoft services checkbox.
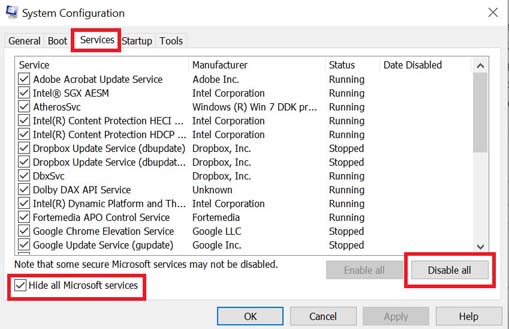
- Check all the services from the list and click on Disable all.
- Click on Apply and then OK to save changes.
- Now, click on the Startup tab > Click on Open Task Manager.
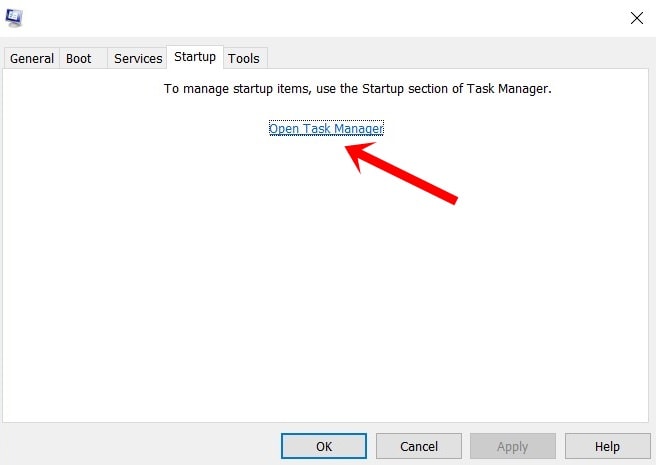
- Under the Startup tab from the Task Manager interface, click on the particular tasks which are enabled for startup boot > Click on Disable.
- Make sure to select and disable one by one.
- Once done, restart your computer to apply changes.
9. Use Safe Mode
Safe Mode is one of the diagnostic modes of the Windows operating system that runs only necessary software and services or drivers which are stock. To boot your computer in Safe Mode:
- Click on the Start Menu > Click on Power.
- Press and hold the Shift key and click on Restart.
- Click on the Troubleshoot option > Select Advanced options.
- Go to ‘Advanced options’ > Click on Start-up Settings.
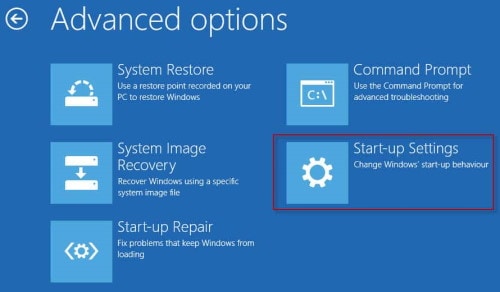
- Under the ‘Start-up Settings’, click on Restart.
- Now, you can select an option by pressing one of the numbers or function keys F4, F5, or F6. (Safe Mode numbers are 4, 5, or 6)
- Once your Windows boots in the Safe Mode, you can check for the possible reasons behind the Chrome BSOD Errors on Windows 10.
Now, if you want to turn off the Safe Mode again, you can follow the steps below.
- Press Windows + R keys to open the Run dialog box.
- Type msconfig and click on OK to open System Configuration.
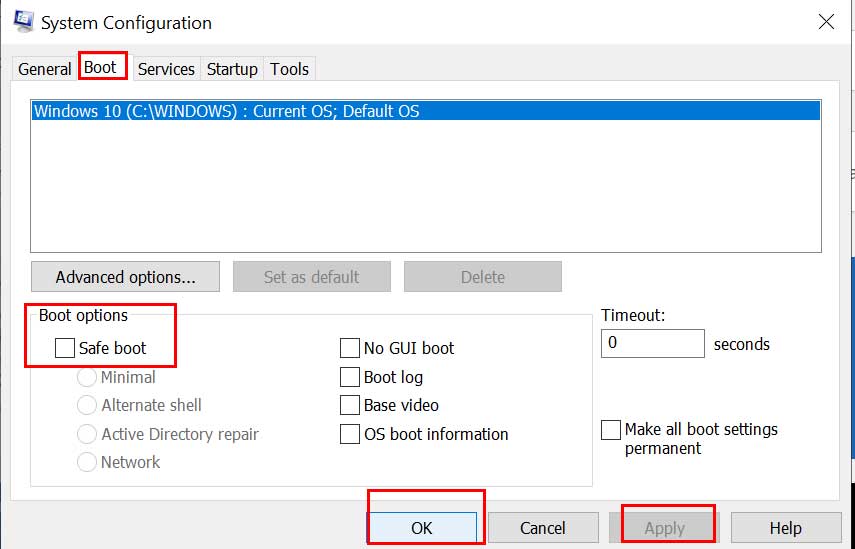
- Click on the Boot tab > Uncheck the Safe boot checkbox to turn it off.
- Once done, click on Apply and OK to save changes.
- Restart your computer and check for the error again.
10. Run Driver Verifier
Run Driver Verifier is a utility tool that runs via command prompt to check which device drivers are getting failed while installing. To use it:
- First of all, make sure to create a System Restore Point on your Windows 10.
- Click on the Start Menu > Type cmd and right-click on Command Prompt from the search result.
- Select Run as administrator and if prompted by UAC, click on Yes to allow the permission.
- Now, type verifier and press Enter in the command prompt.
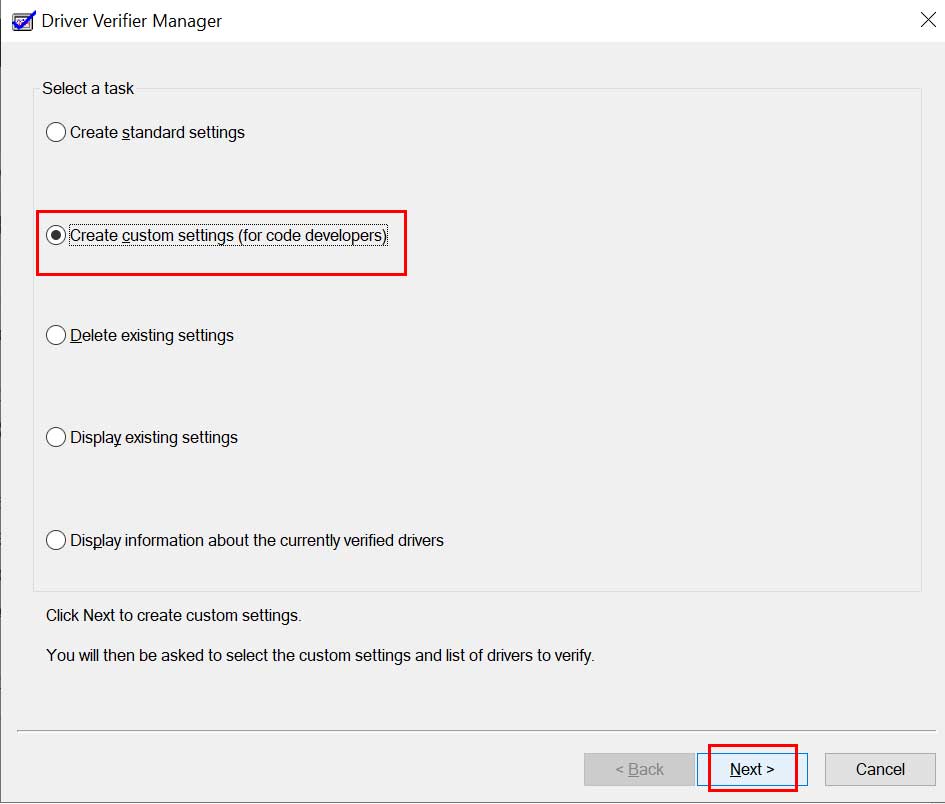
- A new window will pop-up and select “Create custom settings (for code developers)”.
- Click on Next > Select I/O verification, Force pending I/O requests, and IRP logging from the list.
- Then click on Next > Click on “Select driver names from a list”.
- Check all non-Microsoft drivers and click on Finish.
- Restart your computer and let the Driver Verifier work in the background for around 24 hours or so.
Although you may experience slight performance drops while the tool works in the background, it’ll help you out. On the next day, you can open Driver Verifier again and select Delete existing settings. Then click on Finish and restart your computer to apply changes.
11. Reinstall Windows 10
Finally, if none of the methods worked for you, and still receiving the BSOD error then we’ll recommend you clean reinstall the Windows 10 system. Maybe some of the missing or corrupted device drivers and system files are triggering such an issue. You can follow this guide to install Windows 10.
That’s it, guys. We hope you’ve found this guide useful. If you’ve any queries or suggestions, let us know in the comment below.

Bless you! I have struggled with BSOD for over a week. Tried multiple fixes. Your website was a last resort. The System File checker fixed the problem. SFC wasn’t mentioned on other websites I visited, so I very much appreciate you including this fix in your list.