Windows 10 is the latest OS version from Microsoft for PCs and Laptops right now. It offers plenty of system improvements, security features, improved visualizations, better performance, and more. Though there are plenty of issues that users face, and Wi-Fi problem is one of them. If your PC or Laptop is Wi-Fi compatible, but the connection is not working or not stable, then this guide is for you. Here we’ve shared the possible solutions on How to Fix Windows 10 Wi-Fi Problems on any Laptop/PC.
There may be some of the possible reasons behind the Wi-Fi connectivity issue on your Windows 10 computer. Such as internet connectivity issue, internet speed problem, poor signal of Wi-Fi, IP address or DNS issue, network driver issue, network adapter problem, invalid configuration, wrong Wi-Fi password, security firewall issue, etc. So, without wasting time any more, let’s jump into it.
Also Read
How to Fix White Screen of Death in Windows 11/10
Fix: Micro SD Not Showing Up on Windows 10/11
Download Dolby Audio Driver for Windows 11/10/8.1
How To Fix External Hard Drive I/O Device Error in Windows 11/10
Fix: Win+Shift+S Not Working on Windows 11/10
Fix: Apple Magic Keyboard Not Showing Up in Windows 10 / 11

Page Contents
- How to Fix Windows 10 Wi-Fi Problems on any Laptop/PC
- 1. Wi-Fi Connected but the Internet isn’t working
- 2. Can’t Connect to Wi-Fi on Windows 10
- 3. View and Manage IP Configuration
- 4. Use Correct Wi-Fi Password to Fix Windows 10 Wi-Fi Problems
- 5. Update/Rollback Wi-Fi Driver on Windows 10
- 6. No Wi-Fi Network Found (Fix Windows 10 Wi-Fi Problems)
- 7. Forget Wi-Fi Network and Reconnect on Windows 10
- 8. Wi-Fi Connection Keeps Dropping on Windows 10
- 9. Manage Windows Firewall Settings
- 10. Check and Manage Antivirus Protection
How to Fix Windows 10 Wi-Fi Problems on any Laptop/PC
As we’ve already mentioned some of the possible and most common Wi-Fi related issues on your Windows 10 PC/Laptop, now, we will try to provide each and every solution that you can follow.
1. Wi-Fi Connected but the Internet isn’t working
Some times users can see that the Wi-Fi is connected to the PC/Laptop still, the Internet isn’t working at all. In this case, either the Windows 10 is facing any TCP/IP stack, IP address, or DNS client resolver cache issue. To fix it, follow the below steps.
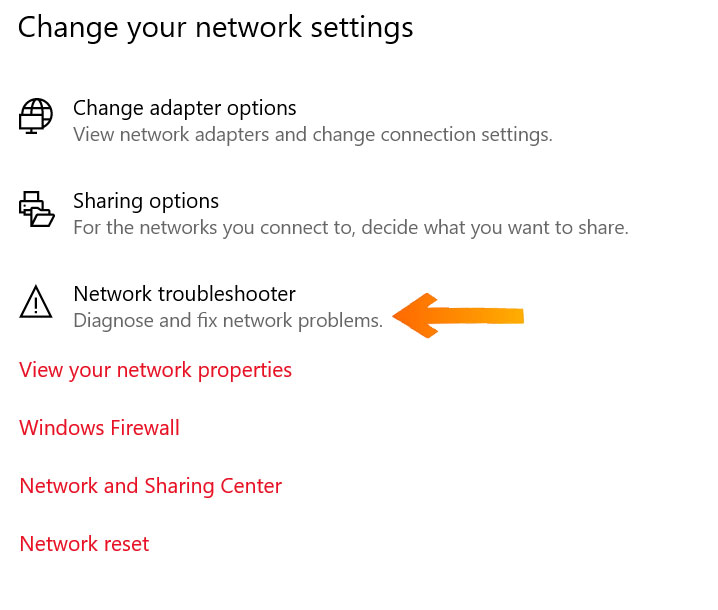
- Go to the Settings app > Network & Internet > run the Network troubleshooter.

- We assume that it will find out the possible error, and you can follow the on-screen instructions to fix it.
- Otherwise, you can open the Command Prompt on the PC and run below commands to reset network issues completely.
netsh winsock reset
ipconfig /release
netsh int ip reset
ipconfig /renew
ipconfig /flushdns
If the above steps don’t work for you, follow the next methods as well.
2. Can’t Connect to Wi-Fi on Windows 10
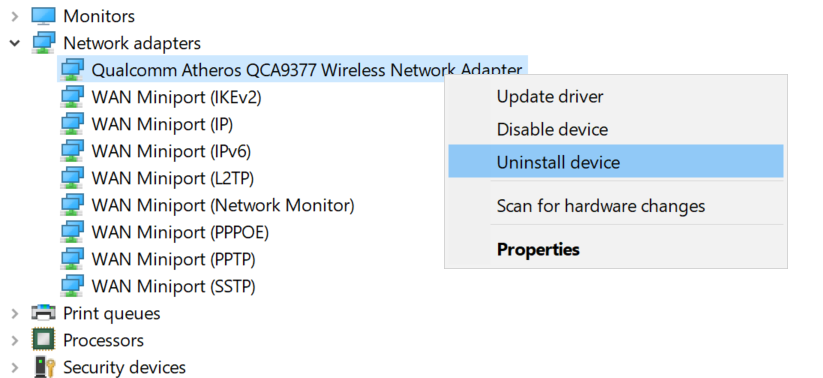
If you can see that Windows 10 can’t connect to this network, it should be better to uninstall the network adapter driver from the Device Manager and then reinstall it.
- Press the Windows Key + X button together > click on Device Manager.

- Head over to the device Network adapters > right-click on it.
- Click on the Uninstall device. If prompted, click on Delete the driver software for this device.
- Reboot the PC/Laptop, and the network adapter driver will be reinstalled again.
3. View and Manage IP Configuration
If you can see that the system is showing you an error like Wi-Fi Doesn’t Have a Valid IP Configuration, then you should use the reset network commands that we’ve mentioned in method 1.
If nothing works, either you can change the Wi-Fi network name and password, or you can set a Wi-Fi channel to Auto from the router’s login page.
4. Use Correct Wi-Fi Password to Fix Windows 10 Wi-Fi Problems
If you’ve forgotten the Wi-Fi password, then you will need the Wi-Fi password after resetting the network on Windows 10.
- Go to Control Panel > Network and Internet > Network Connections.
- Right-click on the Wi-Fi connection > select Status.
- Click on Wireless Properties.
- Then click on Security tab > enable the checkbox of Show Characters.
- You will get your Wi-Fi password. Note it down somewhere for future reference.
5. Update/Rollback Wi-Fi Driver on Windows 10
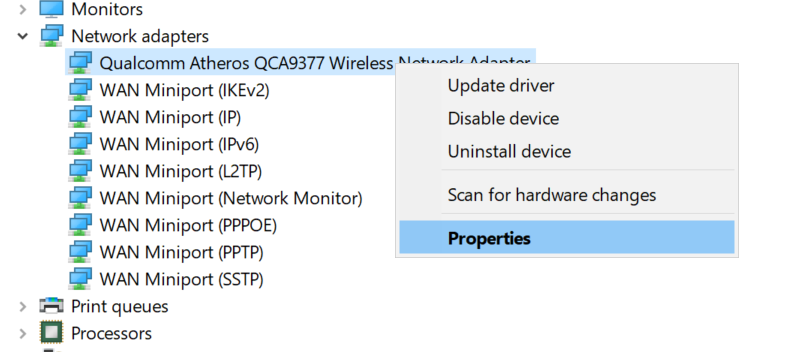
- Press the Windows Key + X button together > click on Device Manager.
- Click on Network Adapters arrow to open the drop-down menu > select the Wireless Network Adapter.

- Right-click on it > go to Properties > click on driver> select Update Driver or Roll Back Driver.
- Restart your PC.
- Now, Windows will automatically find the updated driver. If not, then you will need to go to the manufacturer’s website and download it on your PC & then install it.
6. No Wi-Fi Network Found (Fix Windows 10 Wi-Fi Problems)
If in case, Windows 10 isn’t able to find the Wi-Fi network, make sure that the Wi-Fi is turned on and working fine. Then check whether the Wi-Fi range or speed is good enough or not. Now, you may need to follow some of the steps below.
- Press Windows key + R buttons together to open Run mode.
- Now, type devmgmt.msc and press Enter.
- Click on the Network Adapters arrow icon to expand the drop-down list.
- In your mouse, Right-click on the name of your wireless network adapter.
- Click on Properties > select the Advanced tab.
- Select Country and Region.
- Next, select according to the location.
Note
7. Forget Wi-Fi Network and Reconnect on Windows 10
Due to system glitch or any other service-related issue, it’s better to clear the cache of the Network Connection by forgetting the connected network.
- Go to the Settings menu > Network and Internet.
- Select the Wi-Fi section from the list > click on Manage known networks under the connected Wi-Fi network.
- Click on the connected Wi-Fi network once and select Forget.
- Now, restart your computer and enter the Wi-Fi password again to connect it.
8. Wi-Fi Connection Keeps Dropping on Windows 10
If in case, the connected Wi-Fi network keeps frequently dropping on your Windows 10 computer, you can follow the steps below to fix this problem.
- Right-click on the Start menu > click on Device Manager.
- Click on the Network Adapters arrow to expand the list.
- In your mouse, Right-click on your wireless network adapter.
- Choose Properties > click on Power Management.
- Uncheck the checkbox of Allow the computer to turn off this device to save power.
- Now, restart your computer check whether the Wi-Fi still drops frequently or not.
9. Manage Windows Firewall Settings
Windows 10 comes with the Firewall settings that block the suspicious incoming or outgoing traffic to protect the system from any malware or spyware. However, some times it blocks the web access as well. Therefore, you will need to turn off the Windows Firewall settings.
- Click on the Start menu on your Windows 10 > type Command Prompt.
- You need to right-click on the Command Prompt and select Run as administrator.
- Now, type the following command and hit enter to apply it.
netsh advfirewall set allprofiles state off
- That’s it. Now, the Firewall security won’t block web access on your PC.
If you want to turn on the Firewall settings again, type the below command and press Enter.
netsh advfirewall set allprofiles state on
10. Check and Manage Antivirus Protection
After turning off the Windows Firewall, you should also check the Windows Antivirus software on your computer.
- Go to the Windows Security app > Virus & threat protection > Turn if off.
If any other antivirus software is installed on the PC, go to the app interface use filters to allow the network connection and web access.
We hope you’ve found this guide useful. If you’ve any queries, let us know in the comments below.
