With the recent launch of the Android 10, the developers have geared up to find ways via which they can mod or root the devices. Moreover, the Android 10 brings in some changes in the system settings through which, one can root the devices. However, lucky for us, the developers are always one step ahead and there are numerous ways which you can use to root your device based on Android 10. And in this post, we bring to you a guide on how to root any Pixel device running Android 10 Q [Pixel 2, Pixel3/3a XL]. Besides, with the help of these methods, you can gain root access on any of the Pixel devices including the recently launched Pixel 3a and 3a XL.
If you are new to rooting, then you must understand that in order to root a device, you must first unlock the bootloader of the device. Then you go ahead and install any custom recovery like TWRP via which you can root your device. However, if you are already way ahead and know the drill then you can jump straight right into the guide on how to root any Pixel device running Android 10 Q. However, it is highly recommended that you follow all the instructions very carefully as Google has tweaked some system settings for its Pixel devices for rooting. So, without any further ado, let us get straight into the article itself;
![]()
Page Contents
- How to root any Pixel device running Android 10 Q [Pixel 2, Pixel 3/3a XL]
- Step 1: Unlock the Bootloader
- Step 2: Download the Factory Images
- Step 3: Extract Boot Image
- Step 4: Install Canary Magisk Manager
- Step 5: Change the Update Channel
- Step 6: Patch the Boot Image
- Step 7: Install ADB and Fastboot
- Step 8: Move the Patched boot image
- Step 9: Boot into the Fastboot Mode
- Step 10: Open Command Window in the Platform Tools folder
- Step 11: Flash the Patched boot image
How to root any Pixel device running Android 10 Q [Pixel 2, Pixel 3/3a XL]
As already mentioned, Google has changed some system settings of the recently its Pixel range of devices (Pixel 3, 3XL, 3a and 3a XL). The change is done in the “Logical Partitions” with the Android 10 Q release. Moreover, these logical partitions allow the user to install GSI (Generic System Image) without the need for unlocking the bootloader of the Pixel devices. All thanks to Magisk creator and manager, John Wu, who figured this and has shared this knowledge to the world. John Wu successfully managed to get root access on the Pixel devices running on Android 10.
Below is the step by step guide on how you can gain root access on any Pixel device (Pixel 2, Pixel 3/3XL and 3a/3a XL) running on Android 10;
Step 1: Unlock the Bootloader
Warning
You can check out our complete guide on how to unlock the bootloader on the Pixel 2, 3/ 3 XL and 3a/3a XL, by clicking the button below;
Step 2: Download the Factory Images
Once you have followed the instructions and unlocked the bootloader of your respective device then, you need to download the factory images for your device based on Android 10. Moreover, you need to download the images compatible with the version of your device. Download the latest and compatible version of the Android 10 Q factory images for your corresponding Pixel device from the download section below;
Download
Note that these are very large files as it contains the Android 10 Q OS itself. It might take some time for them to download on your device. Moreover, for rooting the Pixel 3, you need only a single specific file from the package to complete the process.
Step 3: Extract Boot Image
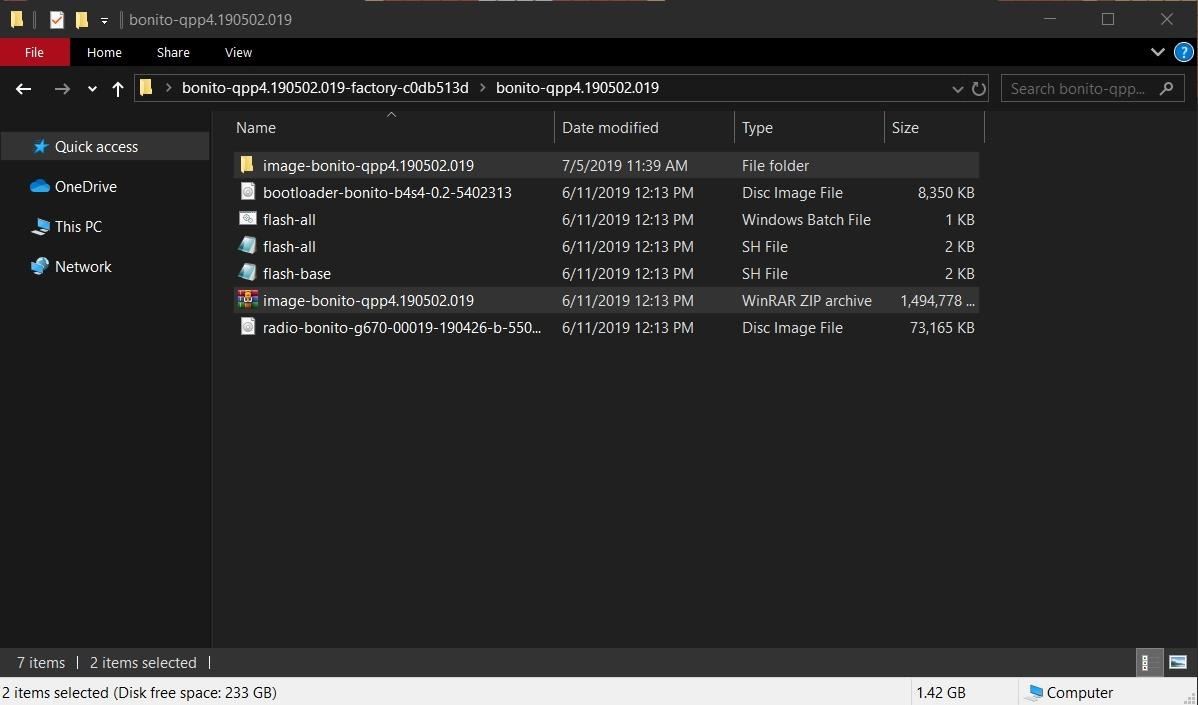
- Go to the downloaded folder and extract the contents of the factory images on your PC.

- Note that you will only be needing the file with the name “image“. Then you need to extract that file within the same folder to get its contents.
- You can ignore all other files except “boot.img“.
- Now connect your Pixel device to the PC via a USB cable.
- Then, transfer the boot.img file from the PC to the “Download” folder of your device.
Step 4: Install Canary Magisk Manager
You need to download the Canary Magisk Manager for the Pixel 3 XL rather than the standard Magisk Manager app due to the issues with the logical partitions as explained above. Besides, you can download the Canary Magisk Manager from the download section below;
Download
![]()
Once the app has downloaded, open and install the app on your device. Grant all the permissions it asks including Chrome as well.
Step 5: Change the Update Channel
Now to change the Update Channel, you must understand that there are two versions of the Canary builds, one is the regular one and the other is meant for the developers.
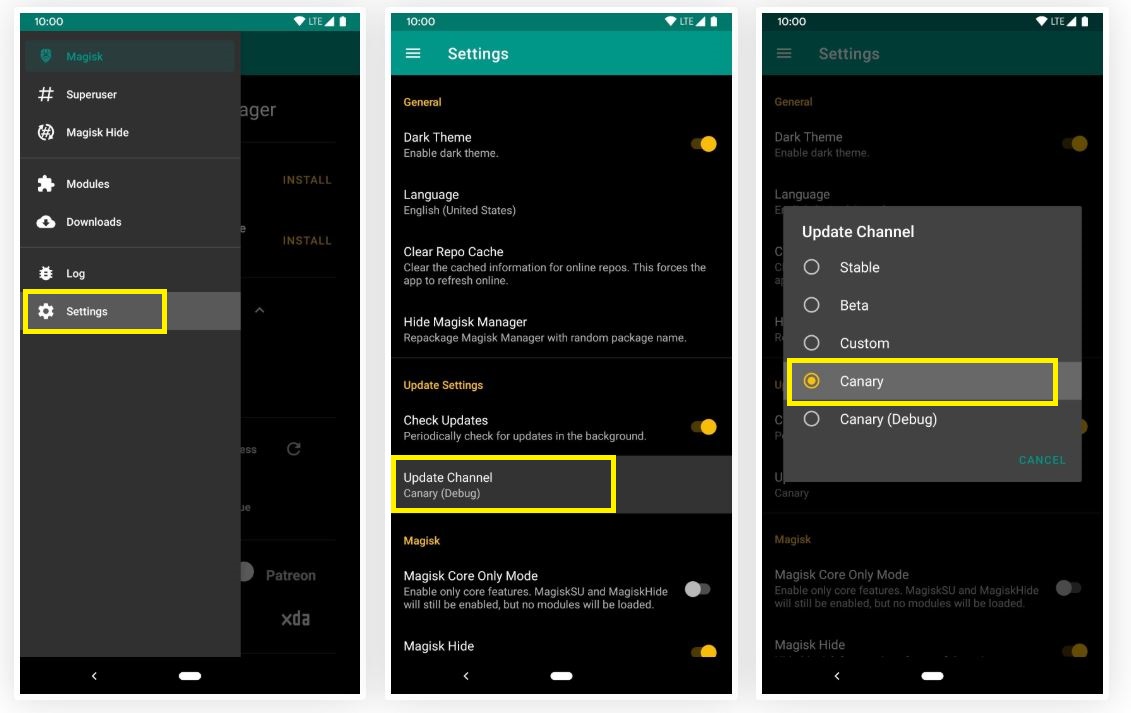
- Open Magisk Manager and tap on the Menu icon on the left.
- Then go to Settings>>Update Channel.
- There change it to Canary if it is already set to debug version.

Step 6: Patch the Boot Image
- Go to the main screen of the Magisk Manager.
- Tap on Install and hit the Install button to bring up new set of options.
- From the list, tap on the Select and Patch a file option.
- Grant all the necessary permissions by tapping Allow.

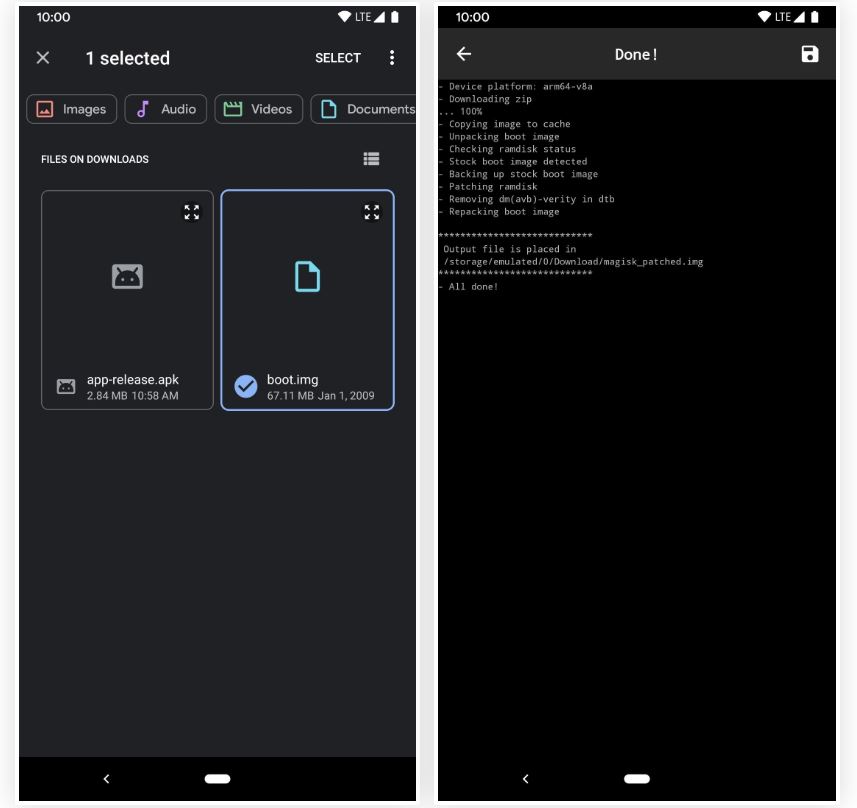
- Now under the File Manger, go to the Downloads folder where you have copied the boot.img file.
- Tap on the boot.img file and Magisk Manager will start patching that file.
- Once the process is complete, tap the back arrow to finish.

Step 7: Install ADB and Fastboot
This is a pretty common step for rooting any smartphone. Now that you have patched the boot.img file, you need to setup a quick command on your PC to transfer it over to your smartphones partition. Download the Google’s SDK Platform tools package to install ADB and Fastboot tools on your PC by clicking the buttons below;
Windows MacOSStep 8: Move the Patched boot image
Now, you need to move and transfer the patched boot image file from your Magisk Manager app on your smartphone to the platform-tools folder on your PC. The file will be located in the Downloads folder however, the name will be changed to magisk_patched.img
Step 9: Boot into the Fastboot Mode
- Long press the Power button to shut down your phone.
- Now hold down the Power + Volume Down button till the Fastboot menu appears.
- Quickly connect your device to the PC via a USB cable.
- Leave the phone in that state for the further process.
Step 10: Open Command Window in the Platform Tools folder
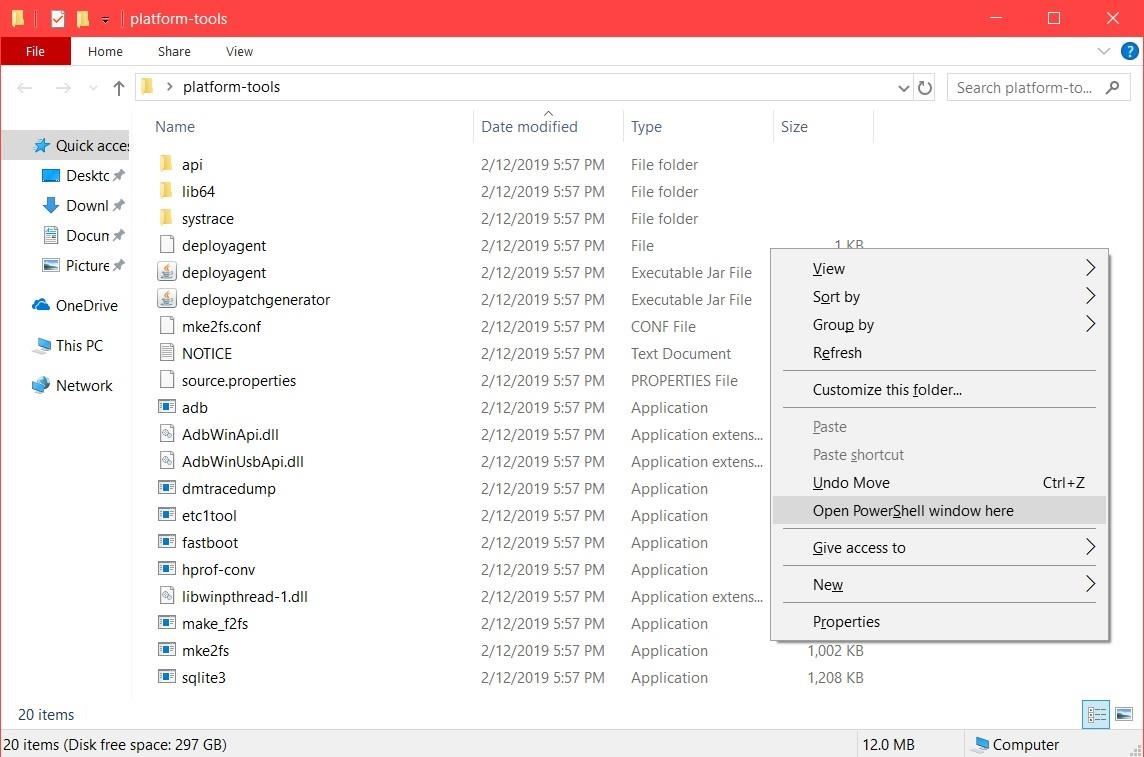
- Head over to the platform-tools folder.
- Open a command prompt by right-clicking + press Shift button together.

Step 11: Flash the Patched boot image
- Type the below command in the cmd prompt;
fastboot flash boot magisk_patched.img - Type in the next command;
fastboot reboot - The above command will automatically reboot your device.
- Once your device has rebooted you can verify the root status of your device by opening the Magisk Manager app.
- That’s it!
Source: Gadget Hacks
So, there you have it from my side in this post. Hope you guys liked this post and were able to root your Pixel device running Android 10 Q . Note that you should only follow this guide if you are on a Pixel device running Android 10 and not any other devices to avoid problems. Let us know in the comments if you successfully rooted the Pixel device on Android 10 using the above method or not. Until the next post…Cheers!

So I rooted my pixel 2 when it was on Android 9, after the OTA update to 10 I was no longer rooted. My bootloader is still unlocked, am I able to get root again without wiping my phone? If i just follow all these steps it should keep my phone intact correct?
I’m not able to paste the boot.img to the downloads folder. No option to paste.Running windows 1903 explorer.
Fixed!
This would be impossible to do with any Verizon Pixel device as the bootloaders are locked and not unlockable.. Not patched — it was never doable.
Hi, you can try use one click PC tool RootKHP Pro 3.2 for getting root on Android 10, i had experience with Samsung Galaxy S10, it’s comfortably, but not stable works with Android 10
Hello I want to root a google pixel 2 XL. I tried to follow your link to download the magisk file but its broken, Can you help me to download the magisk file for my cell phone?
Thanks in advance