Call of Duty: Modern Warfare II is a 2022 first-person shooter video game that’s a sequel to the 2019 edition of the Call of Duty series. As COD titles are so popular and come with multiplayer support, a wide range of maps, weapons, etc., they are prone to bugs or stability issues. Though known issues can be fixed quickly, some bugs appear frequently to the players that we can’t deny. Modern Warfare 2 GPU Driver Version Error is one of them.
If we take a quick look at this specific error, it occurs whenever there is an issue with your system’s installed graphics driver version. Windows device drivers automatically get updated with security patch releases and software updates. However, the device driver might sometimes not get updated and requires a manual update process. Now, if you’re also one of the victims to experience such an issue at your end, check out this guide to fix it.
Also Read

Page Contents
Fix: Modern Warfare 2 GPU Driver Version Error
With the “GPU driver version” error in Call of Duty Modern Warfare 2, it seems that affected players are unable to run the game. Luckily, a couple of potential workarounds mentioned below should come in handy for you. It’s highly recommended to follow all methods one by one until the problem has been fixed. So, without wasting any more time, let’s jump into it.
1. Restart the PC
You can simply restart your PC to refresh any temporary system glitches or cache data. A normal system reboot will eventually resolve several issues whatsoever.
2. Run the Launcher as an Administrator
Ensure to run the specific Steam or Battle.net launcher app as an administrator on the PC by following the steps below to ensure there is no issue with the program running.
- Go to the installed game client directory.
- Right-click on the launcher application file on your PC.
- Click on Properties > Click on the Compatibility tab.

- Click on the Run this program as an administrator checkbox to enable it.
- Once done, click on Apply and then OK to save changes.
- Finally, run the launcher, and play the game to check for the issue.
3. Update Modern Warfare II
It’s always recommended to check for the Call of Duty Modern Warfare II game update on your PC manually by following the steps below. An outdated game patch version might trigger several issues with the game launching or server connectivity in most cases.
Battle.net:
- Open the Battle.net launcher.
- Select Modern Warfare II on the Battle.net client.
- Click on the cog icon next to the game.
- Select Check for Updates.
- If an update is available, just download and install the update.
Steam:
- Open the Steam client > Go to Library.
- Right-click on Modern Warfare II > Select Properties.
- Then click on Updates > From Automatic Updates, make sure to select Only update this game when I launch it.
- Now, launch Modern Warfare II and wait for it to download whenever available.
- Go back to the Updates section and select High Priority – Always auto-update this game before others (if you want).
4. Scan and Repair the Game Files
Sometimes corrupted or missing game files on the PC might also trouble you a lot while launching the title. It’s always better to verify and repair the game files by following the steps below on your PC to avoid errors.
Battle.net:
- Open Battle.net > Click on Modern Warfare II.
- Select the Cog icon beside the Play button.
- Now, select Scan and Repair > Wait for the repair to complete.
Steam:
- Open Steam > Go to Library.
- Right-click on Modern Warfare II in your library.
- Go to Settings and select Properties.
- Click on Local Files and select Verify integrity of game files.
- Wait for the process to complete.
5. Update the Graphics Driver
An outdated or corrupted graphics card driver can trigger multiple issues with the games or system performance while running programs. It’s highly recommended to check the graphics driver update. To do so:
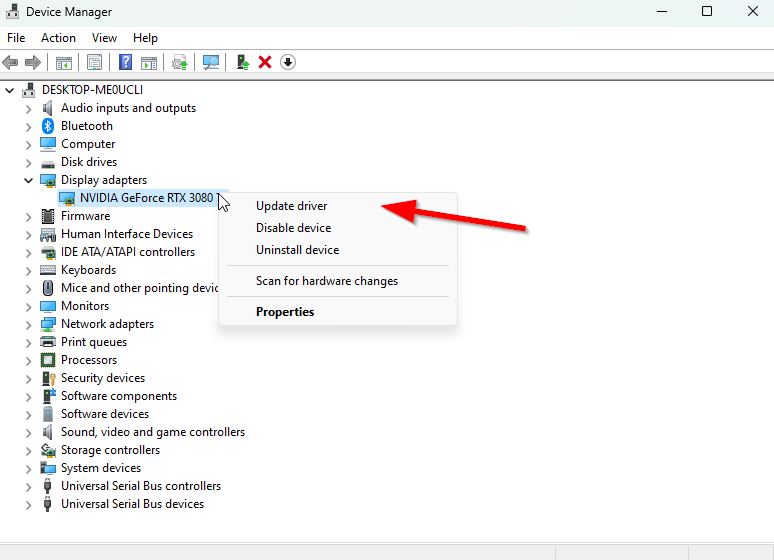
- Press the Win+X keys to open the Quick Link Menu.
- Click on Device Manager from the list > Double-click on Display adapters.
- Right-click on the dedicated graphics card that you’re currently using.

- Click on Update driver > Choose Search automatically for drivers.
- If there is the latest update available, it’ll automatically download & install the latest version.
- Once done, restart the computer to apply changes immediately.
Alternatively, you can manually download the latest version of the graphics driver and install it on the PC via the official website. Make sure to download the graphics driver file respective to your graphics card model and manufacturer.
6. Update Windows
An outdated Windows OS version or build number can eventually trigger system performance issues, game launching issues, etc. You can follow the steps below to install the update.
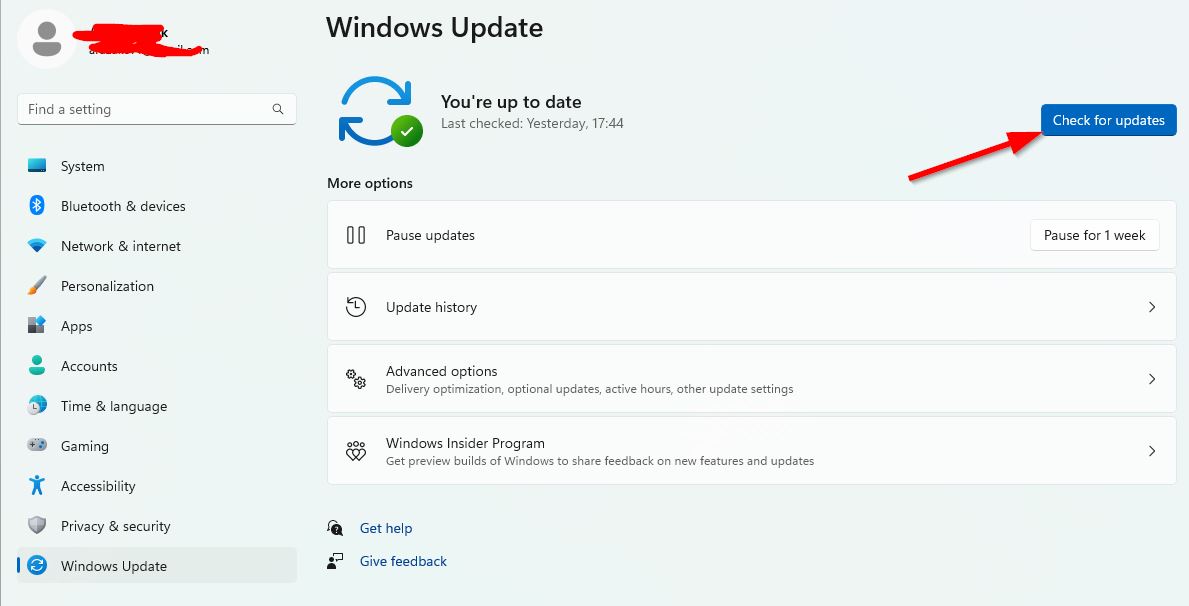
- Press the Win+I keys to open Windows Settings.
- Click on Update & Security.
- Select Check for updates under Windows Update.

- If there is a feature update available, select Download and Install.
- Wait until the software update is complete.
- Once done, restart your computer to install the software update.
7. Clear the GPU Cache
In case, the GPU version error still persists then you’ll need to clear the GPU cache from your computer by following the steps below.
- Go to File Explorer > Type %localappdata% in the address bar and hit Enter.
- It’ll open the Local AppData folder on the PC.
- Now, find the NVIDIA Folder > Open the DXCache folder then delete all the items from this folder.
- Go back and open the GLCache folder and delete all items inside it.
- Next, open the NV_Cache folder and delete all the files from this folder.
- Once done, restart your PC to apply changes.
- Finally, run the MWII game to check for the issue.
8. Disable In-Game Overlay
Whether you’re using the Nvidia graphics card or AMD graphics card, make sure to manually turn off the in-game overlay option from the driver application. This method will help in avoiding the game startup issues or errors up to some extent.
9. Run the Latest DirectX Installer
Another thing you’ll need to do is simply run the latest DirectX installer application on your PC and run the installer program to get the latest DirectX version. An outdated DirectX version will cause several issues with the program launching and conflicts with the system processes. To do so:
- Visit the official Microsoft website and download the latest DirectX installer version.
- Run the installer and install DirectX completely.
- Once done, reboot the PC to apply changes.
That’s it, guys. We assume this guide was helpful to you. For further queries, you can comment below.
