Recently, Call of Duty Modern Warfare II and Warzone Season 6 have been announced, which includes a fresh twist of the knife, impressive free content drops, and more. We can’t deny that Call of Duty titles are always huge and come with several bugs or glitches. Similarly, Modern Warfare II and Warzone II Season 6 players are having issues with the content update on all platforms. So, if you’re also facing the COD MW2 and Warzone 2 Won’t Update in Season 6 issue, then don’t worry.
As we have already mentioned, the Call of Duty Modern Warfare 2 Season 6 has just arrived with a lot of new content; it brings multiple glitches and errors to the players. It seems that not everyone can play Season 6 immediately due to some issues with the game update process. Whenever a new season arrives, updating content becomes one of the most common issues in the beginning. If you haven’t updated the new season yet, you’re lucky enough.
Page Contents
- How to Fix COD MW2 and Warzone 2 Won’t Update in Season 6
- 1. Restart the Game
- 2. Reboot the Gaming Device
- 3. Power Cycle the Console
- 4. Update COD MW2 and Warzone 2
- 5. Check the Internet Connection
- 6. Scan and Repair the Game Files
- 7. Clear the Game Cache Data
- 8. Change the DNS Settings
- 9. Update the Network Driver
- 10. Disable the Windows Firewall Protection
- 11. Check Out the Activision Online Services
- 12. Contact Activision Support
How to Fix COD MW2 and Warzone 2 Won’t Update in Season 6
Fortunately, there are a couple of possible workarounds mentioned below that should come in handy for you. Sometimes the game files get corrupted or missing, the internet connection gets unstable, an outdated game patch version, antivirus or firewall blocking, etc might trouble you in such cases. So, make sure to follow all methods one by one until the problem has been fixed. Now, without further ado, let’s jump into it.
1. Restart the Game
First, you’ll need to restart the COD game then wait for a couple of minutes and relaunch the game again to check for the issue.
2. Reboot the Gaming Device
It’s highly recommended to restart the gaming device whether you’re using a PC or console to play Warzone 2 or MWII Season 6 to refresh any kind of temporary system glitches. Some of the players did find this trick useful. Make sure to try it out.
3. Power Cycle the Console
If there is no issue with the Wi-Fi connectivity, that means your router is working well. In that scenario, there may be some issues with the temporary glitch on your gaming console. Make sure to perform a power cycle on your console too.
For Xbox:
- Press and hold the Xbox Power Button for around 10 seconds.
- Once the Xbox console is completely turned off, pull out the power cable.
- Wait for a moment, around 30 seconds and then plug the cable back in.
- Finally, restart the Xbox console to check for the issue.
For PlayStation:
- Press the Power Button on your PlayStation console until you hear two beep sounds.
- Then unplug the console power cord > Wait for 10 seconds or more.
- Next, plug the console power cord back in.
- Finally, restart the PlayStation console to check for the issue.
4. Update COD MW2 and Warzone 2
Another thing you should do is simply update the Call of Duty Modern Warfare II or Warzone II to the latest version to ensure there is no issue with the outdated game patch version.
Xbox:
- Go to Warzone 2 or MWII on the Xbox dashboard.
- Hit the Start button and select Manage Game and Add-ons.
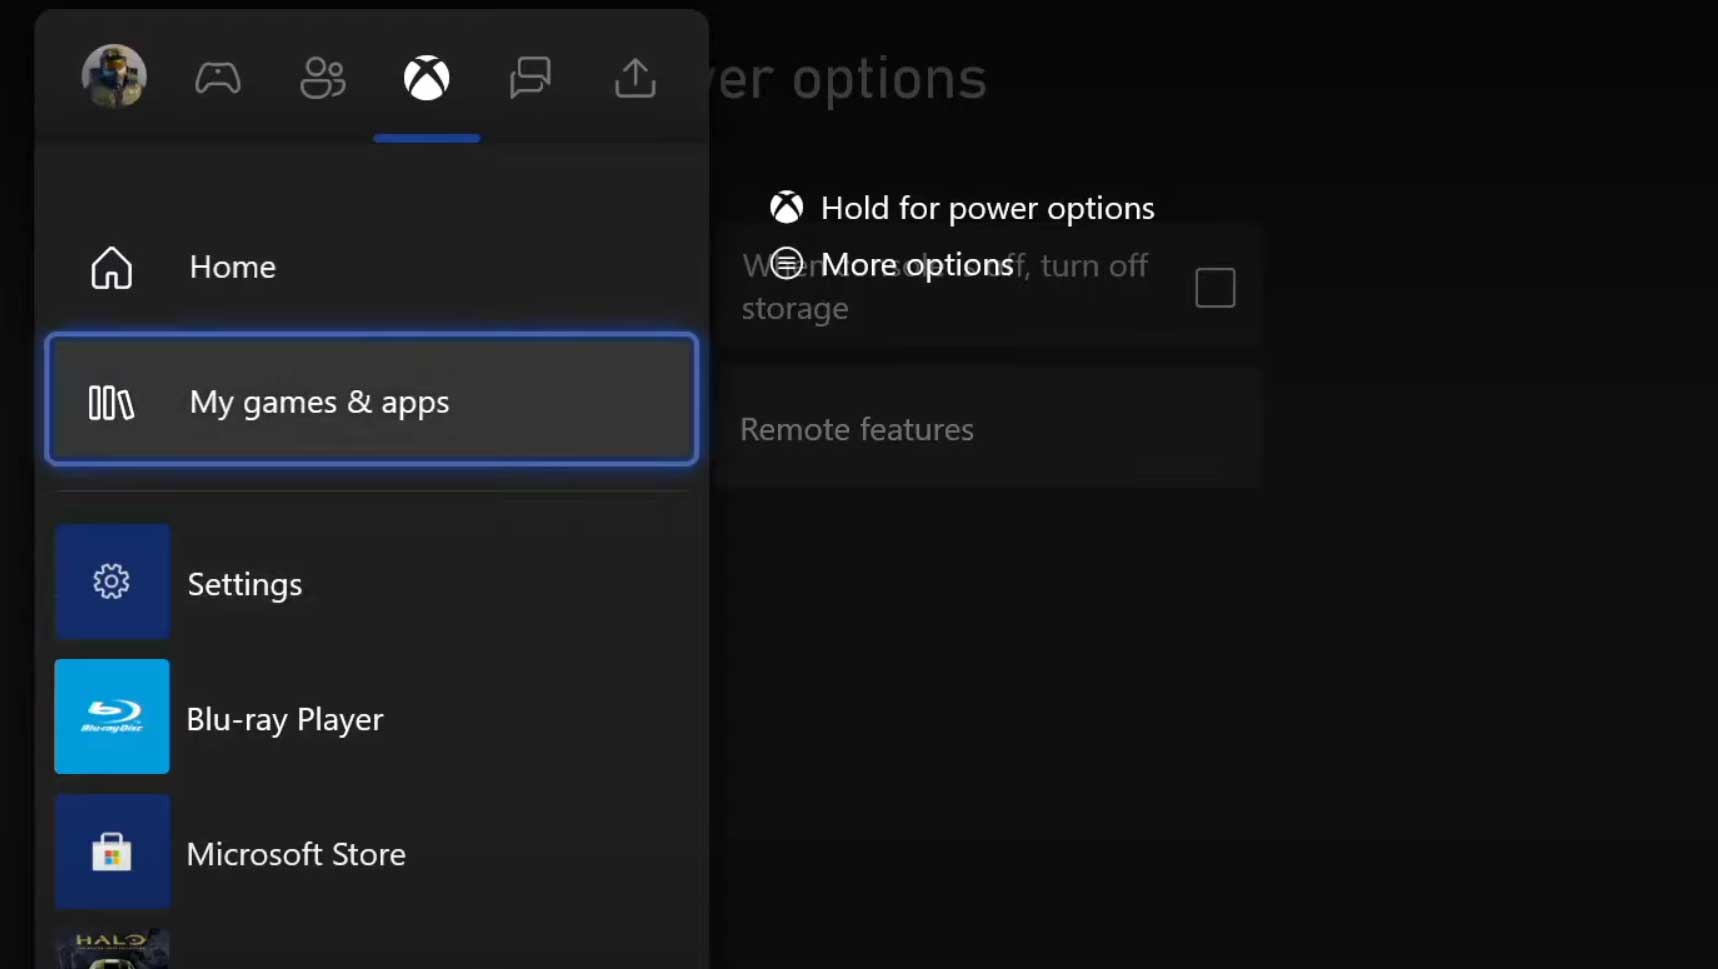
- Now, you’ll check if there is an update available or not.
- If available, select Update All.
- Once done, re-launch the game.
PlayStation:
- Select Warzone 2 or MWII on your PlayStation home screen.
- Next, hit the Start button and select Check for Updates.
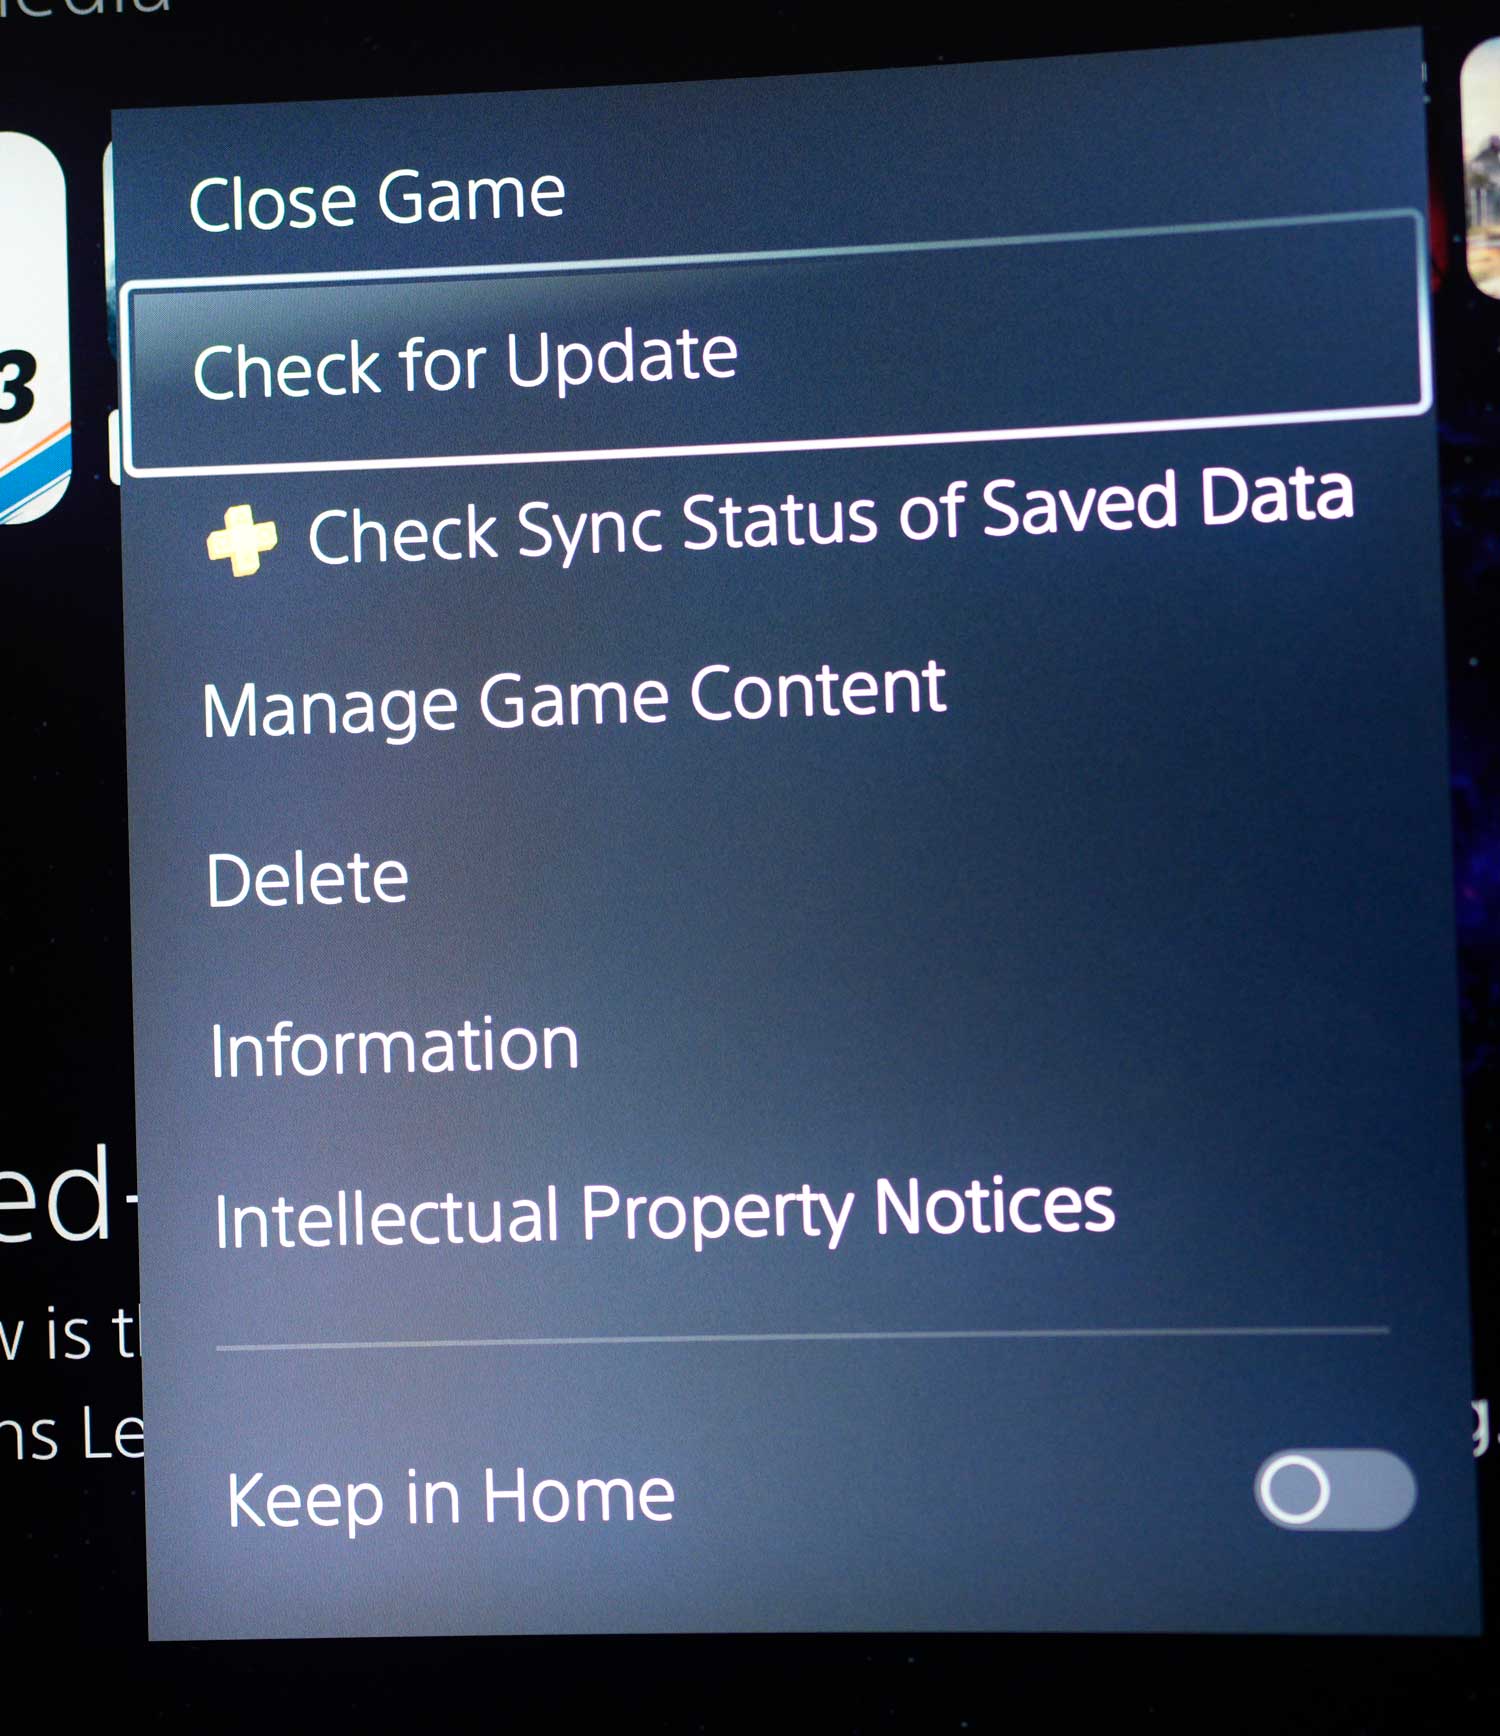
- If an update is available, select OK.
For Battle.net:
- Launch the Battle.net app on the PC.
- Log in with your Battle.net account > Select Call of Duty: MWII or Warzone II.
- Make sure to follow the on-screen steps to install or update the game (if available).
For Steam:
- Open the Steam client > Go to Library.
- Right-click on Warzone 2 or MWII > Select Properties.
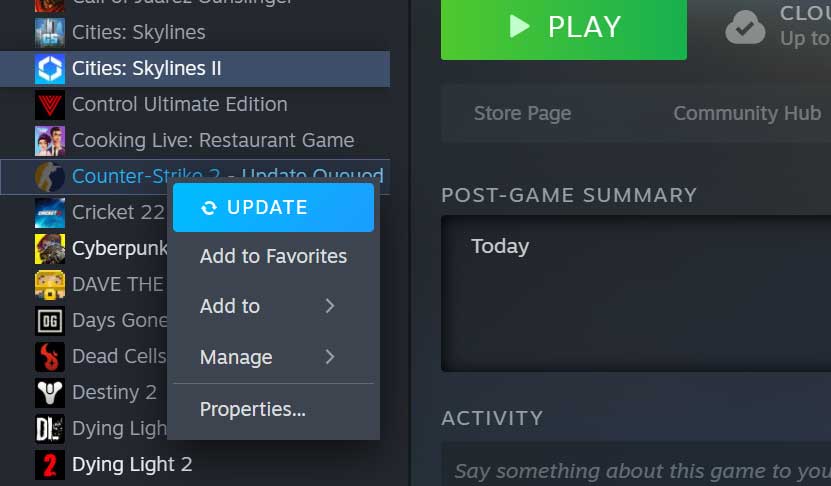
- Then click on Updates > From Automatic Updates, make sure to select Only update this game when I launch it.
- Now, launch Warzone 2 or MWII and wait for it to download whenever available.
- Go back to the Updates section > Select High Priority – Always auto-update this game before others (if you want).
5. Check the Internet Connection
It’s also worth mentioning to check your internet connection to see whether it’s working fine or not. Sometimes a poor or unstable internet network can trigger multiple issues with the server connectivity or downloading additional resources. Sometimes, you should also try switching your wireless connectivity to wired (ethernet) or vice versa. That might go to help you out.
6. Scan and Repair the Game Files
It’s also recommended to repair game files on your PC by using battle.net or Steam client. It can fix corrupted or missing game files (if any). To do that:
For Battle.net:
- Launch the Battle.net desktop app.
- Locate the COD MWII or Warzone II game from the library.
- Select Options > Click on Scan and Repair.
- Wait for the repair process to be done.
- Finally, restart the game to check for the issue again.
For Steam:
- Open Steam > Go to Library.
- Right-click on Warzone 2 or MWII in your library.
- Go to Settings > Select Properties.
- Click on Local Files > Select Verify integrity of game files.
- Wait for the process to complete.
7. Clear the Game Cache Data
The chances are high that even after following all the above methods, you’re going through some issues on the console. It’s better to clear the game cache data on your console to avoid any kind of game launching or server connectivity errors whatsoever.
For Xbox:
- First, quit the Call of Duty game > Select My Games & Apps.
- Select See All > Make sure to highlight the COD MWII or Warzone 2 game.
- Select Manage game and add-ons > Go down to Saved data.
- Choose the Delete All button > Wait for it to complete.
- Finally, relaunch the COD game to check for the issue.
For PlayStation:
- Go to Settings > Select Application Saved Data Management.
- Choose System Storage or Online Storage or USB Storage.
- Select Delete > Select the COD MWII or Warzone 2 game.
- Checkmark the files that you want to delete or just Select All.
- Select Delete > Select OK to confirm the task.
- Once done, reboot your console to check for the issue again.
8. Change the DNS Settings
You can use a Google DNS address (public DNS) to ensure there is no server connectivity issue with the problematic game. Sometimes issues with your blocked DNS address that have been provided by the ISP may have some issues. To do this, you can follow the steps below.
For PC:
- Press the Win+R keys to open the Run dialogue box.
- Type ncpa.cpl and click on OK to open the Network Connections page.
- Now, right-click on your active network adapter > Click on Properties.
- Choose Internet Protocol Version 4 (TCP/IPv4) > Select Properties.
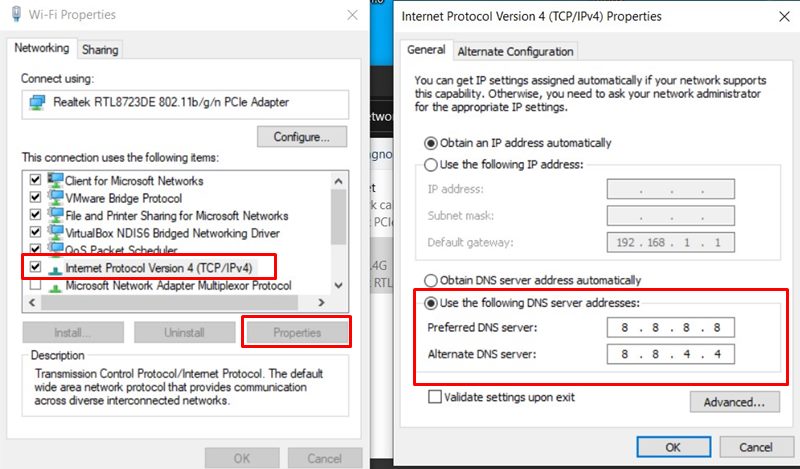
- Click to select Use the following DNS server addresses.
- Now, enter 8.8.8.8 for the Preferred DNS server and 8.8.4.4 for the Alternate DNS server.
- Once done, click on OK to save changes.
- Make sure to restart your PC to apply changes.
For Xbox Consoles:
- Press the Xbox button on your controller to open the Guide menu.
- Go to the System tab > Select Settings.
- Choose Network > Select Network Settings.
- Select Advanced Settings.
- Select DNS Settings > Select Manual.
- Enter 8.8.8.8 for the Primary DNS Address and 8.8.4.4 for the Secondary DNS Address.
- Once done, reboot the console to change the effects.
For PlayStation Consoles:
- Go to the PlayStation Settings menu > Select Network.
- Select Set Up Internet Connection > Select Wi-Fi or LAN (whatever you use).
- Choose Custom > Select IP Address Settings to Automatic.
- Set DHCP Host Name to Do Not Specify > Select DNS Settings to Manual.
- Enter 8.8.8.8 for Primary DNS and 8.8.4.4 for Secondary DNS.
- Now, select Next > Set MTU Settings to Automatic.
- Set Proxy Server to Do Not Use.
- Once done, reboot the console to apply changes.
9. Update the Network Driver
Some of the affected players have also mentioned that an outdated or missing networking driver on their Windows system was troubling them a lot. So, if you’re not sure enough whether your networking driver is updated or not, try following the steps below:
- Press the Win+X keys to open the Quick Link Menu.
- Now, click on Device Manager > Double-click on Network adapters.
- Right-click on the networking device and select Update driver.
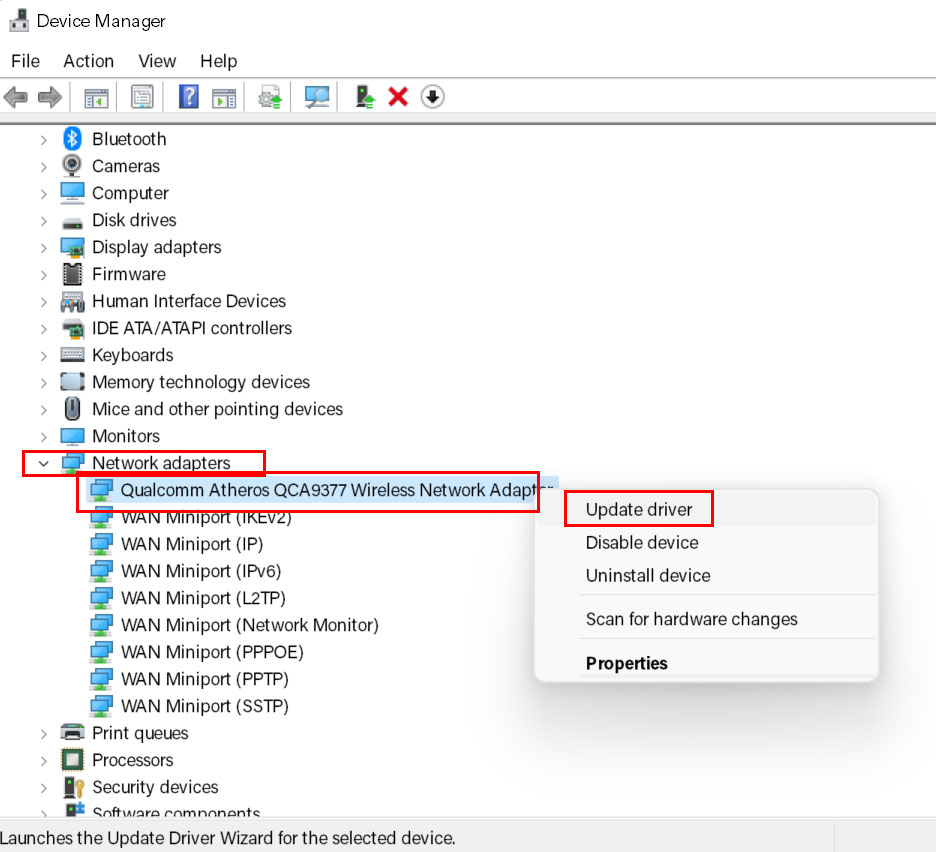
- Click on Search automatically for drivers to check for the update.
- If there is an update available, it’ll automatically download & install the update properly.
- Let the process be completed and then reboot your computer to apply changes.
10. Disable the Windows Firewall Protection
The chances are high enough that maybe your default Windows Defender Firewall protection or any third-party antivirus program is preventing the ongoing connections or game files to run properly. So, make sure to temporarily disable or turn off the real-time protection and firewall protection. Then you should try running the game to check if the specific error appears or not. To do this:
- Click on the Start Menu > Type firewall.
- Select Windows Defender Firewall from the search result.
- Now, click on Turn Windows Defender Firewall on or off from the left pane.
- Select the Turn off Windows Defender Firewall (not recommended) option for both the Private & Public Network Settings.
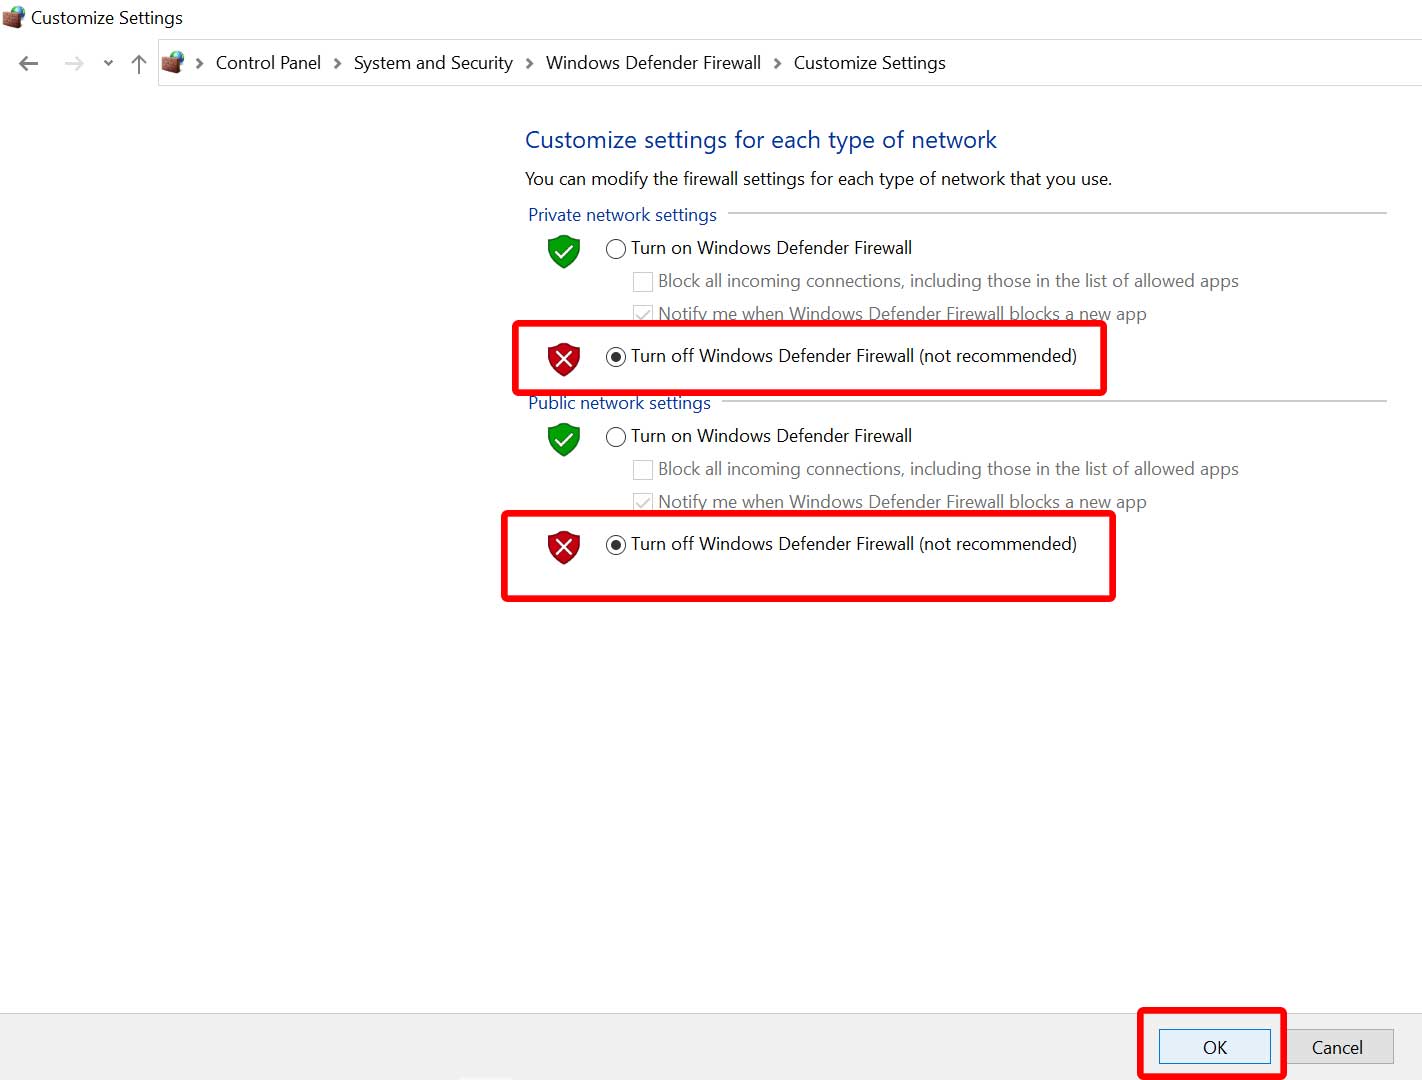
- Once selected, click on OK to save changes.
- Finally, restart your computer.
11. Check Out the Activision Online Services
You should check out the Activision Online Services status from this link to ensure no server downtime or service outage is happening at that moment. If in case, there is an issue with the server operations, then you’ll need to wait for some time until the problem has been resolved. Currently, no server issue is happening at the time of writing this article.
12. Contact Activision Support
If none of the methods worked for you, then make sure to contact Activision Support for additional help. You should also create a support ticket for the same to get a better resolution asap. The chances are high that developers will try investigating this issue and fixing it. You might have to wait further to get it resolved.
That’s it, guys. We assume this guide was helpful to you. For further queries, you can comment below.
Also Read
