Oculus Quest 2 is one of the most advanced all-in-one VR systems to date by Meta Quest that works really well in terms of playing VR games and adapts player movements too. Whereas last year, Meta Quest has released Oculus Air Link which is a wireless way to play VR PC games on Oculus Quest 2 seamlessly with 120Hz support and more. But some users are still facing the Oculus Air Link Not Working or Pairing issue to Windows 7, 10, or 11 PCs.
Now, if you’re also one of the victims experiencing such an issue then don’t worry. Here we’ve shared a couple of possible workarounds for you that should come in handy. Oculus Air Link comes in handy whenever PC gamers play VR titles wirelessly. But it’s really frustrating for the affected Oculus Quest 2 and Oculus Air Link users to get connectivity as well as not working regarding issues quite often. It becomes a common issue among Quest Air Link users.
Also Read

Fix: Oculus Air Link Not Working or Pairing to Windows 7, 10, or 11
So, if you’re getting disappointed most of the time while trying to connect the Oculus Quest 2 VR headset to Windows PC using the Oculus Air Link feature then you’re on the right page. Some of the reports are also claiming that even though the Oculus Quest 2 headset gets connected to the PC via Oculus Air Link quite easily, somehow the actions or in-game inputs aren’t working precisely. It obviously prevents the VR players to play their favorite titles.
Now, talking about the possible reasons behind the Oculus Air Link not working or the not pairing issue to the computer, it seems that an outdated USB driver and the outdated graphics driver are conflicting. Whereas multiple devices are connected to the same Wi-Fi network at the same time which can literally trouble pairing with the Oculus Air Link. Additionally, background running third-party apps or incorrect Air Link Settings can trouble you a lot.
1. Reboot Oculus Quest 2
If you’re having issues with your Oculus Quest 2 (Meta Quest 2) VR headset regarding the connectivity or not working to the PC then make sure to restart your headset by following the steps below.
- Make sure that the Oculus Quest 2 headset is turned on.
- Press and hold the Power button on the right side of the headset until you see the Power Off screen.
- Now, select Restart > Your headset will turn off and then turn back on.
Unable to Restart Oculus Quest 2:
- Press and hold the Power button for at least 10 seconds until the headset is turned off.
- Wait for around 30 seconds > Press and hold the Power button until your headset turns back on.
2. Force Close and Relaunch Oculus Software
As a second workaround, you should try force closing the Oculus software on the PC via Task Manager by following the steps below:
- Press the Ctrl+Shift+Esc keys to open Task Manager.
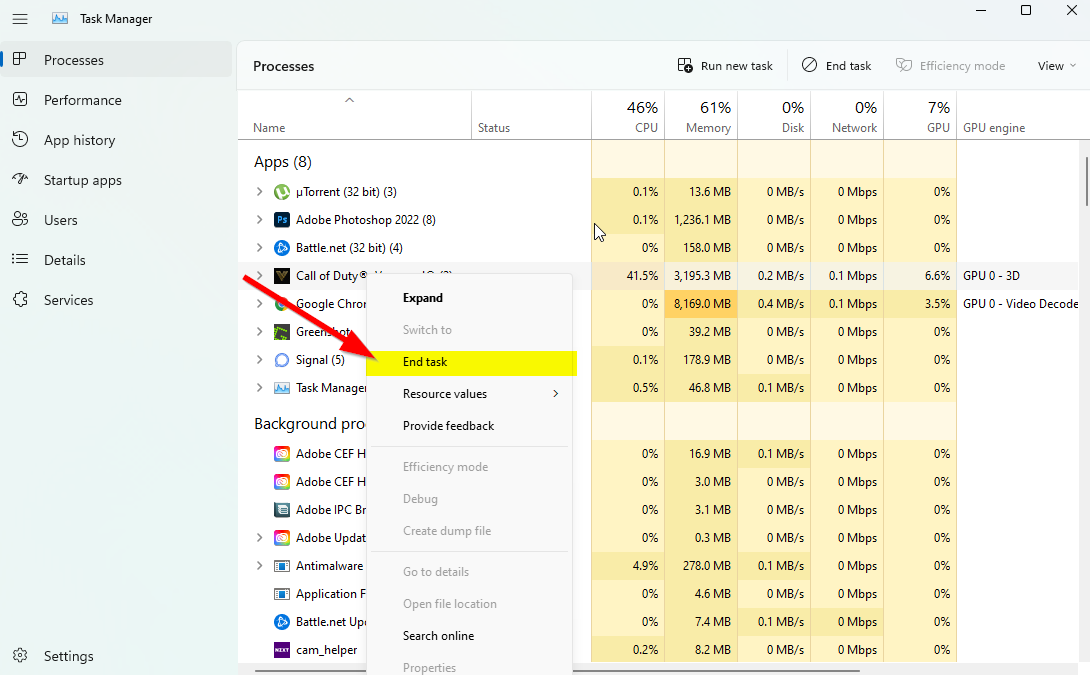
- Now, click on the Processes tab > Check if the Oculus tasks are running or not. [For example; OVR Redir, OVR Service Launcher, OVRServer_x64.exe, etc]
- If Oculus software-related tasks are already running then right-click on each task and select End Task.
- Make sure to close all the Oculus-related tasks one by one.
- Reboot the PC to apply changes > Relaunch the Oculus software on the PC.
- Finally, try connecting the Oculus Air Link again.
3. Modify the Router’s Wi-Fi Channel
You can also try modifying the router’s Wi-Fi channel to avoid the Oculus Air Link connectivity issue on the PC. Oculus Air Link may encounter issues due to so many devices being connected to the same Wi-Fi network under the same channel. It’s better to use a dual-band Wi-Fi router and try switching to a different channel.
- Try using a dual-band Wi-Fi router.
- Set up Oculus Quest 2 headset under the 5GHz Wi-Fi band and connect other devices to the 2.4GHz Wi-Fi band.
- Make sure to use a wired (ethernet) connection on the PC with your router to get more stable and faster connectivity.
- Do not keep your Wi-Fi router and the headset far away to reduce the signal strength-related issues whatsoever.
4. Update Networking and Bluetooth Drivers
It’s also worth mentioning to check for the device driver updates on your Windows PC and especially the networking driver and Bluetooth driver because outdated or faulty drivers can eventually trouble a lot in terms of the Oculus Air Link connectivity to the PC. To do so:
- Press the Win+X keys to open the Quick Access Menu.
- Click on Device Manager from the list.
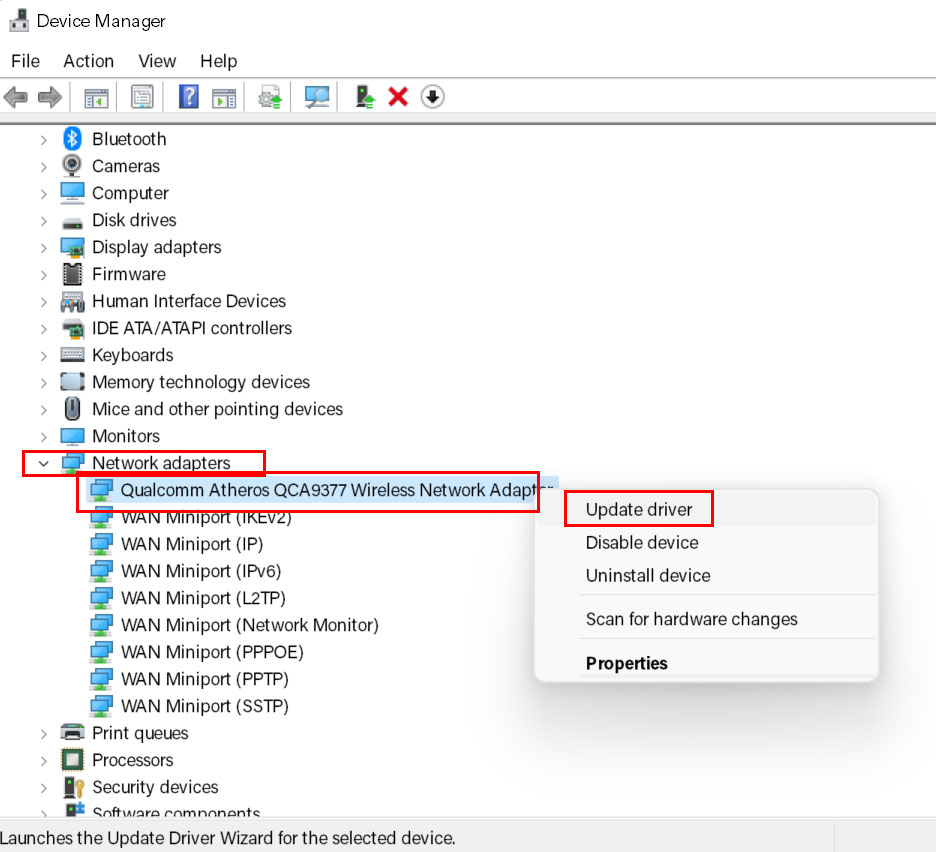
- Double-click on Network adapters to expand it.

- Right-click on the network adapter and click on Update driver.
- Click on Search automatically for drivers.
- The system will automatically check for the available update.
- Next, it’ll download and install the latest driver version.
- Wait for the same to complete and then restart the PC to apply changes.
Make sure to check for the Bluetooth driver update from Device Manager and install it (if available).
5. Update Windows
Make sure to check for the available Windows system updates on the PC by following the steps below manually. Sometimes outdated system build can trouble you a lot in terms of performance, device connectivity, in-game performance, and more. To do so:
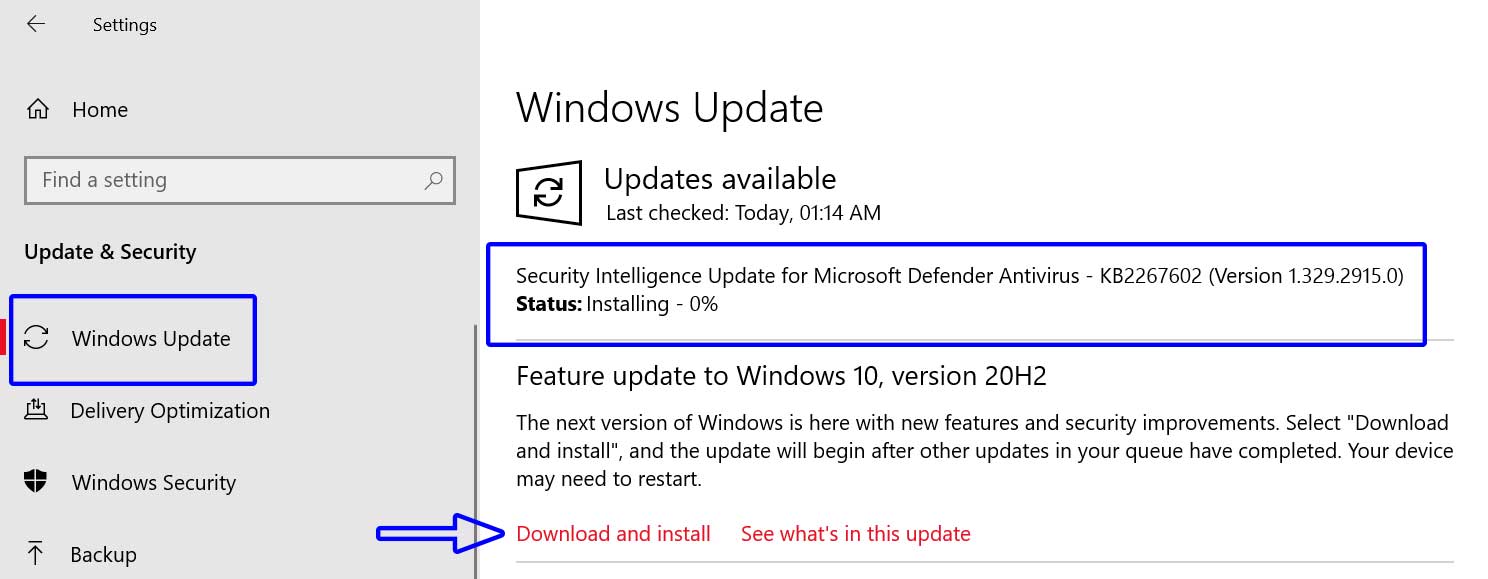
- Press the Win + I keys to open Windows Settings.
- Click on Update & Security > Click on Check for Updates from Windows Update.

- If there is an update available, select Download and Install.
- Wait for it to complete and then reboot the PC to apply changes.
6. Close Unnecessary Background Tasks
It’s also worth recommending closing all third-party unnecessary background tasks on your system via Task Manager. You can follow the steps below to do so. This method will help your system to boost performance by increasing the available CPU or RAM space. Mostly cloud-based applications like Adobe Updater, Microsoft Onedrive, third-party antivirus tasks, graphics software, keyboard or mouse software, RGB-related software, Steam VR, etc run always.
- Press the Ctrl + Shift + Esc keys to open Task Manager.

- Click on Processes > Ensure to cross-check which tasks are consuming higher resources.
- Next, click on the particular process > Select End Task to close it.
- Make sure to do the same steps for each third-party app process that is consuming higher resources.
- Once done, close Task Manager, and restart your PC.
7. Run the Oculus Debug Tool
You should run the Oculus Debug Tool (ODT) that can be found inside the installed Oculus directory on your PC. This is a utility tool that allows users to check and debug the settings. To do this:
- Press the Win + E keys to open File Explorer.
- Now, copy and paste the following path into the address bar, and then hit Enter.
C:\Program Files\Oculus\Support\oculus-diagnostics
- Double-click on the OculusDebug Tool.
- Under the Oculus Air Link category, make sure to check if the Encode Dynamic Bitrate Encode is in ‘Default’ status or not.
- If not, click on it, and select Default.
- Check if the Encode Bitrate (Mbps) option is set to ‘0’ or not. [If not, change it to 0]
- Make sure to save changes and reboot the PC to apply effects.
8. Perform a Factory Reset Oculus Quest 2
If none of the methods worked for you then make sure to perform a factory reset of your Oculus Quest 2 headset manually by following the steps below to forcefully refresh the temporary system glitch on the VR headset. Sometimes the cache data issue or system glitch can trouble you a lot with the connectivity or not working problem to the PC.
Please Note: By resetting the headset, all the VR game data will be wiped out from the headset completely. But it should be worth trying.
- Press and hold the Power + Volume buttons simultaneously for a few seconds until it turns ON.
- Now, highlight Factory Reset > Press the Power button to select it.
- Make sure to select Yes, erase, and factory reset.
- Then press the Power button again to start the reset process.
- It may take some time to complete. So, have some patience.
- Once done, the Quest 2 headset will reboot automatically.
- Finally, go through the initial setup process, and you’re good to go.
That’s it, guys. We assume this guide was helpful to you. For further queries, you can comment below.
