2018’s Red Dead Redemption 2 is another best-in-class and popular action-adventure multiplayer video game by Rockstar Games. It’s the 3rd entry in the Red Dead lineup, a prequel to the 2010 Red Dead Redemption (part 1). This open-world, story-rich Western adventure kind of title has been so much loved by players and critics. Meanwhile, plenty of players are getting frustrated by the Red Dead Redemption 2 Long Loading Time issue.
Now, if you’re also one of the victims to encounter such an issue on your Windows PC then don’t worry. Here, we’ve provided you with some possible workarounds that should be useful. Though installing the game on a hard drive (HDD) may take some time to load into the menu or session, multiple reports claim that the loading time gets slow enough, which takes around 5-8 minutes, which is quite long anyway.
Also Read

Page Contents
How to Fix Red Dead Redemption 2 Long Loading Time
Whereas some of the unfortunate Red Dead Redemption 2 players are reporting that they’re facing the slow loading issue even on an SSD (Solid State Drive) which is considerably faster than compared HDD. If you’re not aware of an SSD, it’s a solid-state storage device that uses integrated circuit assemblies (flash memory) to store persistent data. So, the stored data on the SSD or the installed Windows system loads way faster and becomes responsive than HDD.
Luckily, there are some troubleshooting methods mentioned below that can help you to resolve such an issue. So, without wasting any more time, let’s jump into it.
1. Try Disconnecting and Reconnecting Internet
Make sure to disconnect and reconnect the internet on your PC to ensure there is no issue with the network at all. If your internet connection is poor or unstable then try using another network to check for the issue.
2. End High Memory Using Processes
It’s highly recommended to end the unnecessary background tasks which are consuming higher CPU or RAM resources. You can follow the steps below to close processes on the system.
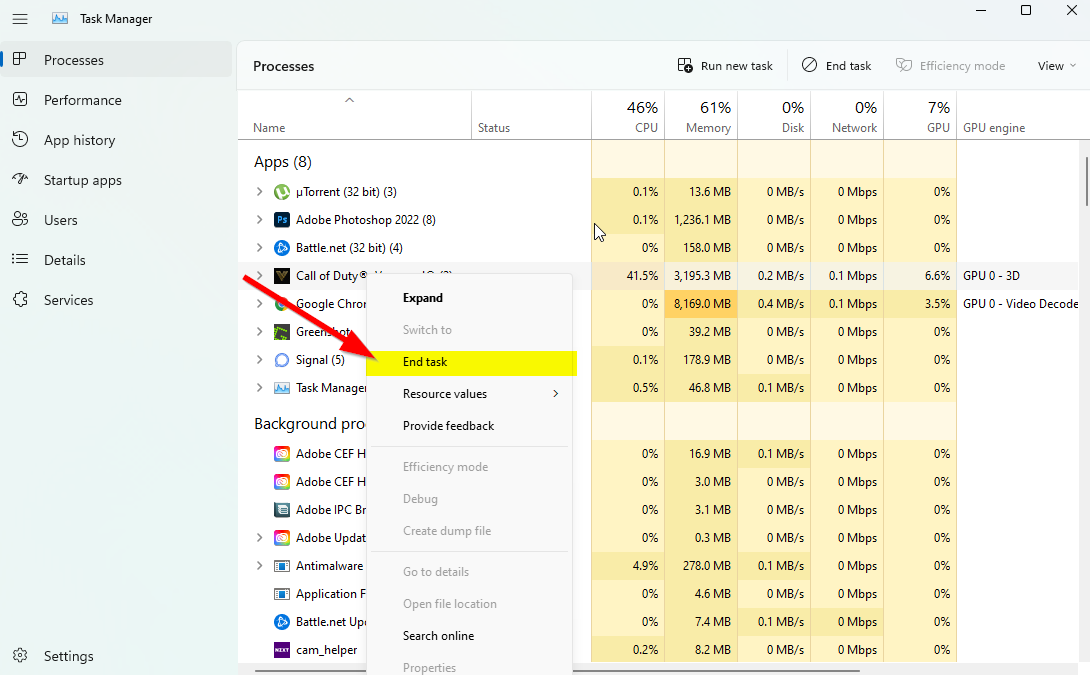
- Press the Ctrl + Shift + Esc keys to open Task Manager.

- Click on Processes and check which task is consuming higher resources.
- Click on the particular process and select End Task to close it forcefully.
- Make sure to do the same steps for each third-party app process that consumes more resources.
- Once done, close Task Manager and restart your PC.
3. Remove Junk or Temporary Files
It’s also recommended to manually remove the junk or temporary files from the computer by following the steps below. A huge amount of the temporary data on the system may cause several issues with the game launching or connecting to the server online in most cases. To do so:
- Press the Windows + R keys to open up the Run dialog box.
- Type %temp% in the field and hit Enter to open the Temporary folder.
- Press the Ctrl+A keys to select all temp files.
- Press the Shift+Delete keys and click Yes to permanently remove all temp files.
- If some temp files can’t get deleted, make sure to skip those files.
Just perform delete all for prefetch and recent, too, in the same way.
4. Update Red Dead Redemption 2
Another thing you can do is check the RDR2 update on the PC by following the steps below because an outdated game version can cause multiple issues with the game launching or loading screen.
For Steam:
- Launch Steam > Click on LIBRARY.
- Right-click on Red Dead Redemption 2 from the left pane.
- Select Properties > Click on UPDATES from the left pane.
- Click on Always keep this game updated under the AUTOMATIC UPDATES section.
- Next, go back to LIBRARY > Click on Red Dead Redemption 2.
- If you can see the Update button, click on it to install the latest update.
- Wait for the process to be completed > Once done, restart the PC.
For Epic Games Launcher:
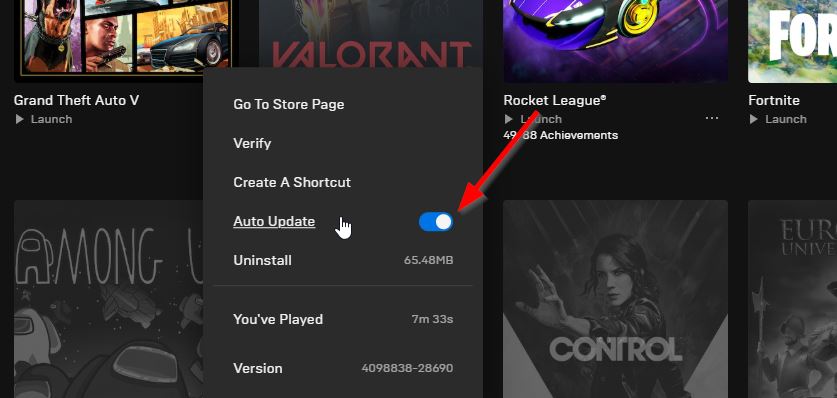
- Open Epic Games Launcher > Go to Library.
- Click on the three dots icon next to Red Dead Redemption 2.

- Click on Auto Update to turn on the toggle.
- If an update is available, the launcher will automatically install the update for you.
- Finally, restart the Epic Games Launcher to apply the changes.
For Rockstar Games Launcher:
- Open the Rockstar Games Launcher > Click on Red Dead Redemption 2 from the left pane.
- Go to the Settings menu > Click on Red Dead Redemption 2 under My installed games.
- Now, click on Enable automatic updates to enable it.
5. Verify and Repair Game Files
It’s also worth mentioning to verify and repair the installed game files on the PC so that the missing or corrupted game files can be fixed easily via the respective game launcher. To do so:
For Steam:
- Open Steam > Go to LIBRARY.
- Right-click on Red Dead Redemption 2 from the left pane.
- Select Properties > Go to LOCAL FILES.

- Click on Verify integrity of game files > Wait for the process to be completed.
- Once done, make sure to reboot the PC to apply changes.
For Epic Games Launcher:
If you’re using the Epic Games Launcher then you can follow the steps below.
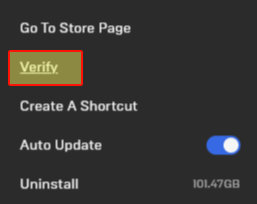
- Open Epic Games Launcher > Go to Library.

- Click on the three-dots icon next to Red Dead Redemption 2.
- Select Verify and wait for the process to be completed.
- Once done, make sure to reboot the PC to apply changes.
For Rockstar Games Launcher:
- Open Rockstar Games Launcher on your PC.
- Sign in to the account and go to Settings.
- Select Red Dead Redemption 2 under My installed games.
- Click on Verify Integrity under Verify game file integrity.
- Now, wait for the process to be completed, and reboot the PC to apply changes.
- Finally, launch the client, and run the game to check for the issue.
6. Run Disk Cleanup
As the name suggests, disk cleanup is a built-in feature on the Windows system to automatically defragment and clean disk storage whatever isn’t necessary. It’ll also allow you to choose to delete temporary files and other unnecessary data from the storage to increase the free storage space whatsoever. You can check this full-depth guide.
7. Run SFC
You should run the system file checker scan on your Windows computer to check for any kind of possible or corrupted system files and restore them. To do so:
- Click on the Start Menu and type cmd.
- Now, right-click on Command Prompt from the search result.
- Select Run as administrator > If prompted, click on Yes to give admin privileges.
- CMD window will open now > Type the following command line and hit Enter to run it:
SFC /scannow

- Wait for the process to complete it.
- Once done, just restart your PC to change effects immediately.
Fix Consistent Loading Screen in RDR2 Story Mode (Console)
According to a workaround by Rockstar Games Support, this specific issue may appear if the game didn’t save correctly on the storage. You can follow the steps below to save the game data properly and that’s how the loading time may get reduced drastically or doesn’t get stuck in the 50% on the loading screen.
- Launch Red Dead Redemption 2 > Select Story from the main menu.
- Wait for around three minutes to load the game.
- Press Options on PlayStation (Menu on Xbox).
- Press the Down on the D-pad 4 times > Press X on PlayStation (A on Xbox).
- Now, select Save > Select a Save Slot.
- Press X on PlayStation (A on Xbox) to confirm.
- Wait for one minute for the game to save.
- Press Options on PlayStation (Menu on Xbox).
- Press the Down on the D-pad 4 times > Press X on PlayStation (A on Xbox).
- Next, press right on the D-pad once > Press X on PlayStation (A on Xbox) two times.
- A prompt should appear on the screen to confirm if you want to load the saved game or not.
- Make sure to confirm the action to load the saved game.
- After a few minutes, the RDR2 game should load properly.
Please Note: If in case, ‘any prompt asking you to confirm the loading of a saved game’ doesn’t appear on the screen still now then you can you should press the Circle button on the PlayStation controller (B button on the Xbox controller) multiple times and then repeat the above steps again.
That’s it, guys. We assume this guide was helpful to you. For additional queries, you can comment below.
