Cortana is one of the personal virtual assistants that came with Windows 10 OS initially and then slightly successful for some time. But due to the lack of additional features or support, plenty of users found Cortana not so useful in their daily life when it comes to performing tasks or answering questions, etc. Now, if you’re interested in disabling the Cortana from Windows 10, this guide is for you.
Due to too much competition and the failure of getting involved with user interaction in so many ways, Windows users started disliking this feature. Whereas the use of Google Assistant, Siri, and Alexa become so much popular or indulging. Therefore, the use of Cortana obviously got reduced and now we can assume that Windows users barely prefer Cortana while using their PCs.
Although it still remains one of the parts of the Windows 10 operating system and Microsoft is continuously pushing it further to the users, if you’re not interested to keep using it or having it on your computer anymore, you can always manually uninstall or delete Cortana by following the easy steps below. After getting the Windows 10 May 2020 update, it’s now easier than ever.
Also Read
Page Contents
How to Uninstall Cortana From Windows 10
We will be sharing two different methods for the same. The first one will be for the users having the Windows Home Edition. The second method will be for the Professional or Enterprise Editon user. Although the second method is easy, it isn’t applicable to the Home edition users. So please stick with the method for your respective OS edition.
Remove Cortana From Windows 10 using Registry Editor (Windows Home)
For Windows Home users, they could remove Cortana using Registry Editor. Dealing with Registry Editor is always a risky task. Hence it is recommended to proceed with caution. GetDroidTips or any of its members won’t be held responsible in case anything happens to your PC. With that said, here are the required steps:
- Bring up the Run dialog box using the Windows+R shortcut key combination.
- Type in regedit and hit Enter. This will open Registry Editor.
- Enter the following location in the Registry Editor address bar situated at the top:
HKEY_LOCAL_MACHINE\SOFTWARE\Policies\Microsoft\Windows\
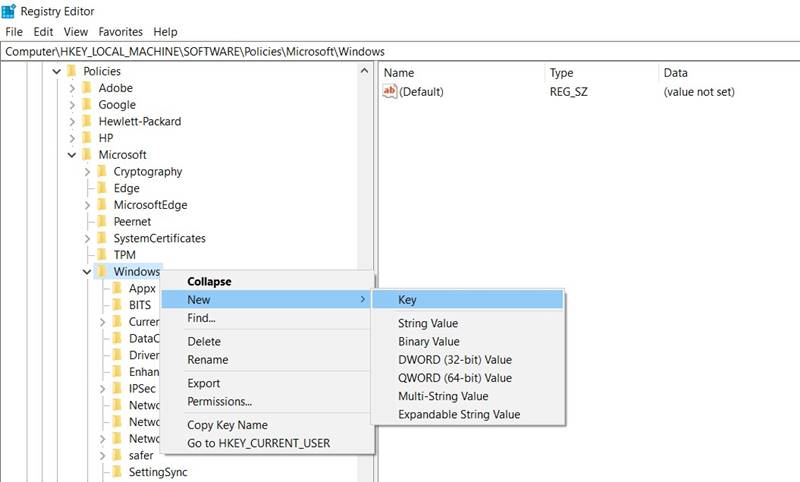
- Under the Windows section, you will have to create a new folder. Right-click on it and select New > Key. Name it Windows Search.
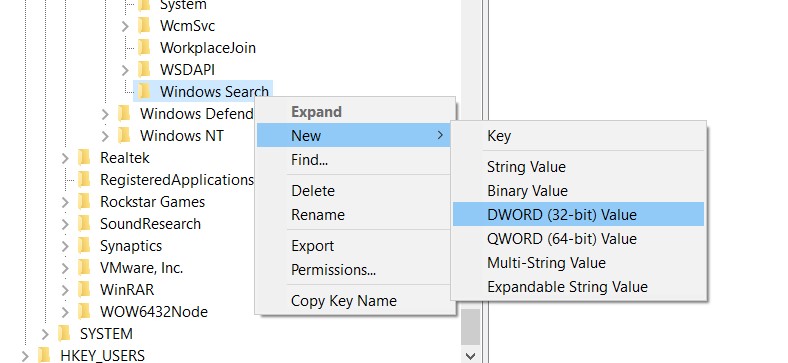
- Now right-click on the newly created Windows Search key and select New > DWORD (32-bit) Value.
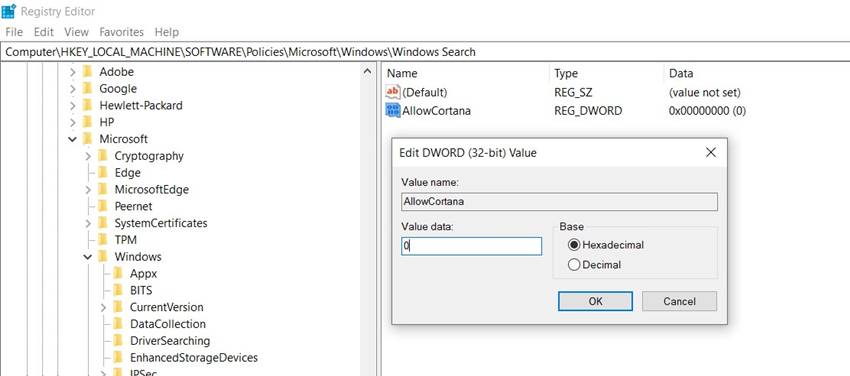
- Name it AllowCortana and enter 0 in the Value Data field. Hit OK to save it.
- Finally, restart your PC for the changes to take place. That’s it. You have successfully removed Cortana from Windows 10. If at any point in time, you wish to re-enable it, just change the Allow Cortana value from 0 to 1. With that said, here is how you could remove Cortana from Professional or Enterprise Edition.
Using Group Policy (Enterprise Users)
If you are having a Professional or Enterprise edition, then the process might be a little bit easier. You wouldn’t even need to take the route of Registry Editor. The entire process will be carried out via the GPE, or Group Policy Editor. Let’s begin
- Launch the Run dialog box using the Windows+R shortcut key combination.
- Enter gpedit.msc in the box and hit Enter. This will open the Group Policy Editor.
- Navigate to the following location: Computer Configuration > Administrative Templates > Windows Components > Search.
- Scroll to the Allow Cortana file and double-click to open it.
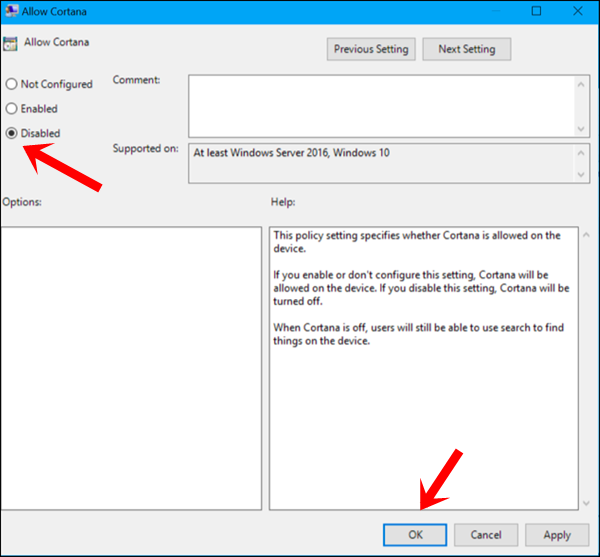
- Select Disabled from the left-hand side and hit Apply > OK.
- Finally, restart your PC. The changes will take place accordingly. Furthermore, if there’s a change in the plan you could re-enable it quite easily. Just select Enabled from the Allow Cortana file under GPE and that is it.
Uninstall Using Windows Powershell:
- Press Windows + X keys to open the Quick Start Menu. [You can also click on Start and type for Powershell to access it]
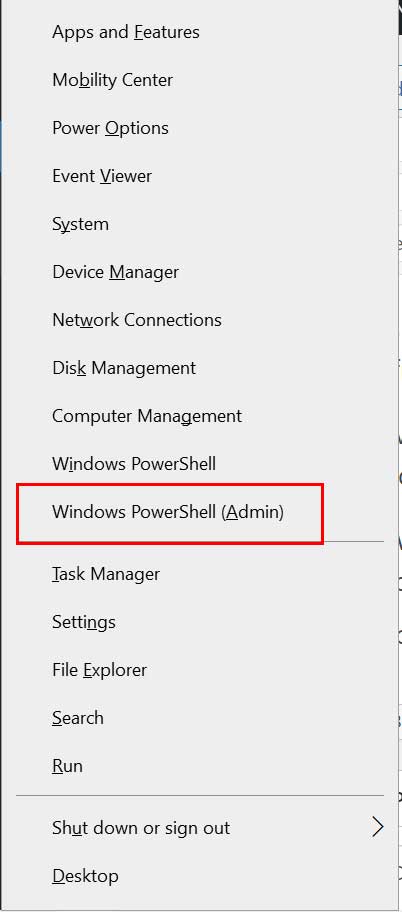
- Now, click on Windows PowerShell (Admin) from the list.
- Click on Yes if prompted by User Account Control (UAC) to give admin privilege.
- Type in or copy/paste the following command line into the PowerShell window and hit Enter to execute it:
Get-AppxPackage -allusers Microsoft.549981C3F5F10 | Remove-AppxPackage

- This command will completely uninstall the Cortana package from your Windows computer.
- Enjoy!
Reinstall Cortana on Windows 10
However, if you want to reinstall Cortana on your Windows computer for some reason or you’ve unintentionally deleted it previously by using the PowerShell method, then you can follow the steps below to bring it back normally. To do so:
- Click on the Start Menu > Search for Microsoft Store and open it.
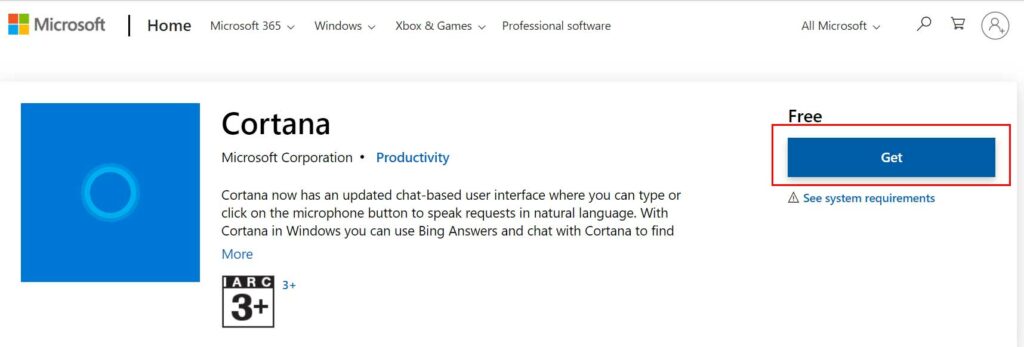
- Now, search for Cortana and click on the Get button to install it again. [You can also directly head over to this specific Microsoft Store link and reinstall the program]
- Once done, click on Open > Then click on Install.
- Once installed, you’re good to go.
Conclusion
So with this, we conclude the guide on how to remove Cortana from Windows 10. We have listed two different approaches to the same. The first one is for the Home Edition users whereas the second one belongs to the Enterprise. While the Enterprise users could try out the Home method, the reverse isn’t true. If you end up with any queries, do let us know in the comments section. Rounding off, here are some iPhone Tips and Tricks, PC tips and tricks, and Android Tips and Trick that you should check out as well.

How to uninstall Cortana from windows 10? [Powershell Method]