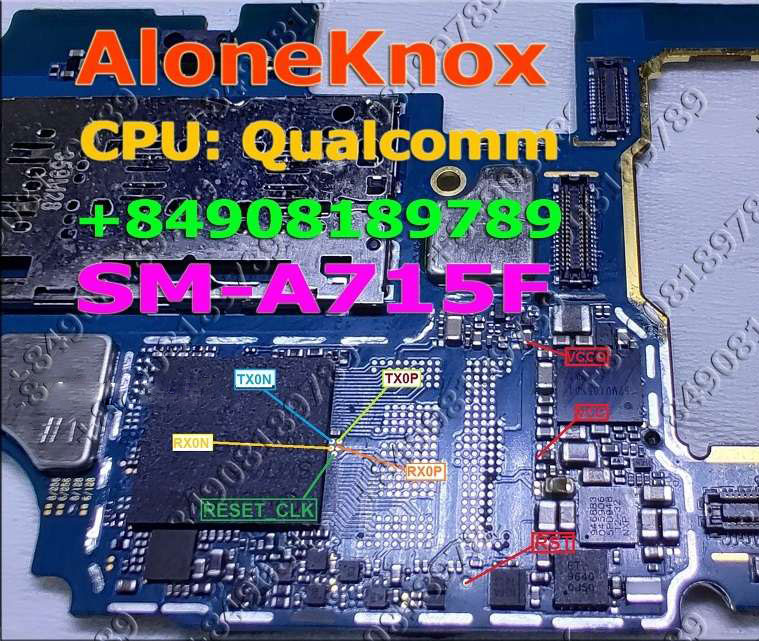
The Samsung Galaxy A71 was released recently with upper mid-range hardware specifications like Snapdragon 730 chipset, 6GB/8GB of RAM, 128GB of internal storage, 64MP quad rear cameras, and more. In this guide, we will show you the real image of the ISP pinout and test point for the Samsung Galaxy A71 (SM-A715F).
By using the ISP PinOUT, you can easily restore the stock ROM, bypass FRP lock, or reset user data on your device via UFi Box. In this guide, we will also guide you on how to reboot into 9008 EDL Mode.
Also Read
Page Contents
What is ISP PinOUT?
ISP or In-system programming also known as in-circuit serial programming (ICSP) for hardware that has a cross-reference of pins or contacts. By shorting the pins together, you can power or signal the logic board (motherboard) of an electronic device such as a mobile, computer. You will find the IS Pinout connection on the logic board of your device. Therefore, you will need to remove the back panel of the handset and follow the below image to locate the pinout.
Samsung Galaxy A71 (SM-A715F) ISP Pinout Image:

How to Enter EDL Mode on Samsung A71 (SM-A715F)
Follow this instruction carefully to boot your device into EDL Mode (aka Emergency DownLoad Mode)
Method 1: Using ADB
- Download ADB and Fastboot Tool and extract it to your PC (C:/ Drive)
- Connect your device to your PC
- Open the adb command and enter the command
.\adb reboot edl
Method 2: Using Fastboot
- Download ADB and Fastboot Tool and extract it to your PC (C:/ Drive)
- Boot your device into the bootloader
- Open the command window on your PC on the same folder extracted (ADB and Fastboot Tool)
- now enter the command
.\fastboot oem edl
Method 3: By Hardware Test Points / Restore Your device
- Download the QDLoader driver
- Find the EDL PinOUT/Test Point on your device (refer to image above to find the test point)
- To enter EDL mode, you need to use a metal tweezer or a conductive metal wire to short the points.
- Once you are done, connect your device to the PC using a USB cable
- This way, your device will enter EDL mode. Now you can open the QFil or QPST Tool to flash the firmware and restore your device.
I hope this guide was helpful to find the Samsung Galaxy A71 (SM-A715F) ISP Testpoints.
Samsung Galaxy A71: Device Overview
The Samsung Galaxy A71 sports a 6.7 inches Super AMOLED display with an FHD+ resolution i.e. with 1080 x 2400 pixels. It has a screen-to-body ratio of 87.2 percent, an aspect ratio of 20:9, a pixel density of 393 PPI. The display has also an under-display optical fingerprint scanner which is also gets protected by this old Corning Gorilla Glass 3.
Underneath the Samsung Galaxy A71, it sports the Qualcomm Snapdragon 730 SoC and this SoC is built on the 7nm process. On the GPU side, it has the Adreno 618 which is 30% faster compared to the old Adreno 616. The device has 6GB and 8GB of LPDDR4 RAM and 128GB of UFS 2.1 internal storage. This is further expandable via a micro SD card up to 1TB. The device has a dedicated type SIM card slot where you can insert two Nano type SIM cards a micro SD card at the same time.
Coming to the optics, the Samsung Galaxy A71 has a quad rear camera setup which gets arranged in vertical setup ( in an L shape ) to the left of the device along with the flash module. This rear camera setup includes a primary 64MP In-house Samsung GW1 sensor with f/1.7 aperture value, PDAF, and also for Electronic Image Stabilisation ( EIS ). This sensor pairs with a secondary 12MP ultra wide-angle sensor with an f/2.2 aperture value. And, it has a tertiary 5 MP depth sensor with an f/2.2 aperture value which will be used for taking portrait shots.
The Samsung Galaxy A71 packs a large 4,500 mAh battery that charges over a USB type C port. This battery also supports 25W fast charging tech from the brand. Sadly the device doesn’t come with support for other charging facilities like wireless charging, reverse charging, and many others. The device runs on One Ui 2.0 which is based on the latest Android 10. Coming to the biometric options, the device comes with an in-display fingerprint scanner and also face unlock. Connectivity options include Wi-Fi 802.11 a/b/g/n/ac/ax, dual-band, Wi-Fi Direct, hotspot, Bluetooth 5.0, A2DP, LE, GPS with A-GPS, GLONASS, BDS, GALILEO, NFC (market dependant), FM radio, and USB 2.0, Type-C 1.0 reversible connector, and many more.
