In this guide, we will show you how to scan a document using your iPhone. Gone are the days when one needed to head over to the shop or spend a few bucks to purchase a scanner to scan a document. Mobile devices have evolved quite a lot in recent times. Among the plethora of useful functionality that a smartphone is capable enough to carry out, one is the ability to scan a document and export it via PDF.
In this regard, the App Store currently boasts of a long list of apps belonging to this domain. However, you wouldn’t even need to download any of these third-party apps. This is because your iPhone comes with a built-in scanner that could carry out all these tasks quite efficiently. And in this guide, we will show you how to make full use of this functionality. Right from document scanning to using various editing tools, we will check out all its feature set. So without further ado, let’s get on with the guide.
Also Read

Page Contents
How to Scan a Document From Your iPhone
You wouldn’t find a standalone scanner app on your iPhone, rather this feature is baked inside the Notes app. All that is needed is just a few taps and your scanned document will ready to be shared as a PDF. Here are the required instructions for the same:
- Head over to the Notes app on your device and open an existing note or create a new one.
- Then tap on the Camera icon situated at the bottom and select the Scan Document option.
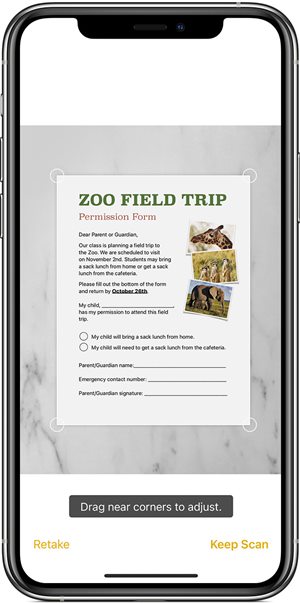
- Now place your document in the device’s camera best field of view and the document should automatically be scanned.
- If that doesn’t happen, you may also click on the Shutter button or use one of the Volume Keys.

- Drag the corners so that it lies in sync with the edges of the document.
- Then hit the Keep Scan button from the bottom right and tap Save on the next screen.
- Once the document is saved, tap on the Share button in the upper-right corner, select the desired app from the list and share it with the intended recipient.
That’s it. These were the steps to scan a document using your iPhone. Let’s now turn our attention towards the methods to customize this scanned file.
Customizing the Document
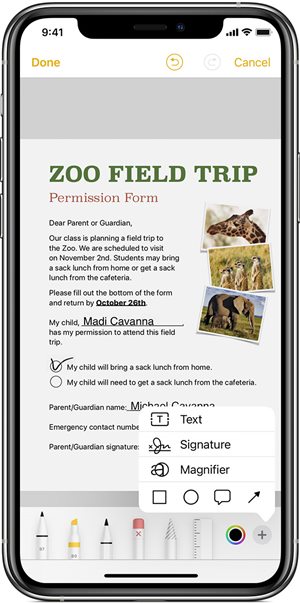
You could also customize the scanned document by using the markup tool or a color picker. Likewise, adding a text box, signature, magnifier, or a custom shape is also possible.
- To do so, open the Notes app and select the scanned document.
- Then tap on the Share button and select the Markup option.
- Tap on the Add icon situated at the bottom right.

- Select the desired option from Text. Signature, Magnifier, or a Shape.
- Once you are done customizing the document, hit the Done button to save the changes.
How to Delete a Scanned Page/Document
If you wish to delete any specific page from the scanned document on your iPhone, then head over to that page, tap on the trash can in the bottom-right corner, and tap on Delete Scan. Reply in the affirmative in the confirmation dialog box that appears. On the other hand, to delete the entire scanned document, just delete that note itself.
That’s it. These were the steps to scan a document using your iPhone. We have also shared the steps to customize this document and delete the same when no longer needed. If you have any queries concerning the aforementioned steps, do let us know in the comments. Rounding off, here are some iPhone Tips and Tricks, PC tips and tricks, and Android Tips and Tricks that you should check out as well.
