Recently, the BSOD (Blue Screen of Death) INTERNAL POWER ERROR has affected a lot of Windows 10 users. It can occur due to several reasons including outdated, corrupt, or incompatible drivers, the small size of the hibernation file, junk files, hardware issues, or some problems with system files.
Also Read
Page Contents
- Fix INTERNAL_POWER_ERROR Blue Screen on Windows 10
- FIX 1: Update your Drivers:
- FIX 2: Disable your graphics card:
- FIX 3: Roll back your drivers:
- FIX 4: Increase the size of the hibernation file:
- FIX 5: Set hard drive turn off timer to 0:
- FIX 6: You can Disable automatic driver updates and uninstall display driver:
- FIX 7: Perform the SFC scan:
- FIX 8: Clean junk files:
- FIX 9: Check for HDD corruption:
Fix INTERNAL_POWER_ERROR Blue Screen on Windows 10
However, even though whatever reason triggers the INTERNAL POWER ERROR, we have possible fixes to outrun each of them. Consider using the fixes listed in this article below in order to resolve the INTERNAL POWER ERROR. Have a look:
FIX 1: Update your Drivers:
Like several other BSOD errors, the “INTERNAL POWER ERROR” is also a result of corrupt, outdated, and incompatible drivers. Thus, the first resort to resolve the said problem is updating the Drivers. You can do so either manually via Device Manager or automatically via updating tools available online.
For updating your Drivers manually via Device Manager:
- Firstly, right-click on the Start menu and then select the option Device Manager from the context menu.
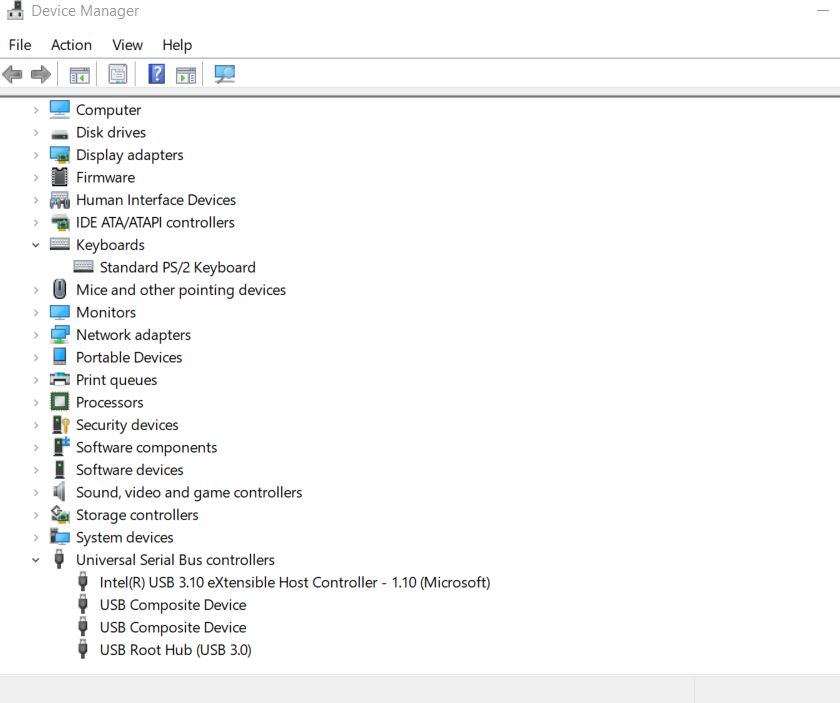
- On the Device Manager window, expand all the available sections one after another.
- Now right-click over the drivers with a yellow indication only and further choose Update driver from the sub-menu.
- From the next prompt, click on the option Search automatically for updated driver software and then further follow the instructions as directed on your screen. The process will remain the same for multiple drivers (with yellow indication) and must be followed individually.
- Once you are done with updating them all, restart your computer, run the relevant program and check whether the said issue got resolved or not.
For updating your Drivers automatically via Online tools:
Updating all the drivers manually can be an extraordinarily time-taking and effortful process. Thus, if you want to avoid such a situation, you can use any automated driver updating tool available online, run them and let them update all the necessary drivers within no time.
FIX 2: Disable your graphics card:
Disabling the AMD Graphics card is known for resolving the “INTERNAL POWER ERROR” in no time. For disabling the Graphics card, follow the steps given below:
- Begin with restarting your computer a few times during the boot sequence and start Automatic Repair mode.
- Now navigate to the following path:
Troubleshoot > Advanced options > Startup Settings
and then again click on the Restart button.![]()
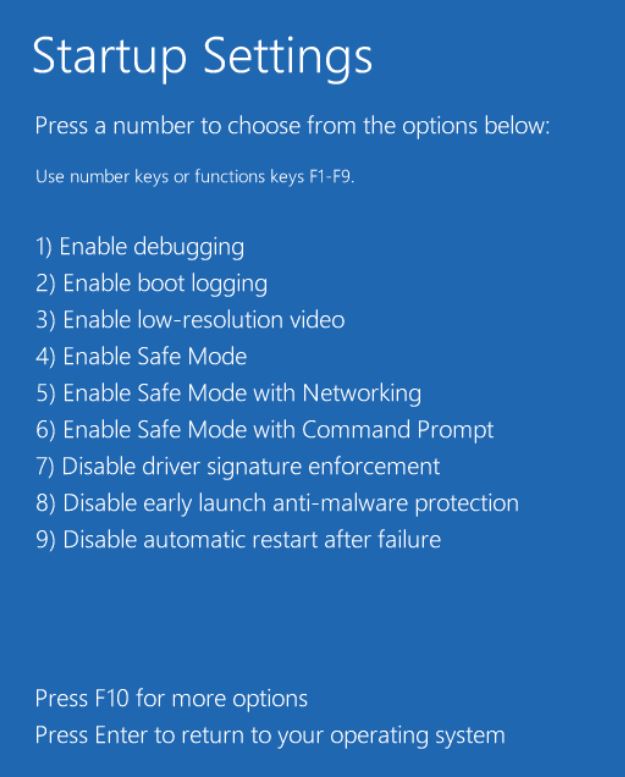
- Once your system Restarts, it will appear a list of options into your screen. Here press F5 or 5 for selecting the option Safe Mode with Networking. (Though this option is usually on the 5th position in the list; however, if you find it at any other position, press that number for selecting).
- Further, right-click on the Start menu and then select the option Device Manager from the context menu.
- Now on the Device Manager window, locate your Graphics card, right-click over it and then select Disable from the sub-menu.
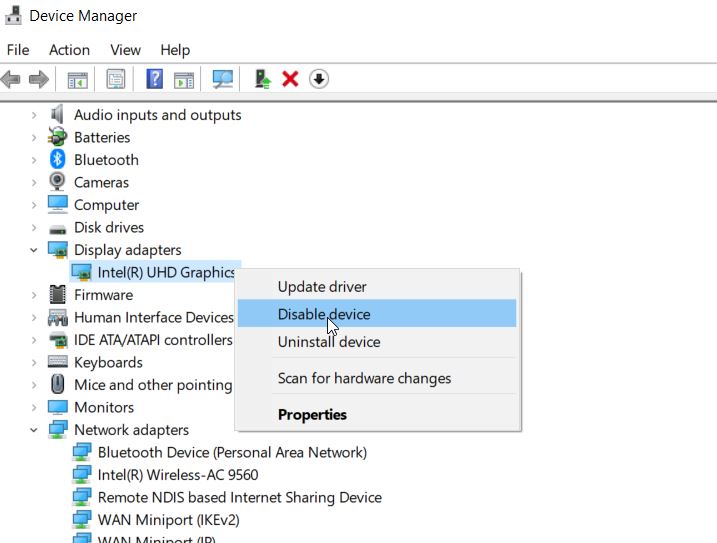
- Lastly, check whether the said issue got resolved or not. If not, follow the next fix in the list.
FIX 3: Roll back your drivers:
As per a lot of suffered users, rolling back the drivers has helped them resolve the “INTERNAL POWER ERROR”. For doing so, follow the steps given below:
- Firstly, right-click on the Start menu and then select the option Device Manager from the context menu.
- Here locate your Graphics card, right-click over it and then select Properties.
- Now on the Properties window, navigate to the Driver section (From the vertical menu).
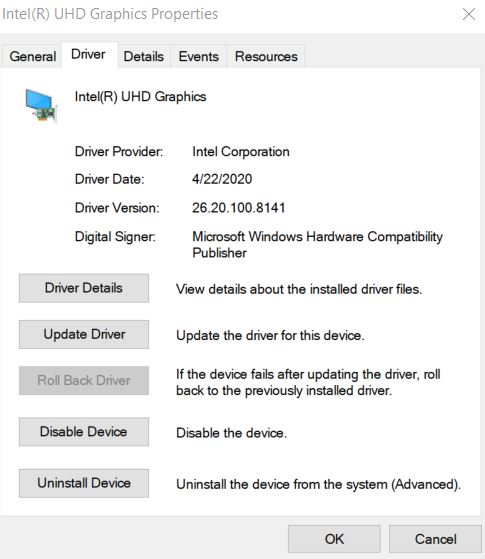
- Here click on the Roll back Driver tab and then select OK.
- Once the process gets completed, you can check and confirm if it has resolved the said issue or not.
FIX 4: Increase the size of the hibernation file:
The small and limited size of the hibernation file can also trigger the “INTERNAL POWER ERROR” issue at times. The hibernation file is set to 75% by default, and users can change it to 100% if required. Thus, to increase the size of the hibernation file and resolve the said error, follow the steps given below:
- Firstly, go to the windows search bar, type “cmd” and launch the Command Prompt window from the search results. Make sure you launch it with Administrator access.
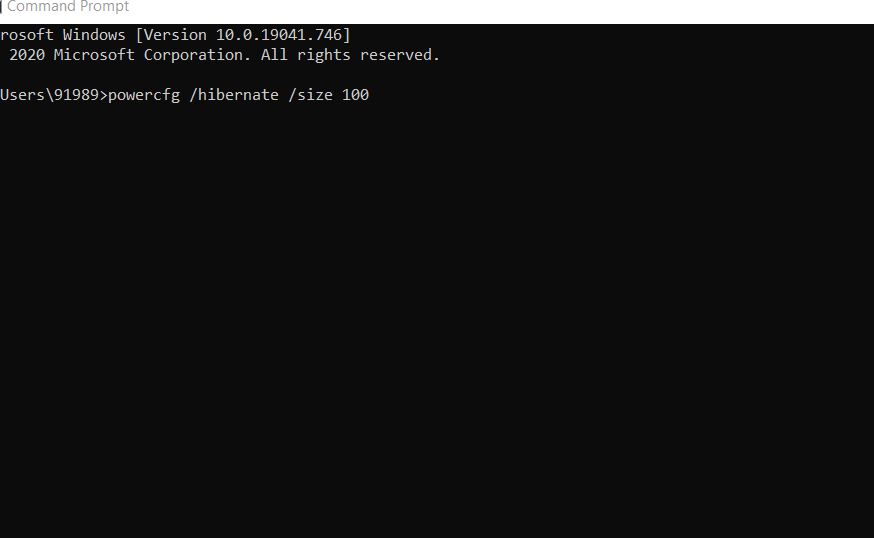
- Now on the Command prompt window, type or copy + paste, powercfg /hibernate /size 100 and then press Enter. The command will process and will change the size of the hibernation file to 100%.
- You can further check and confirm if it has helped or not.
FIX 5: Set hard drive turn off timer to 0:
Setting the Hard drive turn off timer to 0 have proven effects in resolving the “INTERNAL POWER ERROR” issue. For doing so, follow the steps given below:
- Firstly, press WINDOWS Key + S altogether then type Power options and select Power options from the search result.
- On the Power Options window, find your selected plan and click on the Change plan settings link.
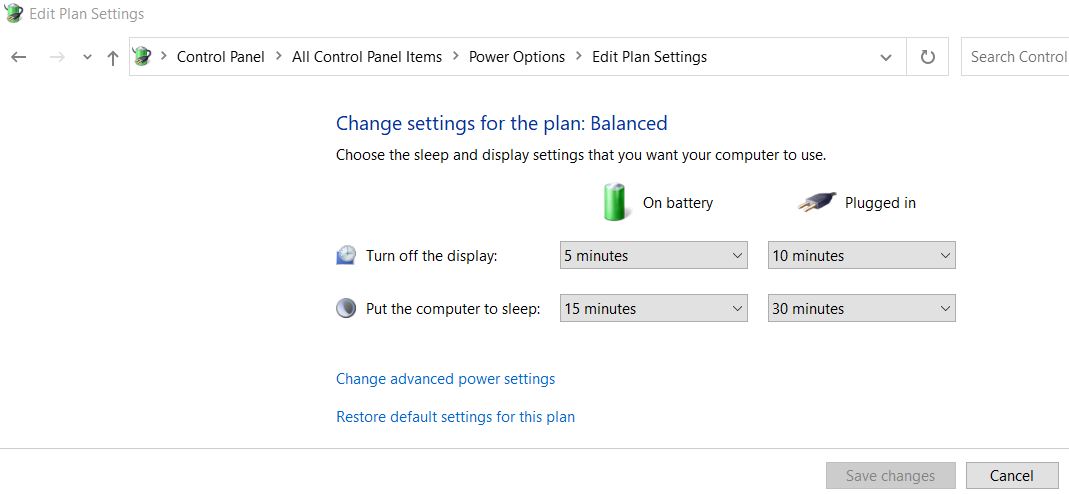
- Further on the next screen, click on the Change advanced power settings link.
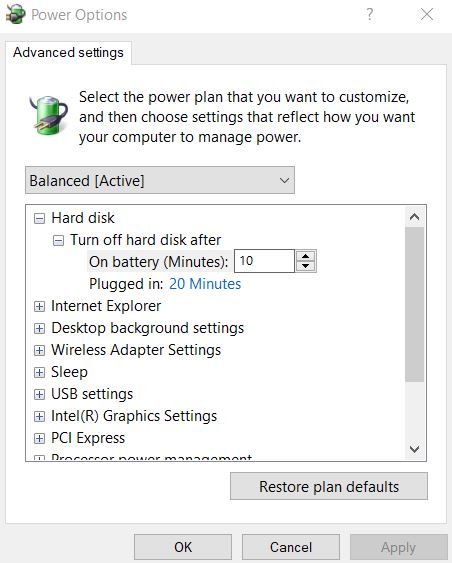
- Now navigate to Hard disk > Turn off hard disk after and then set the value to numeric 0 here.
- Further, click on Apply and then select OK to make the changes applied.
- Once done, check and confirm whether the said issue got resolved or not.
FIX 6: You can Disable automatic driver updates and uninstall display driver:
Uninstalling the Display driver might help in resolving the “INTERNAL POWER ERROR” issue. However, Windows 10 is designed to install the missing drivers automatically with every fresh Start. Thus, before uninstalling the display driver, you would need to disable the automatic driver updates feature as well. It will keep Windows from looking and installing the missing driver automatically.
For disabling the automatic driver updates feature, follow the steps given below:
- Firstly, on the Windows search bar type advanced system settings and then select the option View advanced system settings from the search results.
- On the next window, navigate to the Hardware section (from the vertical menu) and then click on the Device Installation Settings It will launch the Device installation settings window.
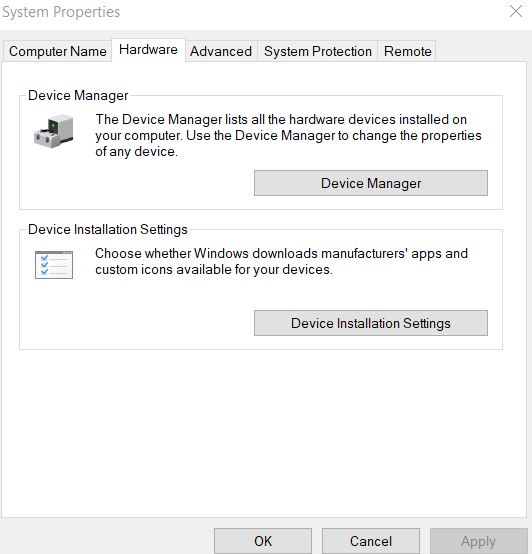
- On the next window, select option No (your device might not work as expected) and then click on the Save changes tab.
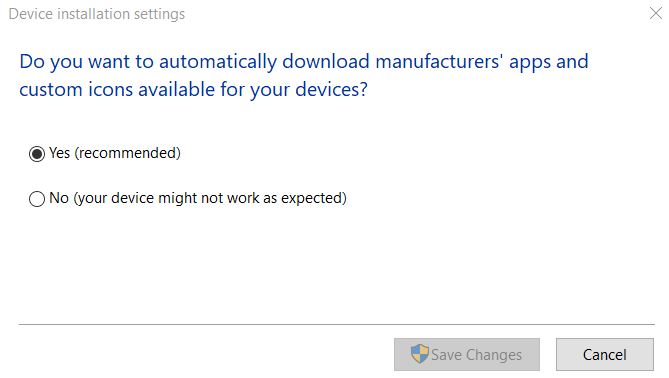
- Further, uninstall your display driver and then check if it helps in resolving the said error or not.
FIX 7: Perform the SFC scan:
If the system files are corrupt, it can also trigger the “INTERNAL POWER ERROR” issue. Thus, performing an SFC scan might help here in this case. For doing so, follow the steps given below:
- Firstly, go to the Windows search bar, type “cmd” and launch the Command Prompt window from the search results. Make sure you launch it with Administrator access.

- Now on the Command prompt window, type sfc /scannow and then press Enter.
- Once the process gets completed, restart your computer and check whether the said issue got resolved or not.
FIX 8: Clean junk files:
Cleaning the junk files is another resort that has helped a few suffered users in getting rid of the “INTERNAL POWER ERROR” issue. For cleaning the junk files follow the steps given below:
- On the Windows search bar, type This PC and open the relevant search result.
- Now right-click over the System drive (C:) and then select Properties from the sub-menu.
- Now click on Disk Cleanup and then further navigate to the option Clean up system files.
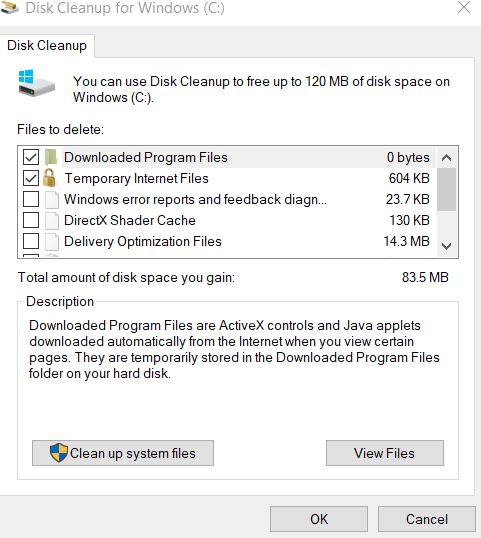
- Then check every file you want to clean.
- Lastly, click on OK, and once the process completes, restart your computer and check whether the fix helps or not.
FIX 9: Check for HDD corruption:
If you ever encounter an “INTERNAL POWER ERROR” in your system, it is advisable to check for any hard drive errors. For doing so, follow the steps given below:
- On the Windows search bar, type This PC and open the relevant search result.
- Now right-click over the System drive (C:) and then select Properties from the sub-menu.
- Navigate to the Tools section (from the vertical menu) and under the Error Checking option click on Check.
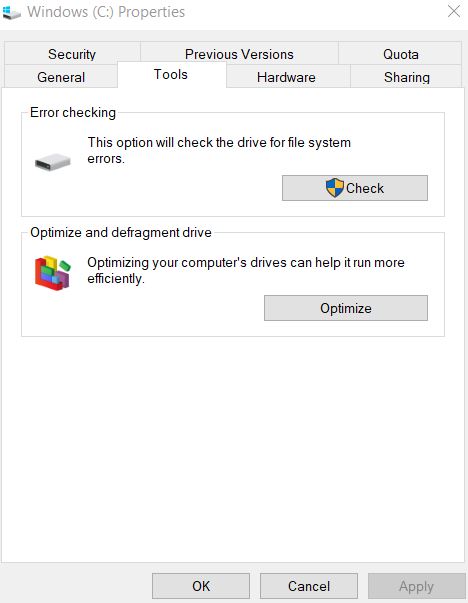
- Further, click on Scan Drive and let the process gets completed on its own.
- Once it is done, check and confirm if it has helped in resolving the error or not.
These were the several methods that will possibly resolve the “INTERNAL POWER ERROR” issue on your system. As the said error is a BSOD error, it might keep the user from operating their system further. Thus, it is advisable to resolve the error quickly.
Also, make sure you are using the right hard drive mode. Incorrect hard drive mode can also trigger the said error. For fixing it, users would have to change the hard drive mode in the BIOS setting. If you have any queries or feedback, please write down the comment in the below comment box.
