Trying to restore your windows 10 from a recently saved timestamp but getting error of System Restore Did not complete Successfully? System restore is a tool that can help you to overcome problems by rolling back Windows in the previous installation state. In case the system restore does not work properly, here is how you can fix the problem.
Windows is known to be the friendliest Operating system among other Operating systems. Hence it includes various Troubleshooting tools that you can use easily to fix common errors on your PC. One such tool is the System Restore utility. This tool helps to create Restore points on your System, and if anything happens bad, you can jump back to the restore point and get your PC to the point on which you created the restore point.
Although some people are reporting that there are some issues with the process, the tool gives out an error “System Restore did not complete successfully” and an error code: 0x80070005. So in this article, let’s see why this error occurs and how you can rectify this to restore your system.

Page Contents
Fix: System Restore Did not complete Successfully on Windows 10
Method 1: Try disabling Antivirus
The error itself states that any antivirus might be blocking you from doing a system restore. So if this is true in your case, disabling the antivirus will solve this issue. So let’s first try disabling your antivirus.
Note: People use various antivirus systems, so it is impossible to cover all of them. You can search google regarding how to temporarily disable your antivirus (with the name of the app).
Steps to Disable Windows Defender or Antivirus:
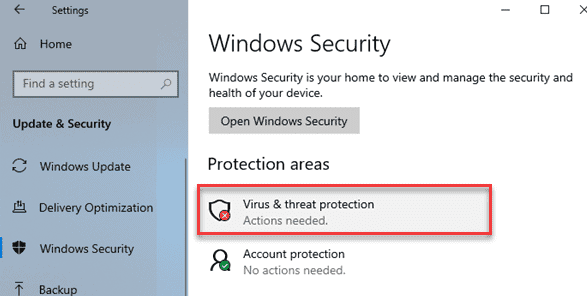
- Click on Start and search for Defender.
- Open the Windows security app and Click on Virus and Threat protection.
- Toggle Off the Real-time Protection.
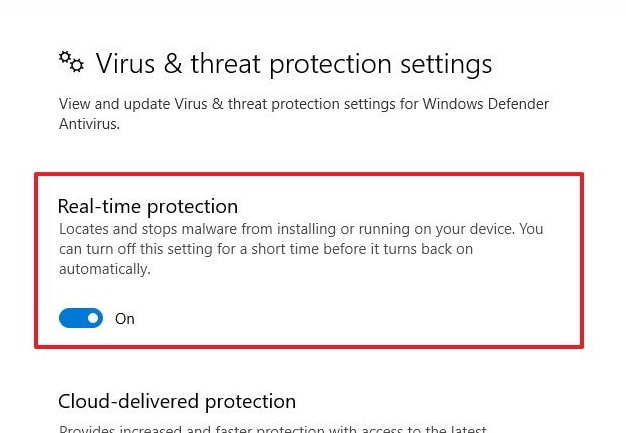
That’s it. Now that the antivirus program is disabled, go ahead and try doing a system restore.
Method 2: Try Restoring from Safe Mode
Windows has a safe mode where you can troubleshoot and fix common errors. So you can try doing the system restore from Safe mode. Since it only starts up the bare minimum of tools required to run, this eliminates all third-party interruptions.
Steps to enter Safe mode in Windows 10:
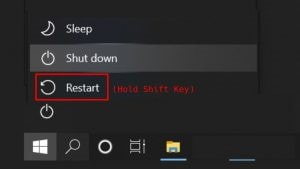
- Click on the Start menu.
- Click on the Power icon.
- Now Hold down the shift key and click on Restart.
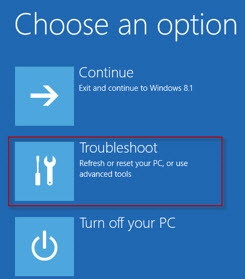
- Now click on the following options one by one.
Troubleshoot
 Advanced Options
 Startup Settings
 Restart

- Now your PC will restart to a list of Boot options.
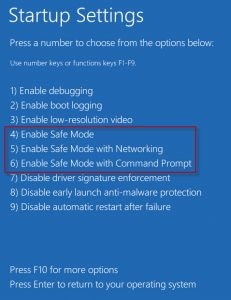
- When the menu is displayed, press no. 4 on your keyboard.
- Your PC will reboot to safe mode.
Once you’re in safe mode, try doing a system restore. It should work now without any issues.
Method 3: Try restoring from Windows Installation Media:
If you have a Windows Installation Media (DVD or Bootable Pendrive), you can try restoring from it as well. Although you should note that you should have at least one Administrative account on the system, you’re about to do restore.
- Insert the Installation medium, and boot from it.
(Different computers have different procedures. So refer to the Manual or google your way) - Select your Language and click on Next.
- On the Install screen, Click on Repair your computer on the leftmost corner.

- Click on Troubleshoot > Advanced options > System Restore.
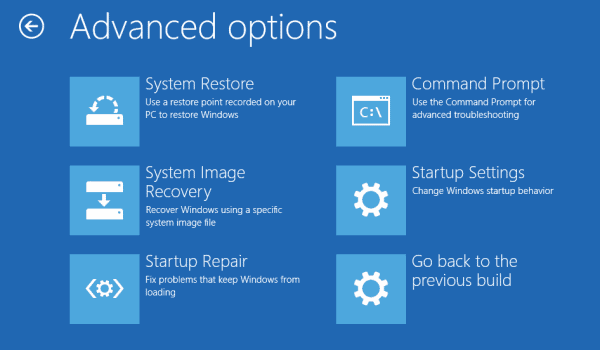
- Finally, follow on-screen prompts to restore your PC.
Conclusion
So, as you can see, there are multiple workarounds to fix the System restore did not complete successfully error on Windows 10. However, many people find the second method most useful. Because most of the time, some third-party software might be interrupting the system restore process result in error. But if your case is something different, you should try the third method that is Restoring from Windows installation DVD or USB.
