In this tutorial, we will show you how to take screenshots in the Chromebook or Chrome OS. The need or usefulness of a screengrab is hardly anyone’s guess. If you come across interesting content or got hold of a tweet that you believe would be deleted in no time, then taking a screenshot is probably the first thing that crosses your mind. And while you might very well be knowing the steps to do so on a Windows desktop, not many seem to be aware of this on a Chromebook.
Although the instructions are quite different, yet the method stands as simple as it is for the Microsoft owned OS. In this guide, we will show you how to take a full screen or partial screenshot in Chromebook. Similarly, we will also list out the steps to take a screengrab in tablets having Chrome OS installed or in Chromebook with an external keyboard. After that, some handy tips related to the editing of these screenshots will also be shared. So without further ado, let’s begin with the guide.
Also Read
How to Take Screenshots on Chromebook
The steps to take screenshots in a Chromebook is pretty simple. Let’s begin with the full-page screenshots. After that, we will turn our attention towards capturing a specific portion of the page. Similarly, the editing options will also be looked at. Here is everything you need to be aware of in this regard.
Full Page Screenshots
If you wish to take a full-page screenshot then make use of the Ctrl + Switch window shortcut key combinations. For the unawares, the Switch window button is situated between the Full-screen and Brightness down buttons. it should be the sixth button in the top row and is in place of the F5 key that you get in a typical keyboard.

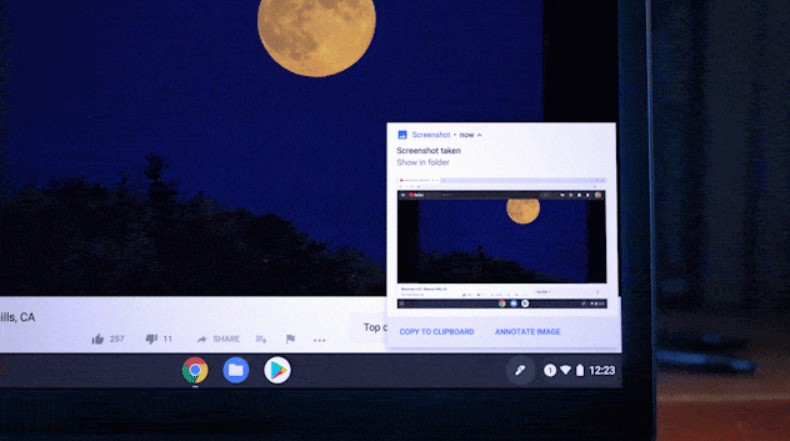
As soon as you have taken a full-page screengrab, you should get a notification of the same at the bottom right corner of your screen. If you click on that notification, you will be taken over to the Downloads folder. This is where all your screenshots are stored. If you end up missing this notification, you could also access the screenshot by clicking on the Files icon present on the Taskbar.
Taking Partial Screenshots
Rather than taking a full-page screenshot in Chromebook and then cropping out the unnecessary portion, you could directly take a partial screenshot as well. For that, you could use the Ctrl + Shift + Switch window shortcut key combinations. As soon as you press these three keys together, the screen will dim slightly and the cursor will change to a crosshair. Click on one portion of the screen and drag this crosshair to the region till the region you need the screenshot. Let go of the mouse button once you have captured the desired region. As before the screenshot will be saved to the Downloads folder.
Tablets Mode
If you are using a touch screen setup with Chrome OS, then you could press the Power and Volume Down button together to take a screengrab. Or if your device supports the screen-grab, you could also make use of the Capture Screen option to take the screenshot of the entire region. Similarly, the Capture Region option allows you to capture a specific portion of the screen.
Using External keyboards
If you aren’t using a Chromebook but have a device with Chrome OS installed, then you could make use of the Ctrl + F5 keys on the keyboard to take a screenshot of the entire screen. Similarly, Ctrl + Shift + F5 will help you take a screengrab of a specific portion of the screen.
Editing Screenshots
You could also perform some editing on these clippings. As soon as you take screenshots in Chromebook, you could see a Copy to Clipboard option right beneath the notification. Just click on it to copy the said grab to the clipboard. You could then use the usual Ctrl+V shortcut to paste it at the desired region.
Do keep in mind that unlike the Prt Sc option in Windows, capturing screenshots in Chromebook doesn’t automatically copy it to the clipboard. You will have to manually do the same in Chrome’s OS. Now if you wish to further edit this grab, head over to the Downloads folder and open the desired screenshot. There you should see the Edit option situated in the top menu bar. Click on it and you should be presented with the options to crop, rotate, or adjust the brightness of the clip.
Concluding Remarks
So this was all fro this guide on how to take screenshots in Chromebook. We have also shared the steps to do so on a Chrome OS or using an external keyboard or stylus. Furthermore, we have also shared some handy screenshots editing tips. Just keep in mind that the Ctrl + Switch window takes full-page screenshots. On the other hand, the Ctrl + Shift + Switch takes partial screen grabs. If you have any queries concerning any of the above steps, do let us know in the comments below. Rounding off, here are some other iPhone Tips and Tricks, PC tips and tricks, and Android Tips and Trick that would prove to be equally useful.