The Finals is a first-person shooter game that is free-to-play. It has been developed and published by Embark Studios, a subsidiary of Nexon. In this game, players engage in team-based matches on maps that have a destructible environment. The game encourages players to take advantage of the dynamic environment to gain an edge over their opponents. However, many players have been facing The Finals Steam Download Error unexpectedly on the PC version. This issue needs to be fixed by the developers.
However, reports are claiming that downloading The Finals from Steam basically throws out this specific download error. Though the downloading and installing process is much easier on Steam for the PC version, several players are having some troubles. Now, if you’re also encountering the same kind of issue, then don’t worry. Sometimes, no license error is bothering a lot of players while downloading or installing The Finals game on Steam.

Page Contents
- Fix: The Finals Steam Download Error
- 1. Restart the PC
- 2. Check the Server Status
- 3. Run Steam as an Administrator
- 4. Update The Finals
- 5. Verify and Repair the Game Files
- 6. Check for Steam Client Updates
- 7. Relink Your Embark ID and Steam ID
- 8. Update Network Driver
- 9. Delete the EasyAntiCheat.Sys File
- 10. Restart Easy Anti-Cheat Service
- 11. Repair Easy Anti-Cheat
- 12. Disable Windows Firewall
- 13. Turn Off Antivirus
- 14. Reinstall The Finals
Fix: The Finals Steam Download Error
The chances are high that an outdated game patch version, corrupted game files, conflicts with the Steam ID, problems with the easy anti-cheat, server downtime, server region issues, security protection conflicts, an outdated network driver, issues with the game installation, etc can be possible reasons behind The Finals Steam Download Error. Fortunately, here we’ve shared with you a couple of potential workarounds that might come in handy.
Make sure to follow this troubleshooting guide until the problem has been fixed. So, without wasting any more time, let’s jump into it.
1. Restart the PC
First of all, you can try restarting the computer to refresh the system glitch or cache issues up to some extent. Although restarting the system might not help everyone, you should always try the same to check for the issue.
2. Check the Server Status
The second thing you can do is to check out the server status of The Finals to ensure there is no issue with the server downtime or outage. Most of the time, server connectivity issues or matchmaking issues might trouble you a lot. It’s better to follow the official @reachthefinals Twitter handle to get to know all the latest updates, server issues, patch notes, player reports, etc. In case, there is a server issue then be sure to wait for a couple of hours & try again later.
3. Run Steam as an Administrator
You should run the Steam client as an administrator to allow the system user account control permission. It’ll fix several issues with the game client while running video games. To do this:
- Right-click on the Steam application on your PC.
- Select Properties > Click on the Compatibility tab.

- Now, click on the Run this program as an administrator option to enable it.
- Click on Apply and select OK to save changes.
- Once done, run the Steam client, and play the game.
4. Update The Finals
Sometimes an outdated game patch version on the PC can trigger multiple issues with crashes, server connectivity errors, Steam download errors, and more. It’s recommended to manually update the game on the respective client to get the latest game patch version. You can check the steps below.
- Open Steam > Go to Library.
- Click on The Finals from the left pane.
- Steam will automatically search for the available update.
- If there is an update available, click on Update.
- Wait for a couple of minutes to complete the update.
- Once done, close Steam, and reboot your PC to apply changes.
5. Verify and Repair the Game Files
Sometimes there might be an issue with the installed game files like corrupted or missing game files on the PC. You can check the following steps to repair the game files to avoid several glitches.
- Launch the Steam client > Click on Library.
- Right-click on The Finals from the list.
- Click on Properties > Go to the Local Files files.

- Click on Verify Integrity of Game Files.
- You’ll have to wait for the process until it gets completed.
- Once done, restart your computer.
6. Check for Steam Client Updates
It’s also a better idea to manually exit Steam and then close it from the background processes before relaunching it. Whenever you launch Steam freshly on the system, it automatically checks for the available updates. If any update is available, it’ll automatically start downloading and installing the update without doing anything else. Even restarting the Windows and then launching Steam can do the job for you. Otherwise, follow the steps below to do so:
- Exit Steam and go to Task Manager (press Ctrl+Shift+Esc).
- Now, go to Processes > Click to select Steam from the task.
- Click on End Task.
- Then open Steam again > Click on the Steam tab at the top left.
- Select Check for Steam Client Updates.
- If there is an update available, wait for it to download.
7. Relink Your Embark ID and Steam ID
Another thing you can do is to relink your Embark ID and Steam ID after unlinking them because any kind of account syncing issues can also cause the Steam download error with video games. To do that:
- Visit the Embark ID page > Log into the account.
- Now, make sure to find & unlink your Embark ID from Steam.
- Once unlinked, try to run the game again.
- When it says to attempt linking, try to relink the ID.
- Once done, relaunch Steam, and check for the error again.
8. Update Network Driver
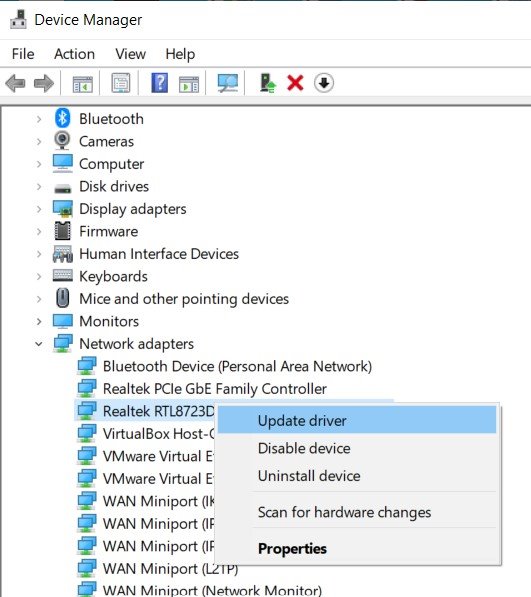
A networking driver is useful to run network-related ongoing connections on your Windows computer. That means it should be updated to the latest version to keep things smoother. It’s not always necessary that the problem is happening at your router or ISP. An outdated networking driver can also cause damage. To update it:
- Press the Win+X keys > Click on Device Manager.
- Double-click on Network Adapters to open the list.

- Right-click on the active network adapter.
- Select Update Driver > Choose Search automatically for drivers.
- If there is an update available, it’ll automatically download and install the update.
- Once done, restart your PC to apply changes.
9. Delete the EasyAntiCheat.Sys File
The EasyAntiCheat.sys file includes launch information for The Finals game that runs in the background whenever players launch a particular game. In general, Easy Anti-Cheat creates the sys extension file automatically. However, you should manually try deleting the sys file and it’ll be created automatically after running the game. So, there is nothing to worry about it.
- Go to the installed game directory on the PC.
- By default, it should be the C:\Program Files (x86) folder.
- Open the EasyAntiCheat folder (EasyAntiCheat_EOS).
- Locate the EasyAntiCheat.sys or EasyAntiCheat_EOS.sys file inside the folder.
- Right-click on the file > Click on Delete.
- If prompted, allow the system permission by clicking on OK.
- Finally, relaunch The Finals game to check for the issue.
10. Restart Easy Anti-Cheat Service
In case, the EAC service error shows you the game launching error then make sure to restart the EAC service manually on your system by following the steps below.
- Press the Win+R keys to open the Run dialogue box.
- Type services.msc and hit Enter to open Services.
- Search for the Easy AntiCheat service.
- Click on Properties > Set the Startup type to Automatic.
- Choose Start the service and then reboot your PC.
- Now, you can run the game again.
11. Repair Easy Anti-Cheat
You should try repairing the EAC (Easy AntiCheat) system on your PC because a corrupted or missing EAC application file can prevent the game files from running properly. To do so:
- Open the Steam client > Go to Library.
- Right-click on The Finals game.
- Click on the Local Files tab.
- Select EasyAntiCheat > Right-click on the EasyAntiCheat_Setup.exe file.
- Click on Run as administrator > Hit Yes to confirm the UAC permission.
- Next, click on Repair > Wait for the process to complete.
- Once done, restart your PC to check for the issue.
12. Disable Windows Firewall
You can try disabling Windows Firewall manually to ensure there is no issue with the security software blocking the game application. Make sure to follow the steps below to do so:
- Click on the Start Menu > Search and open Windows Defender Firewall.
- Select Turn Windows Defender Firewall ON or OFF.
- From the Customize Settings page, select the Turn off Windows Defender Firewall (not recommended) option in all the Public, Domain, and Private Networks.
- Click on OK to save changes.
- Once done, reboot the PC to apply changes.
13. Turn Off Antivirus
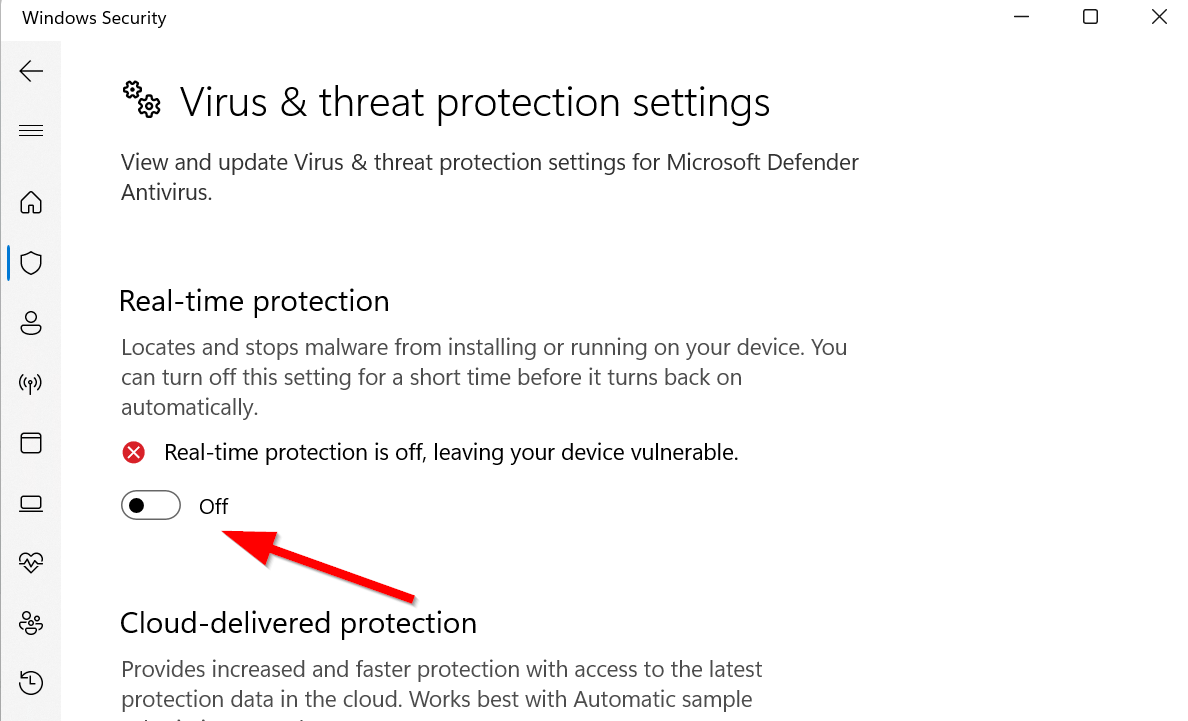
Additionally, you can also try disabling the antivirus protection on your Windows computer manually to prevent game application blocking by the aggressive real-time protection scanning in the background. If you’re using the default Windows antivirus that comes pre-installed then check the following steps to turn it off.
- Press the Win+I keys to open Windows Settings.
- Click on Update & Security > Go to Windows Security.
- Now, click on Open Windows Security > Select Virus & Threat Protection.

- Select Manage Settings > Go to Real-time protection and Turn it Off.
- If prompted, click on Yes to continue.
- Now, you can run The Finals again to check for the issue.
Please Note: If you’re using any other third-party antivirus program on your PC then turn off the real-time protection feature via the program settings menu.
14. Reinstall The Finals
If none of the methods worked for you, try uninstalling and then reinstalling The Finals game on your PC to make sure there is no issue with the installed game files or directory.
- Open the Steam client on your PC.
- Go to Library > Right-click on The Finals.
- Now, navigate to Manage.
- Select Uninstall > If prompted, click on Uninstall.
- Then follow the on-screen instructions to complete it.
- Once done, restart the PC to apply changes.
- Finally, launch Steam, and reinstall the game to check for the issue. (Try installing on a different disk drive)
- You’re good to go. Enjoy!
That’s it, guys. We hope this guide was helpful to you. For further queries, you can comment below.
Also Read
