Transferring photos from iPhone to Windows 11/10 has always been a troublesome task. Since Windows do not support Airdrop and iPhone doesn’t support Bluetooth, it becomes harder for users to transfer their iPhone photos to their Windows computer. And the truth is, many people use a combination of iPhone and Windows laptops for their home or office use. Now, if you’re also facing the issue of Can’t Transfer Photos from iPhone to Windows 11/10, then there are plenty of fixes available to solve your problem.
First of all, you can easily transfer photos from iPhone to windows using the iTunes software. It is free to download from the Apple website, and it pulls out all the photos automatically. Moreover, it also creates a backup for your iPhone in case you need it further in the future. But if iTunes is also not working correctly, then you will face trouble transferring photos from iPhone to Windows 11/10 computer.
Also Read
Page Contents
- Can’t Transfer Photos from iPhone to Windows 11/10? How to Fix?
- 1. Checking Apple Mobile Device support
- 2. Restarting the Apple Mobile Device Service
- 3. Checking the USB cable, Update, USB Driver, and importing photos again.
- 4. Resetting your iPhone’s location and privacy settings
- 5. Disabling Windows Anti Virus and Giving the Picture folder full permission
- 6. Using Third-Party WiFi File Sharing Apps
- Conclusion
Can’t Transfer Photos from iPhone to Windows 11/10? How to Fix?
If you are an iPhone user, then it is very common to have issues while transferring photos from your iPhone to Windows PC. There is no specific reason for the cause of such an error. However, it can be driver error, compatibility issue, damaged hardware, and much more for the cause of the issue. There are plenty of solutions available to resolve the issue. Read further below to know the solutions.
Also Read: How to Fix Photo Import Not Working on Windows 11/10
1. Checking Apple Mobile Device support
If you are facing issues while transferring photos, then firstly, you can check if your PC has Apple Mobile Device support installed. If not, then you can manually install it.
Step 1) Type Control Panel in the windows search bar, to open up the control panel, click on the control panel option.

Step 2) On the Control Panel window, click on the Programs and Features option.

Step 3) Now, scroll down and find the AppleMobile Device Support in the list if there is no such app installed on your device then install it manually.
2. Restarting the Apple Mobile Device Service
Restarting the device will help your Pc to recognize the iOS device. Firstly, disconnect the iOS device and close all the Apple-related applications.
Step 1) Type Service Manager in the windows search bar and open up the Service Manager.
Step 2) Now, scroll down and find the Apple Mobile Device Service. Once you find it right-click on it and select Properties.

Step 3) A prompt will appear, make sure that besides the Startup Type label, the drop-down menu option is selected Automatic and click on the Stop button below.
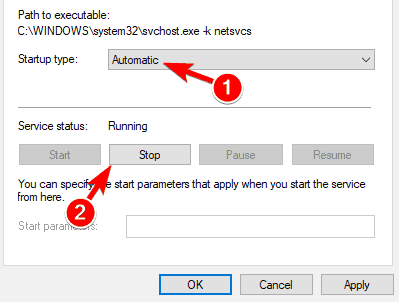
Step 4) After you have stopped the service wait for a few seconds and click on the Start button to restart the service, then click on the OK button.

Now you can connect your iPhone and open up the iTunes for photo transferring.
3. Checking the USB cable, Update, USB Driver, and importing photos again.
Firstly, check if the USB cable is working properly. If it is disconnecting too often, then you will have an issue with the USB. Check if the USB cable is torn somewhere and lastly check the USB cable on other devices. Always use the official Apple cable.
Make sure that your iTunes, iCloud application is up to date as well as your iOS device. It will be great if your Windows is also up to date, there will be no line for the error.
Now you have to check if the Apple Mobile Device support driver is installed on your PC or not. Firstly, open up the Device Manager, click on the Universal Serial Bus Controller to expand the list, and find if the Apple Mobile Device USB Driver is on the list or not. Right-click on it, and if there is an Enable option available, then enable the driver. If the driver is not installed on your device, then install it manually.
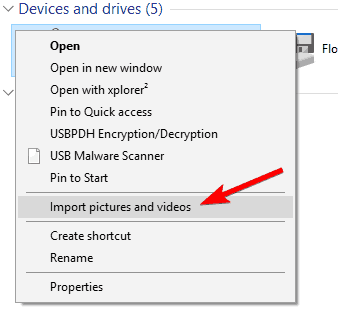
After you have checked all these, try to import your photos and videos again. Connect your iOS device to your PC. Open This PC, then locate your iPhone device, right-click on it and select the option Import pictures and videos. Moreover, you can also do the same using iTunes.
4. Resetting your iPhone’s location and privacy settings
Due to security reasons, sometimes Apple blocks users from having access to import files on Pc.
Step 1) Open up the settings app on your iPhone and go to General. Then navigate to General> Reset> Reset Location & Privacy.
Step 2) After reset, connect your iOS device to your Pc and select the Trust option on your phone.
Step 3) Check the Trust option in iTunes. Now, your problem should be resolved, and you can import your photos in your Pc.
If it is still not working, you can try connecting the USB cable to different ports of your PC.
5. Disabling Windows Anti Virus and Giving the Picture folder full permission
Firstly, disable your default windows antivirus by going into settings>updates & security>Windows Security> Virus threat and disable the real-time protection option. Windows Defender might be in conflict with the apple applications, therefore, causing the issue. However, if it still doesn’t solve your issue, then try to give full access to your picture folder and try importing the photos.
Step 1) Open up the File Explorer and navigate to the Picture folder on your pc, right-click on it and click on the properties.

Step 2) Go to the Security tab and click on the Edit button.

Step 3) Check on the Full Control option and select your account. Then click on the ok button.

However, if this doesn’t solve the issue, then you can click on the Add button.
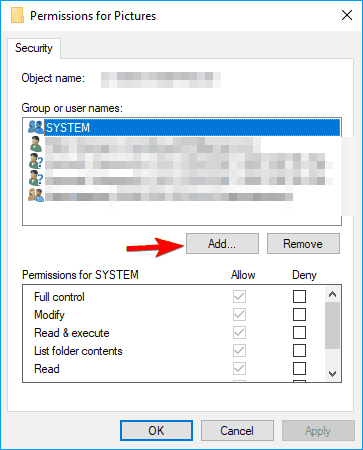
A new window will be prompt, type Everyone in the input text field and then click the Check Names and ok button.

On the Permission window, select Everyone, make sure that you have checked the Full Control option, and click on the OK button. This would resolve your issue.
6. Using Third-Party WiFi File Sharing Apps
There are plenty of third-party apps available, which makes the process of transferring iPhone photos to windows laptop or computer much easier. All you need to do is download the app, set it up on your iPhone. Then use a Laptop hotspot to connect with your iPhone. The one which works flawlessly is “Share it” which can transfer a large amount of iPhone photos easily.
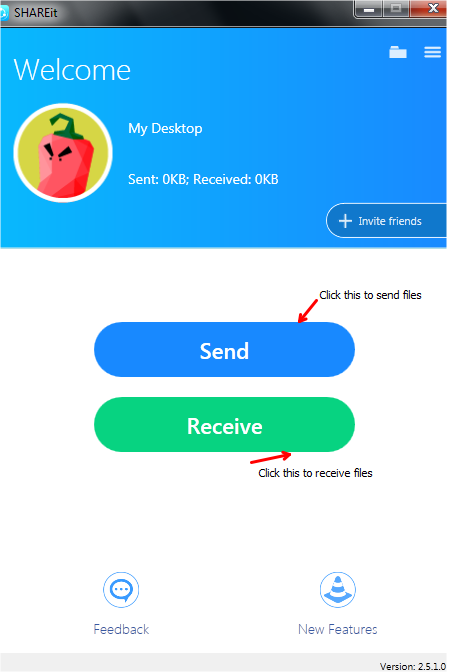
After setting up the connection, simply send the files and confirm it on the other end. Wait for a few minutes, and all your photos will be loaded on your computer.
Conclusion
Using an iPhone can be troublesome when it comes to sharing files with other devices. If you own a MacBook, then you can Airdrop all your files easily. But for windows, you need to use iTunes, which does the work most of the time. But if it doesn’t, you can use the above methods to solve the problems. Make sure to reboot your computer after applying each fix.
Also Read
