In this tutorial, we will guide you on how to install the TWRP Recovery on Samsung Galaxy A13 (A135F). TWRP recovery is probably the most used and popular custom recovery we know. Those who are quite accustomed to rooting and flashing custom ROM, etc. then know what TWRP Recovery is. However, for naive users, the TWRP Recovery allows them to install custom ROMs/mods, take a complete backup of their phone, and gain root access on their phone using Magisk Manager.
To root your Samsung Galaxy A13, you first need to have TWRP access. To flash the TWRP recovery image, it’s important to follow the guide carefully to avoid any errors. If you own a Samsung Galaxy A13 and want to install TWRP Recovery on your device, this post will guide you through the process. We’ll show you how to download and install TWRP Recovery on Samsung Galaxy A13, and then root it using Magisk. So, let’s dive into the article and get started.
Also Read

Page Contents
Samsung Galaxy A13 Device Overview:
The Samsung Galaxy A13 boasts impressive specifications across its display, cameras, and battery, providing users with a feature-rich smartphone experience. Starting with the display, it features a PLS LCD panel that delivers vibrant and lifelike visuals. With a large 6.6-inch screen size and an impressive screen-to-body ratio of approximately 83.2%, the device offers an immersive viewing experience. The display resolution stands at 1080 x 2408 pixels, with a 20:9 aspect ratio, ensuring sharp and detailed content. Additionally, the display is protected by Corning Gorilla Glass 5, offering enhanced durability and resistance against scratches.
In terms of photography capabilities, the Samsung Galaxy A13 is equipped with a versatile camera setup. The primary camera sports a high-resolution 50 MP sensor with a wide f/1.8 aperture, enabling detailed and sharp images. It features phase detection autofocus (PDAF) for quick and accurate focusing. The device also incorporates a 5 MP ultra-wide-angle camera with a 123˚ field of view, allowing users to capture wide vistas and group shots. For close-up photography, there is a 2 MP macro camera that captures intricate details, and a 2 MP depth camera that assists in creating appealing bokeh effects. On the front, there’s an 8 MP wide-angle selfie camera that captures high-quality self-portraits and facilitates video calls.
Powering the Samsung Galaxy A13 is a non-removable 5000 mAh Li-Po battery, ensuring long-lasting usage on a single charge. This sizable battery capacity allows for extended periods of productivity, entertainment, and communication without frequent recharging. The device also supports fast charging technology with a 15W power output, enabling quick and convenient recharging when needed. With this feature, users can minimize downtime and stay connected throughout their day.
What is TWRP Recovery?
TWRP Recovery or Team Win Recovery Project is a widely used custom recovery software that is open-source. Its touch-screen interface makes it easy for users to flash third-party firmware and backup their system or data. For Android enthusiasts and developers, TWRP Recovery is an essential tool for customization and development.
Apart from that, TWRP allows users to install kernels, modules, root or unroot, perform Nandroid backups, and more. It also makes it easy to wipe system partitions, internal storage, data, cache, vendor, and other areas.
Advantages of TWRP Recovery
- Backups of partitions in TAR or raw Image format
- Restore backups from internal storage, external SD storage, or OTG devices
- Install Custom Firmware
- Install flashable ZIPs and image files
- Partition wiping
- Delete System, Cache, Vendor, Partition, User Data, etc
- Install Root or Unroot by flashing ZIPs
- Terminal access
- ADB Root Shell
- Theme Support
- Possible decryption support depending on the device
Steps to Install TWRP Recovery on Galaxy A13 (A135F)
Now before we go ahead and install TWRP Recovery on the Samsung Galaxy A13, let us make a list of pre-requisites that are required to unlock it:
Charge your phone
You need to make sure that your Samsung Galaxy A13 is charged to about 60% before installing TWRP recovery to avoid any boot loop issues during the unlocking process.
Take a complete backup
Before rooting, one of the most important things that you need to do on your phone is to take a complete backup of your phone. For that, you can follow the guide by clicking the link below:
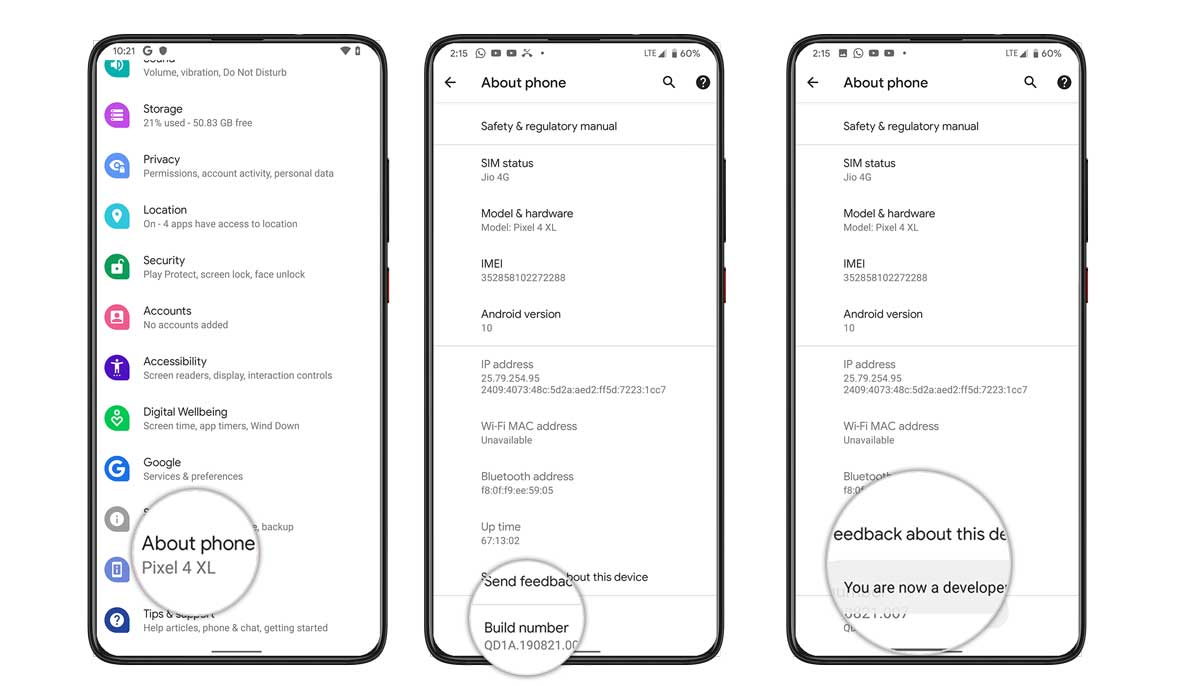
Activate Developer Options
To Enable the Developer Option on your device, follow the below steps:
- Go to the Settings menu of your Android device.
- Then scroll down and go to About.
- Now you need to head to Software Information>> More.
- Here tap on Build Number 7-8 times until you see a message “You are now a developer”.

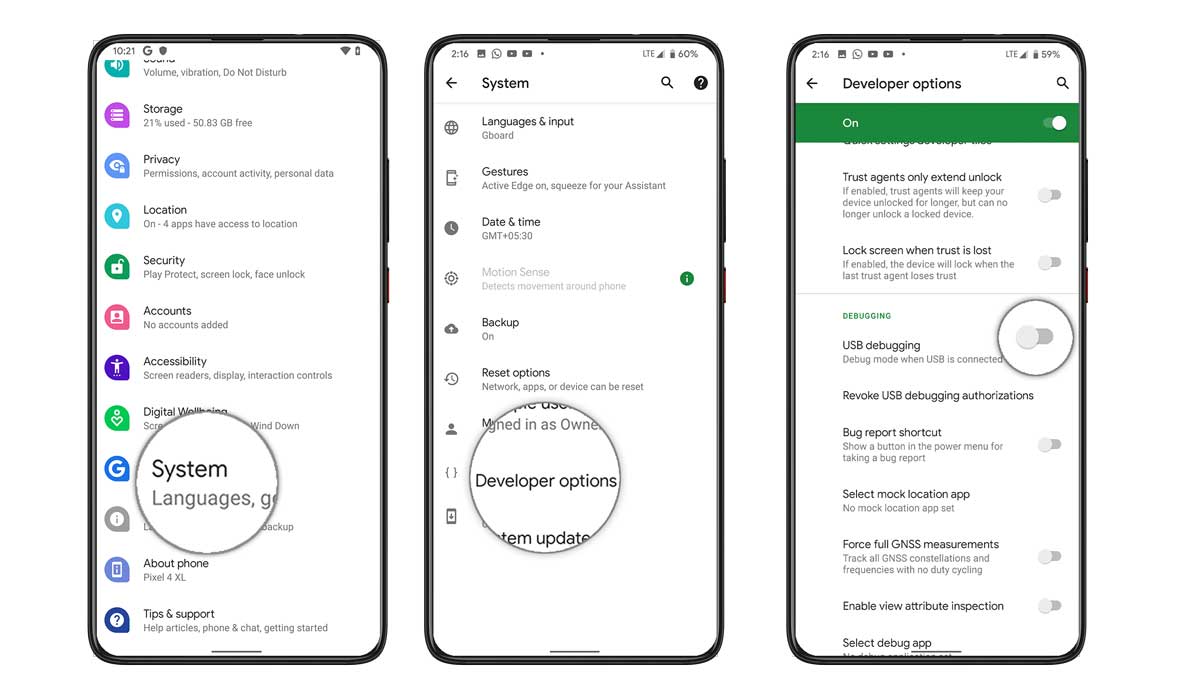
You also need to enable USB Debugging and OEM unlock option under the Developer Options menu. And to do that:
- Head over to Developer Options and toggle ON the USB Debugging option as well as the OEM unlock option.


Install ODIN tool
You need to install the latest Odin tool on your PC. For that, you can follow the link mentioned below:
Unlock the bootloader
In order to install the TWRP Recovery, you have to first unlock the bootloader on the Samsung Galaxy A13.
Warning!
Download Samsung USB Drivers
You can follow the link in order to download the correct Samsung USB drivers for Windows and Mac.
Download TWRP Recovery
Here you will find the latest TWRP recovery for the Samsung Galaxy A13.
| File Name | TWRP Recovery |
| Version | Latest |
| Support | Unofficial |
| Device Name: | Samsung Galaxy A13 |
| Developer | mcrazymanu |
Instructions to Install TWRP
Follow the step-by-step instructions mentioned below to simply install the TWRP Recovery on your Samsung Galaxy A13:
- Once you have downloaded, reboot your device into download mode.
- Flash the vbmeta_disabled_R.tar in the USERDATA slot and click start.
- Now the device will boot into recovery mode prompting you to wipe data.
- Wipe data and reboot to download mode again
- Open Odin and add the TWRP Tar file in the AP slot and click start to flash.
- Once it is done, you can reboot to recovery via recovery key combo (Vol UP + Power button + USB connected).
- In your TWRP Recovery menu, disable encryption:
- Go to Advanced > Terminal, type:
multidisabler.
- Go to Advanced > Terminal, type:
- If the vendor complains about free space left on the device, will attempt to resize the vendor. and it asks to
- Run multidisabler again!. - Type:
multidisableragain and you will see- Finished.when done. - Go back to Wipe > Format Data > type
yes.
You can check out our full-depth tutorial video as well.
- Once the device booted into TWRP Recovery mode, you need to decrypt the data partition. In order to do it: Go to Wipe > Format Data and follow the on-screen instructions.
- Then reboot to recovery mode again.
- Now, flash the Samsung multidisabler zip and then flash the DM Verity Force Disabler (To avoid some issues, like the Reboot thing)
- That’s it. Reboot to the system finally. Enjoy!
Root Samsung Galaxy A13 Using Magisk
- Now you need to install the Magisk Manager APK on your phone.
- Place it in the internal memory on your device.
- Then head over to recovery by pressing the Volume up + Power button together.
- Make sure you have created a backup of your Samsung Galaxy A13.
- In TWRP, select Install and locate Magisk.zip and select the file.
- Swipe to Install and flash it.
- Restart your device.
- Voila!
So, there you have it from my side in this post. I hope you guys liked this post and were able to install the TWRP Recovery and root your Samsung Galaxy A13 smartphone. Let us know in the comments below if you faced any issues while installing the TWRP recovery on your phone and then rooting it using Magisk. Until the next post…Cheers!

vbmeta disabled. tar is not working with firmware binary 6, only for the 5
>4 Wipe data and reboot to download mode again
Wipe what data?
>2Flash the vbmeta_disabled_R.tar in the USERDATA slot and click start.
What does this do?