Apple was having one of the best ecosystems, Which allows you to connect and work continuity across your devices. Likely, when you purchase a new smartphone or upgrading from your old smartphone to the more original iPhone. You might be thinking about the to set up your new iPhone, As you upgrading your iPhone 10 with iPhone 11 Pro. In this case, you need to transfer all your files from old device to new device. Apple iOS allows you to move every file from iPhone to iPhone, and this feature known as Quick-start.
Quick Start allows you to migrate your device storage and helps you to transfer files from your old device to your new device. Before continue, you require an Apple iOS 12.4 or later version of the operating system. Even, it requires Bluetooth and Wi-Fi enabled connectivity if you were thinking about backup your data over iCloud but sometimes your iCloud out of storage. Today we are going to teach you how you can transfer data over a new smartphone without backup.
Also Read
Page Contents
How to use Quick Starts to transfer your data using iPhone Migration?
It seems quite handy and one of the easiest methods to transfer your files to the new device wirelessly. Likely, This is handy because it doesn’t need iCloud, iTunes, or any third-party application.
Noteworthy: it is essential to transfer all your data to your iPhone because your items such as messages, photos, doc, and many other files are on an old device. So, it became essential to migrate your all stuff to the new device and what’s better if your device doesn’t require an internet connection or backup on your iPhone. We don’t say backup isn’t worth but it for an emergency case so that you wouldn’t lose data. Apple Quick Start works ad seamlessly, Which makes your new iPhone identical to your Old iPhone in terms of files, Wallpaper, apps, and software settings among more.
How to Enable Quick Start on the new iPhone?

First thing first, Turn on your Bluetooth and Wi-Fi on both iPhone, Also full charger your iPhone.
- You are starting with “Unlocking” your iPhone.
- You have placed both your iPhone smartphone nearby, next to each other.
- “Hello” then, choose a language and select region.
- “Quick Start” starts automatically on your new iPhone.
(Quick Starts will appear on your older device, ask you for using Apple ID.) - Put your new device in Hold. (follow next step.)
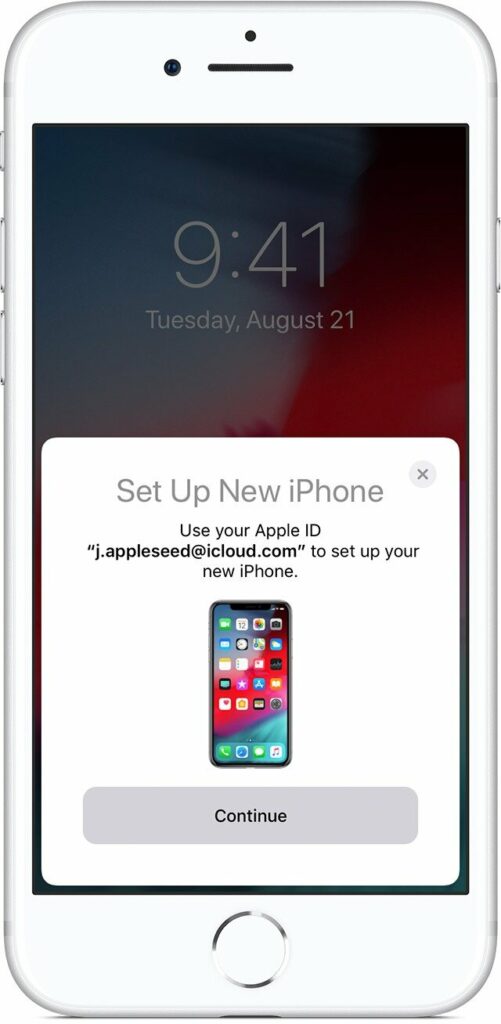
- A Small pop-up appears on your old iPhone and prompts a pop-up asking you to set up your iPhone.
- Click on “Set up New iPhone. “
- Then, Tap on “Continue.”
- Now, Wait for a couple of seconds then a small animation display on your new device.
- Hold your device and Scan an animation using the circular viewfinder with the old iPhone.
(Quite similar to the QR code, Scanning with your old device.) - Then, Enter the passcode that used in your old iPhone device and setting up the Face ID on a new iPhone.
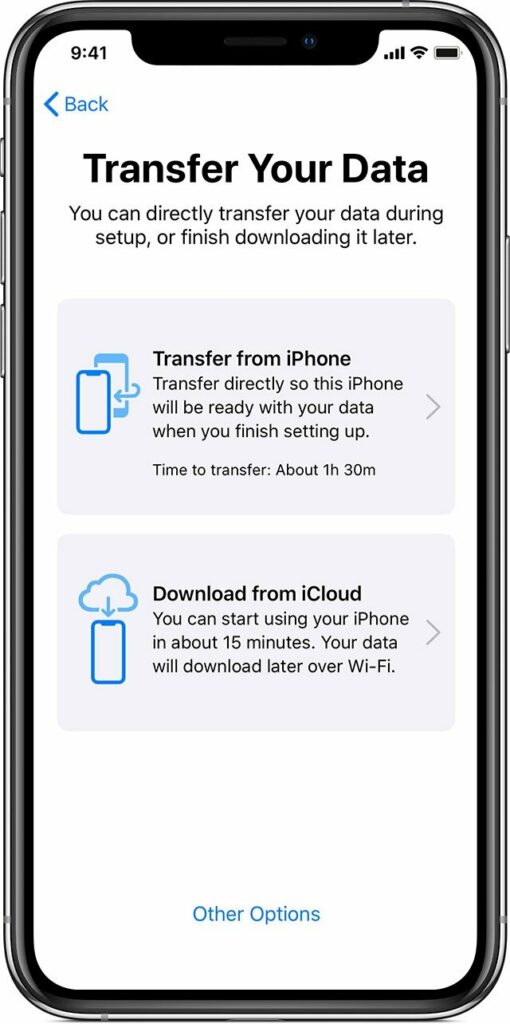
- Now, Agree “Terms and Condition,” and then it will ask for “Transfer your Data” or “Restore from iCloud.”
- Select “Transfer from iPhone,” and then it follows the screen instruction based on your preference.
(You can also tweak some settings like Siri, Apple Pay.) - Continue with your old device, and animation appear on your device.
- It takes some time to completely transfer all your data to the new device, depending on your Wi-Fi network and data.
- Lastly, when the transfer is complete, your new iPhone reboots automatically.
- Now, When it starts, you are ready to use your new iPhone with you all old data.
- That’s it.
Note: If you restore from an Apple iCloud Backup, Then it faster than migrating, and you can continue to use your new iPhone. While if you use Transfer data from the old iPhone takes time, and you are not allowed to use a new iPhone until the transfer is complete.

Pro Tip: You can also use Wire transferring your data. When you were using wired moving, then the icon in notification indicates your appearance of connection.
Give your new iPhone polished transfer check.
You are almost done with migrating, but there were some small changes that you have to make.
-
Check Calendar, Contact, and emails.
It would be best if you re-entered your password for your principal to sync again along with contact and calendar from settings.
-
Apps Notification.
Some apps need specific permission, and You have to turn on the notification from the setting individually.
- Connect your Bluetooth accessories.
You need to pair your Bluetooth device with your new iPhone, such as headphones, Speakers, Apple Watch, and other Bluetooth accessories. - Adding Apple Pay.
Apple Pay stores confidential information such as Prepaid card, Debit, or Credit, then you need to add your Apple Pay again from setting.
While setup, you can also ignore the biometric unlock method or Face ID, but you still need the passcode to unlock your device. Hopefully, you find this article helpful and you have successfully transferred your file on your new iPhone. We like to know your opinion and feedback if any queries share with us in the comment section down below.
