Wallpaper Engine is one of the popular applications for Windows OS which basically allows users to create and use animated live wallpapers on the desktop screen. It has in-depth customizations, Steam Workshop functionality, other user-created downloadable content, and more to do with. However, some users are reporting that the Wallpaper Engine application is somehow Crashing on Windows 11 or older versions unexpectedly. Now, it becomes widespread.
Well, it doesn’t mean every Wallpaper Engine user is facing such an issue, but mostly it happens due to several reasons which we’ve mentioned briefly. So, if you’re also one of the victims to encounter such an issue then you can follow this troubleshooting guide completely to resolve it manually. According to some reports, either user receive an error code 0xc0000005 or no error messages at all which becomes pretty common these days on Windows 11.
Also Read

Page Contents
Wallpaper Engine Crashing on Windows 11, How to Fix?
Luckily, there are a couple of possible workarounds mentioned below that should gonna help you out. Until the problem gets fixed for you, try following all methods one by one. So, without wasting any more time, let’s jump into it.
1. Update Graphics Drivers
Make sure to check for the graphics driver update on your Windows 11 PC to ensure there is no update pending. Sometimes an outdated or corrupted graphics driver on the system may cause several compatibility issues with the games or applications to run properly. To do so:
- Press Windows + X keys to open the Quick Start Menu.
- Click on Device Manager > Double-click on Display adapters.
- Right-click on the graphics card > Select Update driver.
- Choose Search automatically for drivers.
- If there is an update available, it’ll automatically download and install the update.
- Once done, make sure to reboot your computer to apply changes.
2. Disable Windows Security Program
The second thing you should do is to try disabling any security program on your Windows 11 PC temporarily such as the Windows Defender Firewall, Virus & threat protection, or any other third-party antivirus software. Antivirus programs usually work aggressively to prevent ongoing connections and other third-party programs To do that:
- Click on the Start menu > Search for virus & threat protection.
- Click on it from the search result and turn off the real-time protection manually.
- Next, search for defender firewall from the Start menu > Open it and turn off manually.
If in case, you’re using any third-party antivirus software, make sure to turn off the real-time scanning or protection feature temporarily to check for the issue.
3. Update Wallpaper Engine
The chances are high that somehow your Wallpaper Engine application becomes outdated for a while and the latest version is already available. In that scenario, over a period of time, you may start facing compatibility or stability issues on your Windows computer because the application isn’t up-to-date. So, it’s better to keep your software and applications always updated for more stability and improvements. To do so:
- Open the Steam launcher > Go to Library.
- Click on Wallpaper Engine and check whether there is an update available or not.
- If it’s available, click on Update. If not, jump into the next method.
4. Update Windows Build
Sometimes an outdated Windows OS build can also cause multiple issues depending on how the bugs or stability is there. If you haven’t updated your Windows version for a while then you can ensure to follow the steps below to do so.
- Press the Windows + I keys to open Windows Settings.
- Click on Windows Update > Click on Check for updates.
- If there is an update available, make sure to Download and Install it.
- The software update installation process may take some time and you’ll have to reboot your computer to apply changes.
- Once done, make sure to check for the issue again.
5. Check for Optional Updates
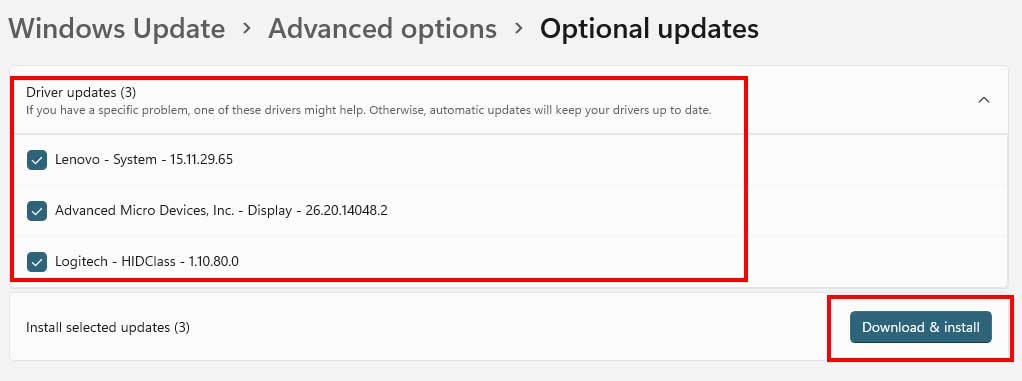
It’s always a better idea to check for optional updates on your Windows system because an additional driver or software update may available which doesn’t appear on the Windows Update section. If so, ensure to install the optional updates straight away by following the steps below:
- Press the Windows + I keys to open Windows Settings.
- Click on Windows Update > Click on Advanced options.
- Now, head over to Optional updates (under Additional options) > Click on Driver updates to expand the list.

- If there is an update available for any drivers or applications, simply select the necessary ones.
- Finally, click on Download & install then wait for the update process to be completed.
- Once done, make sure to reboot your PC to apply changes.
6. Run the SFC tool
SFC or System File Checker tool is useful enough to find out whether any program file or a disk drive has some issues or not on a Windows system. If there is an issue, you can try manually fixing it by following the steps below. To do this:
- Click on the Start Menu and type cmd.
- Now, right-click on Command Prompt from the search result.
- Select Run as administrator > If prompted, click on Yes to give admin privileges.
- Once the command prompt window opens, type the following command and hit Enter to execute it: [There is a space before /]
sfc /scannow

- Now, wait for the process to complete. Depending on the disk size and problematic data, it may take some time.
- Once done, you can note down the detected issues to search for solutions. Make sure to restart your computer to change effects immediately.
7. Reinstall Razer Synapse
If none of the methods worked for you then make sure to uninstall and reinstall Razer Synapse software on Windows 11 (if you’re using it). Sometimes having some other software on the PC may conflict with the Wallpaper Engine application as both are always running in the background. To do so:
- Go to Windows Start menu > Search for Control Panel and click on it.
- Click on Programs > Go to Uninstall a program.
- Now, search for Razer Synapse and right-click on it.
- Select Uninstall and confirm the task by following the on-screen instructions.
- Once the software is uninstalled, make sure to close the window and reboot the PC.
- Finally, head over to this link to download the latest version, and install it again.
That’s it, guys. We assume this guide was helpful to you. For further queries, you can comment below.
