It’s been a couple of days since Atomic Heart has been released worldwide for all major gaming platforms including Windows. As fans are already enjoying this title it looks like Mundfish and Focus Entertainment have done a great job with the overall gameplay experience, stunning graphics quality, better background music, and so on. However, some players are eager to know about Atomic Heart Best Graphics Settings for Nvidia 4090, 4070, 3070, 3080, 3090, 1060, 1070, 2060, 2080, and more graphics cards.
This new open-world, horror plus mysterious first-person shooter video game is performing pretty well and PC version players are praising it on Steam. But somehow unfortunate players are experiencing multiple issues with the game launching, crashes, etc that we can’t deny. Whereas most of the players are having a tough time during the gameplay sessions due to the in-game lags, stutters, framerate drops, other graphical glitches, and so on.
It’s quite possible that your PC specifically isn’t meeting all the system requirements of the game or there is an issue with the installed game file. Additionally, an outdated game version, an outdated graphics driver, problems with the DirectX version, background running tasks, third-party overlay applications, and more can be possible reasons behind the low performance of the game. It’s better to check out all the potential workarounds below to improve performance.
Also Read
Page Contents
- Atomic Heart Best Graphics Settings for 4090, 4070, 3070, 3080, 3090, 1060, 1070, 2060, 2080, and More
- 1. Check System Requirements
- 2. Get a Minimum of 60 FPS with Optimal Graphics Settings
- 3. Disable Mouse Acceleration on Windows
- 4. Adjustments for Nvidia Control Panel
- 5. Update Graphics Drivers
- 6. Switch to a Dedicated GPU
- 7. Check for Game Updates
- 8. Verify and Repair Game Files
- 9. Close Background Running Tasks
- 10. Set High Priority in Task Manager
- 11. Disable Windows Firewall or Antivirus Program
- 12. Set High Performance in Power Options
- 13. Try Disabling Overlay Apps
Atomic Heart Best Graphics Settings for 4090, 4070, 3070, 3080, 3090, 1060, 1070, 2060, 2080, and More
Although the Atomic Heart video game requires a pretty low kind of hardware specifications on the PC to run smoothly before the launch event, it looks like that even the powerful graphics cards like Nvidia RTX 4080 are struggling with the in-game performance. As the game is quite new in the market, we can assume that developers will need to some time to make a couple of optimizations and improvements to the gameplay experience and the consumption of system resources.
But that might not be a solution for everyone those who are using a low-budget or mid-level gaming configuration such as Nvidia GTX 960 or GTX 1060 etc. Even if you’re using a pretty much performance-centric gaming rig in between GTX 1080 and RTX 2080 GPU, the chances are high that you’ll get around 60 FPS in some scenarios with incorrect graphics settings. But if you’re interested in getting an average 60 FPS or higher frame rates on your PC then you should check the methods below.
Also Read
1. Check System Requirements
Before getting to any other conclusion, make sure to check out potential workarounds or in-game graphics settings adjustments by following the methods below. First, you should cross-check the system requirements of the Atomic Heart game to ensure your PC configuration is compatible enough.
System requirements (Low, 1080p / 30fps):
- GPU: Nvidia GeForce GTX 960 / AMD Radeon R9 380
- CPU: Intel Core i5-2500 / AMD Ryzen 3 1200
- RAM: 8GB (12GB recommended)
- Storage: 90GB HDD (SSD recommended)
System requirements (Low, 1080p / 60fps)
- GPU: Nvidia GeForce GTX 1060 / AMD Radeon RX 580
- CPU: Intel Core i5-6500 / AMD Ryzen 3 1200
- RAM: 8GB (12GB recommended)
- Storage: 90GB HDD (SSD recommended)
System requirements (High, 1080p / 60fps)
- GPU: Nvidia GeForce GTX 1080 / AMD Radeon RX 5700 XT
- CPU: Intel Core i5-7600K / AMD Ryzen 5 1600
- RAM: 16GB
- Storage: 90GB SSD
System requirements (Ultra, 4K / 60fps)
- GPU: Nvidia GeForce RTX 3080 / AMD Radeon RX 6800 XT
- CPU: Intel Core i7-8700K / AMD Ryzen 5 3600X
- RAM: 16GB
- Storage: 90GB SSD
2. Get a Minimum of 60 FPS with Optimal Graphics Settings
If you’re using an outdated or low-end PC configuration then tweaking the graphics settings in the Atomic Heart game might help you to achieve an increased FPS count.
DISPLAY SETTINGS:
- Window Mode: Fullscreen
- VSync: OFF
- FPS Cap: Native refresh rate of the monitor/tv
- Screen Resolution: Native resolution of the monitor/tv
QUALITY SETTINGS:
- Preset: Custom
- Depth of Field: OFF
- Motion Blur: OFF
- Anti-Aliasing: High TAA
- DLSS Super Resolution: Quality (on Nvidia GPUs that support DLSS)
- DLSS Frame Generation: ON (on Nvidia GPUs that support DLSS 3.0)
- Nvidia Reflex: ON
- Fidelity FX Super Resolution: ON (on GPUs that don’t support DLSS)
- Animation Quality: Medium
- Shadows: Medium
- Ambient Occlusion: High
- Visual FX: Medium
- Number of Objects: High
- Materials: Medium
- Volumetric Fog: Medium
- Post-Processing: Medium
- Textures: Max (Set Low if VRAM is lower than 8 GB)
- Anisotropic Filtering: 8
- 3D Model Quality: High
- Vegetation Density: Medium
- Hard Drive Speed: HDD or SSD
- Shader Cache: ON
3. Disable Mouse Acceleration on Windows
A mouse acceleration feature improves the motion or movement of the mouse cursor/pointer on the screen. So that you won’t feel any lag or jitter while moving the mouse pointer on the screen here & there. By disabling the mouse acceleration option on the system, you’ll be able to reduce the motion blur or jitter of the mouse pointer movement while gaming which can also help reduce in-game stutters. To do that:
- Click on the Windows logo on the taskbar.
- Type mouse settings in the Start menu search bar.
- Click on Change your mouse settings > Click on Additional mouse options.
- Now, select the Pointer Options tab.
- Make sure to Uncheck the Enhance Pointer Precision box.
- Click on Apply and then OK to save changes.
4. Adjustments for Nvidia Control Panel
You can head over to the Nvidia Control Panel application and try making the following adjustments to ensure your game runs slightly better without screen tearing.
- V-Sync (Vertical Sync) – OFF
- Tripple buffering – ON
- Maximum pre-rendered frames – 1
5. Update Graphics Drivers
You should try checking for the graphics driver update on your Windows PC and installing the latest version to ensure no update is pending. An outdated or missing graphics driver can trigger issues with properly functioning graphics-intensive programs. To do that:
- Right-click on the Start Menu to open up the Quick Link Menu.
- Click on Device Manager from the list.
- Now, double-click on Display adapters to expand it.
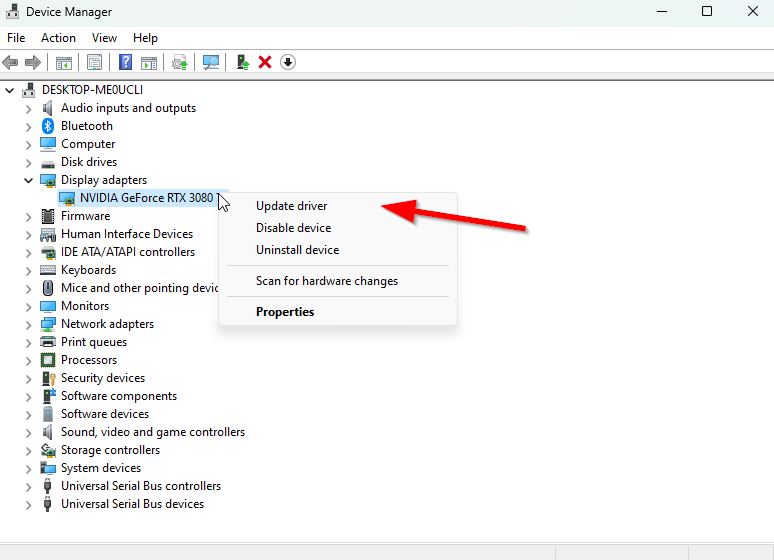
- Then right-click on the dedicated graphics card name you’re using to bring the context menu.
- Next, click on Update driver > Choose Search automatically for drivers.
- The system will automatically check for the available update.
- If an update is available, it’ll automatically download and install the latest version.
- Once done, make sure to restart your PC to apply the changes.
If you can’t find any pending updates then just head over to the official website of Nvidia website below and search manually for the latest update. If a new version is available for the graphics card, just download the driver and install it on your PC. You can jump to the link below to do so:
6. Switch to a Dedicated GPU
Sometimes the game may run with the integrated HD graphics on the PC that comes with the processors to handle minimal graphics tasks. But if you’re using an external Nvidia graphics card then make sure to switch the Atomic Heart game to the dedicated GPU by following the steps below.
- Right-click on the desktop screen to open the context menu.
- Now, click on Nvidia Control Panel to open it.
- Head over to 3D Settings > Select Manage 3D Settings.
- Open the Program Settings tab > Choose Atomic Heart from the drop-down menu.
- Next, select the preferred graphics processor for this program from another drop-down menu.
- Finally, your Nvidia GPU should show as High-Performance Nvidia Processor.
- Save the changes and reboot the PC.
7. Check for Game Updates
According to multiple reports, corrupted or damaged game files can cause a wide variety of problems and errors with game launching or gameplay. Mostly updating the game can resolve these issues in a jiffy.
- Open the Steam client > Go to Library.
- Click on Atomic Heart from the list of installed games on the left pane.
- Now, the client will automatically search for the available update.
- If there is an update available, click on the Update option.
- Wait for a couple of minutes or so until the game update completes. [Depends on the storage space and internet connectivity]
- Once done, make sure to close the Steam client.
- Finally, reboot your PC to apply changes, and launch the Atomic Heart game again.
8. Verify and Repair Game Files
If in case there is an issue with the game files and they somehow get corrupted or missing, then make sure to perform this method to easily check for the issue.
- Launch the Steam client > Click on Library.
- Right-click on Atomic Heart from the list of installed games.
- Now, click on Properties > Go to the Local Files files.

- Click on Verify Integrity of Game Files.
- You’ll have to wait for the process until it gets completed.
- Once done, just restart your computer.
9. Close Background Running Tasks
Unnecessary background running tasks or programs can eat up a lot of system resources like CPU or Memory usage literally reducing system performance. Hence, the startup crashing, lagging, and not loading issues appear quite often. Simply, close all the unnecessary background running tasks completely. To do this:
- Press the Ctrl+Shift+Esc keys to open up the Task Manager.
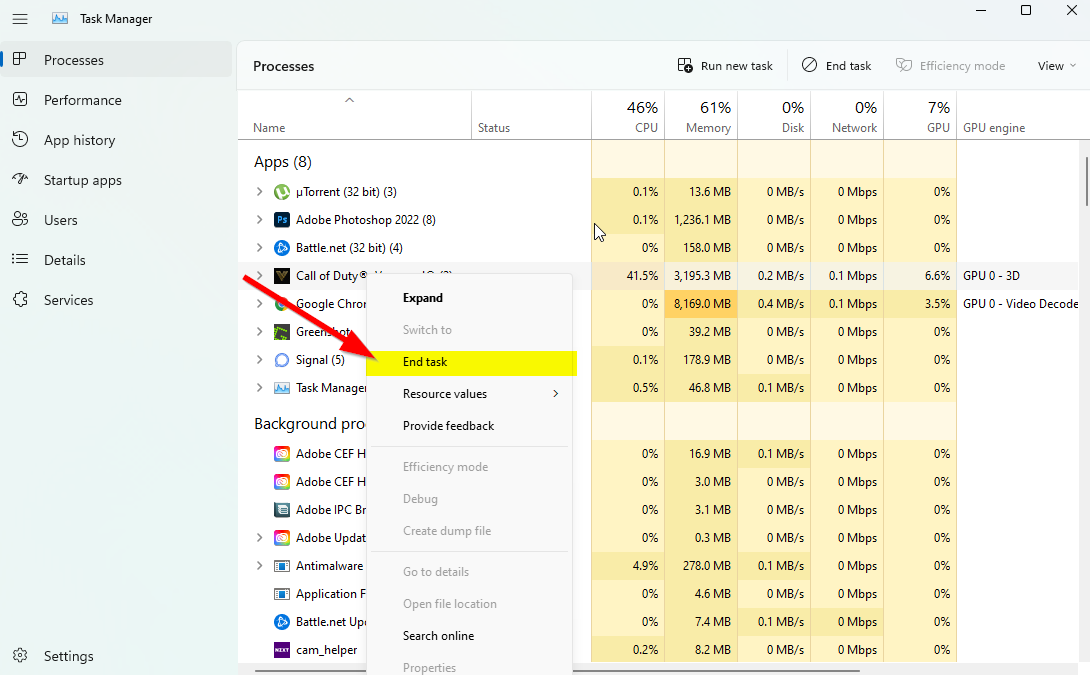
- Now, click on the Processes tab > Click to select tasks that are unnecessarily running in the background and consuming enough system resources.
- Click on End Task to close them one by one.
- Once done, restart your system.
Now, you can check whether you’ve fixed Atomic Heart performance issues on your PC or not. If not, follow the next method.
10. Set High Priority in Task Manager
Make your game priority in the higher segment via the Task Manager to tell your Windows system to run the game properly. To do this:
- Right-click on the Start Menu > Select Task Manager.
- Click on the Processes tab > Right-click on the Atomic Heart game task.
- Select Set Priority to High.
- Close Task Manager.
- Finally, run the Atomic Heart game to check if it still has low FPS on the PC or not.
11. Disable Windows Firewall or Antivirus Program
The chances are that maybe your default Windows Defender Firewall protection or any third-party antivirus program is preventing the ongoing connections or game files from running properly. So, temporarily disable or turn off the real-time protection and firewall protection. Then you should try running the game to check if Atomic Heart’s low FPS issues on the PC have been fixed. To do this:
- Click on the Start Menu > Type firewall.
- Select Windows Defender Firewall from the search result.
- Now, click on Turn Windows Defender Firewall on or off from the left pane.
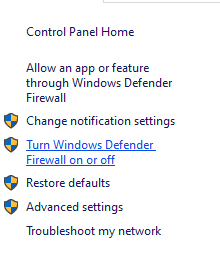
- Select the Turn off Windows Defender Firewall (not recommended) option for both the Private & Public Network Settings.
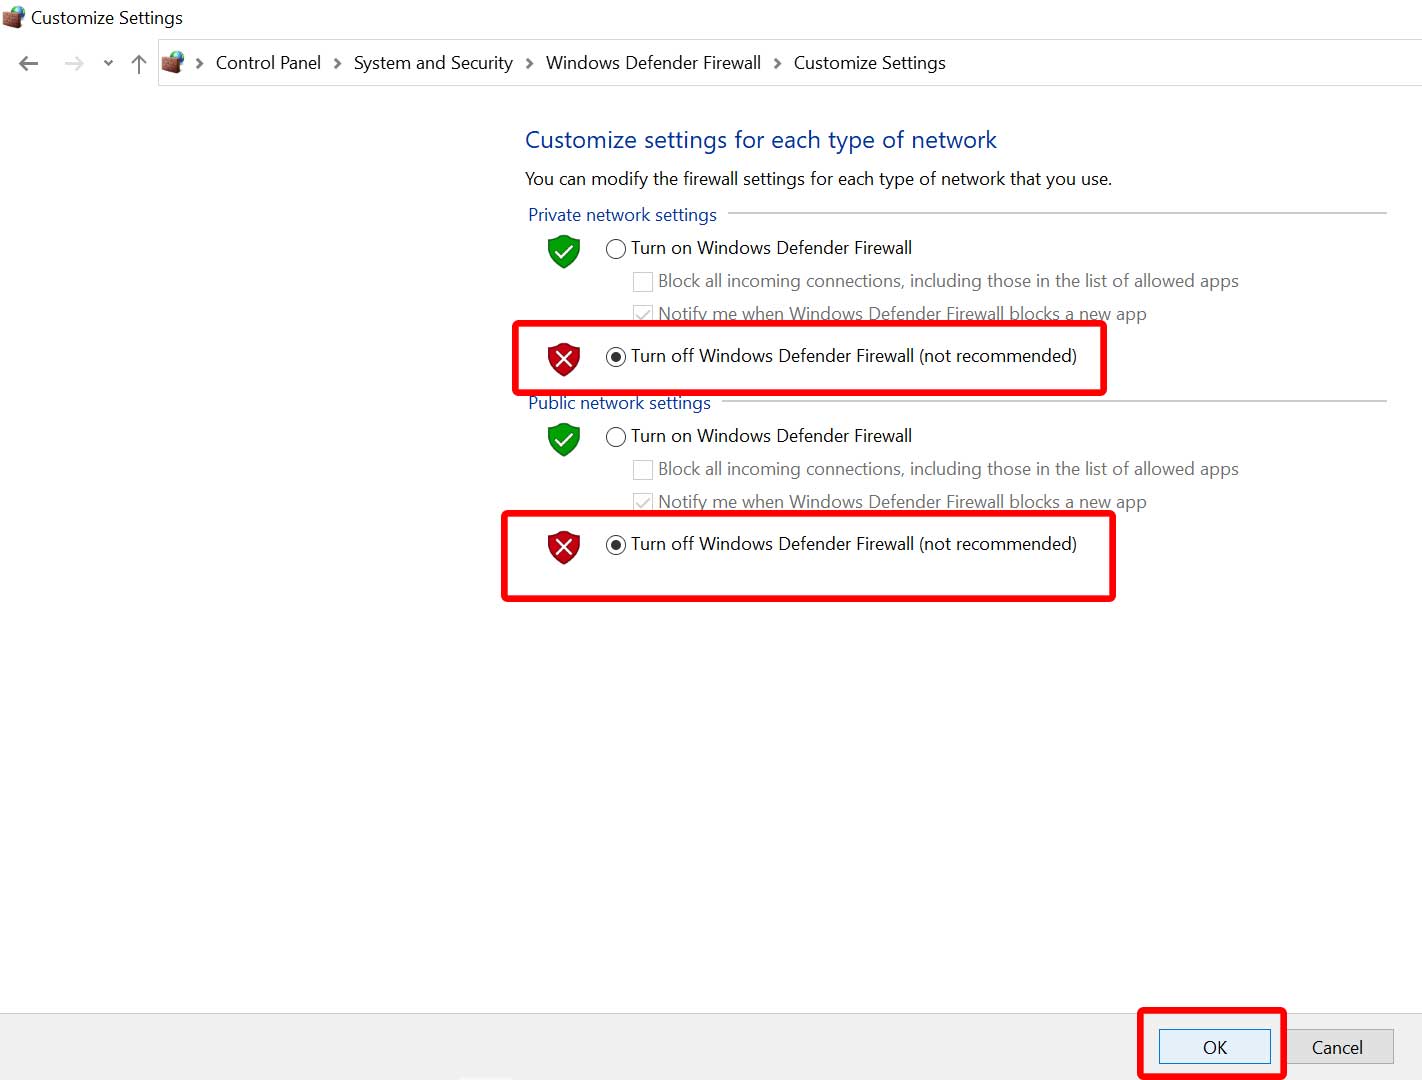
- Once selected, click on OK to save changes.
- Finally, restart your computer.
Similarly, you have to turn off the Windows Security protection too. Just follow the steps below:
- Press the Win+I keys to open the Windows Settings menu.
- Click on Update & Security > Click on Windows Security from the left pane.
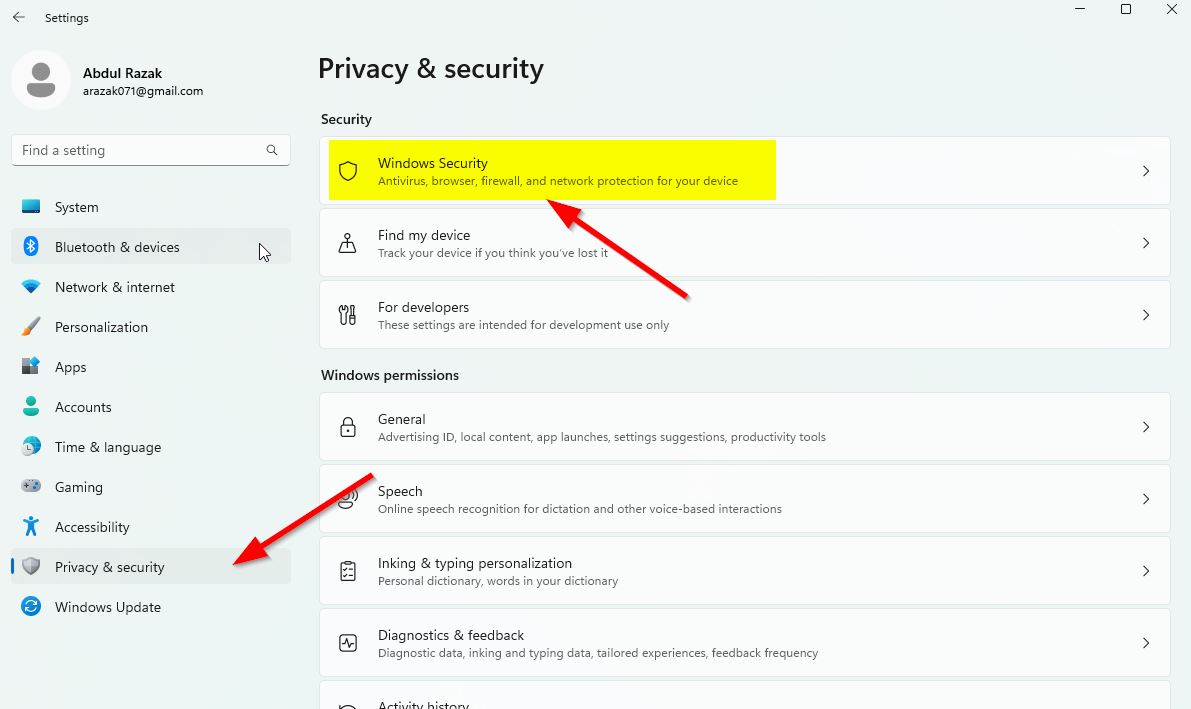
- Now, click on the Open Windows Security button.
- Go to Virus & threat protection > Click on Manage settings.
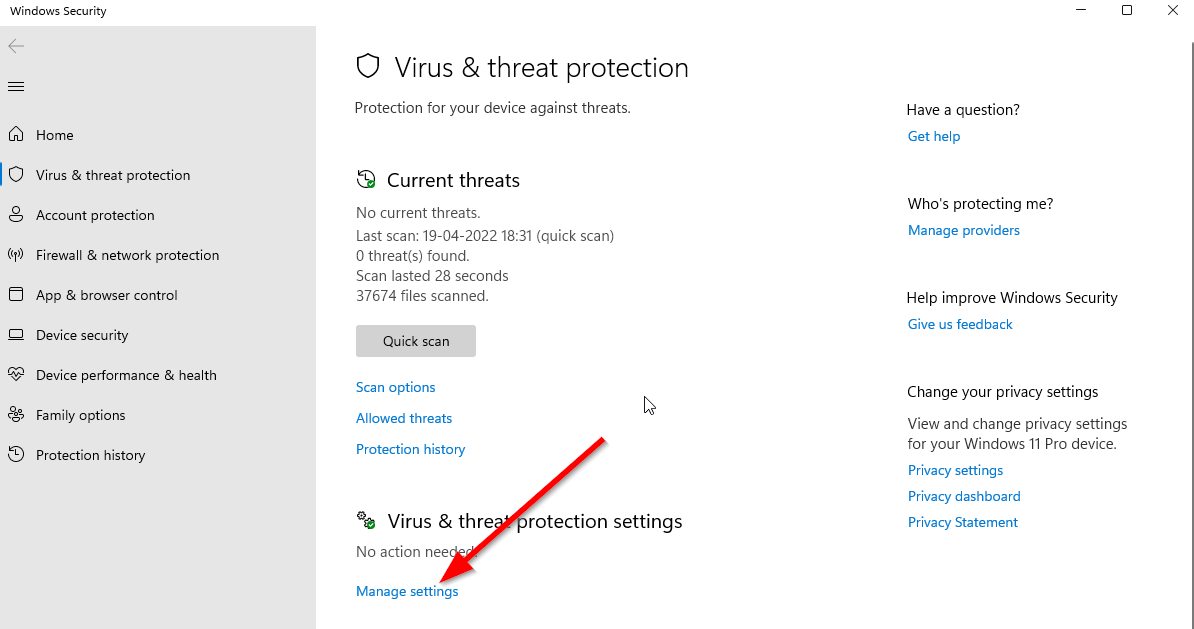
- Next, you’ll need to simply turn off the Real-time protection toggle.
- If prompted, click on Yes to proceed further.
- Additionally, you can also turn off cloud-delivered protection, Tamper protection if you want.
12. Set High Performance in Power Options
If, in case, your Windows system is running on the Balanced mode in Power Options, just set the High-Performance mode for better results. Although this option will take higher power usage or battery usage. To do this:
- Click on the Start Menu > Type Control Panel and click on it from the search result.
- Now, go to Hardware and Sound > Select Power Options.
- Click on High Performance to select it.
- Make sure to close the window and fully shut down your computer. To do this, click on the Start Menu > Go to Power > Shut Down.
- Once your computer is fully turned off, you can power it on again.
This should fix Atomic Heart performance-related issues on your PC in most cases. However, if none of the methods worked for you, follow the next one.
13. Try Disabling Overlay Apps
It seems that a couple of popular apps do have their own overlay program that can eventually run in the background and cause issues with the gaming performance or even launching issues. You should turn them off to fix the issue by following the steps below:
Disable Discord Overlay:
- Launch the Discord app > Click on the gear icon at the bottom.
- Click on Overlay under App Settings > Turn on the Enable in-game overlay.
- Click on the Games tab > Select Atomic Heart.
- Finally, turn off the Enable in-game overlay toggle.
- Make sure to reboot your PC to apply changes.
Disable Xbox Game Bar:
- Press the Win+I keys to open Windows Settings.
- Click on Gaming > Go to Game Bar > Turn off Record game clips, screenshots, and broadcast using Game bar option.
If in case, you’re unable to find out the Game Bar option then just search for it from the Windows Settings menu.
Disable Nvidia GeForce Experience Overlay:
- Launch the Nvidia GeForce Experience app > Head over to Settings.
- Click on the General tab > Disable the In-Game Overlay option.
- Finally, restart the PC to apply changes and launch the game again.
Also, do keep in mind that you should disable some other overlay apps like MSI Afterburner, Rivatuner, RGB software, or any other third-party overlay apps that run in the background always.
Bonus: If you don’t want to mess with the in-game graphics settings, you can open the Nvidia GeForce Experience app. Then click on Optimize to get the optimized Atomic Heart Settings immediately without manually adjusting graphics options.
That’s it, guys. We assume this guide was helpful to you. For further queries, you can comment below.
