Call of Duty: Black Ops Cold War is the first-person shooter under the Call of Duty franchise. Although the title has become quite popular among the battle royale community, it seems this game has a huge list of bugs and errors. Most PC users are affected due to the COD Black Ops Cold War Crashing issue, even in 2023. If you’re also facing the same problem, follow this guide.
The most irritating part is that whenever players are trying to get into the lobby or start the game on their PC, it starts crashing a lot. Even some affected players have reported experiencing frequent crashes, which aren’t expected from such a franchise title. The game faces multiple bugs, such as black screen issues, lags, stutters, frame drops, visual graphic glitches, and more.
Also Read
Fix Call of Duty Black Ops Cold War Fatal Error Crash on Windows 11/10
Fix: Black Ops Cold War Stuck on Compiling Shaders
Fix: COD Black Ops Cold War Crashing Error Code 0xc0000005
Fix: COD Black Ops Cold War Stuttering, Lags, or Freezing constantly
Page Contents
- Why COD Black Ops Cold War Crashes?
- Fix: COD Black Ops Cold War Crashing | 2023 Update
- 1. Check System Requirements
- 2. Update Graphics Drivers
- 3. Update Windows OS Build
- 4. Run the game as an administrator
- 5. Run the game in DirectX 11 version
- 6. Close Other Background Running Tasks
- 7. Scan and Repair Game Files
- 8. Disable Vertical Sync
- 9. Try Using Another Region
- 10. Switch to Windowed Display Mode
- 11. Set Windows Display Language to English
- 12. Ensure Activision and Blizzard Accounts are Linked
- 13. Disable Hardware-Accelerated GPU Scheduling
- 14. Disable in-game Ray Tracing
Why COD Black Ops Cold War Crashes?
To be very precise, there are a couple of possible reasons behind such an issue. Such as an outdated graphics driver version, an outdated Windows OS build, issues with the DirectX, incompatibility issues with the system requirements, corrupted or missing game files, overclocked CPU/GPU frequency, and more.
Here we’ve shared all the possible workarounds to fix this problem that you may follow.
Fix: COD Black Ops Cold War Crashing | 2023 Update
If we talk about the possible reasons, some are quite common these days regarding PC games. Whereas some of the reasons may trigger the startup crashing issue due to several aspects, and most may happen at your end. So, without further ado, let’s jump into the guide below.
1. Check System Requirements
Checking the game’s system requirements is necessary enough if you’re experiencing multiple issues with the game launching or gameplay on your PC. Here we’ve shared the minimum and recommended system requirements that you should check once if you’re unsure whether your PC configuration is capable enough.
Minimum Requirements:
- OS: Windows 7 64 Bit (SP1) or Windows 10 64 Bit (v.1803 or higher)
- CPU: Intel Core i3-4340 or AMD FX-6300
- RAM: 8GB
- HDD: MP Only 35GB, 82GB for all game modes
- GRAPHICS: NVIDIA GeForce GTX 670 / GeForce GTX 1650 or Radeon HD 7950
Recommended Requirements:
- OS: Windows 10 64 Bit
- CPU: Intel Core i5-2500K or AMD Ryzen R5 1600X processor
- RAM: 12GB
- HDD: 82GB
- GRAPHICS: NVIDIA GeForce GTX 970 / GTX 1660 Super or Radeon R9 390 / AMD RX 580
2. Update Graphics Drivers
- Press Windows + X keys to open the Quick Start Menu.
- Now, click on Device Manager from the list > Double-click on Display adapters.
- Right-click on the dedicated graphics card that you’re using.
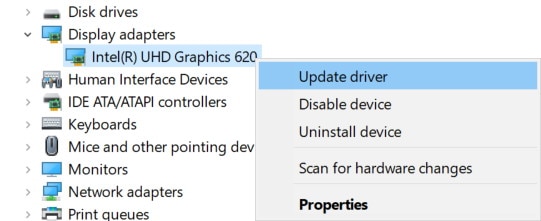
- Next, select Update driver > Choose to Search automatically for drivers.
- If an update is available, it’ll automatically download & install the latest version.
- Once done, make sure to reboot your computer to apply changes.
3. Update Windows OS Build
- Press Windows + I keys to open up the Windows Settings menu.
- Next, click on Update & Security > Select Check for updates under the Windows Update section.
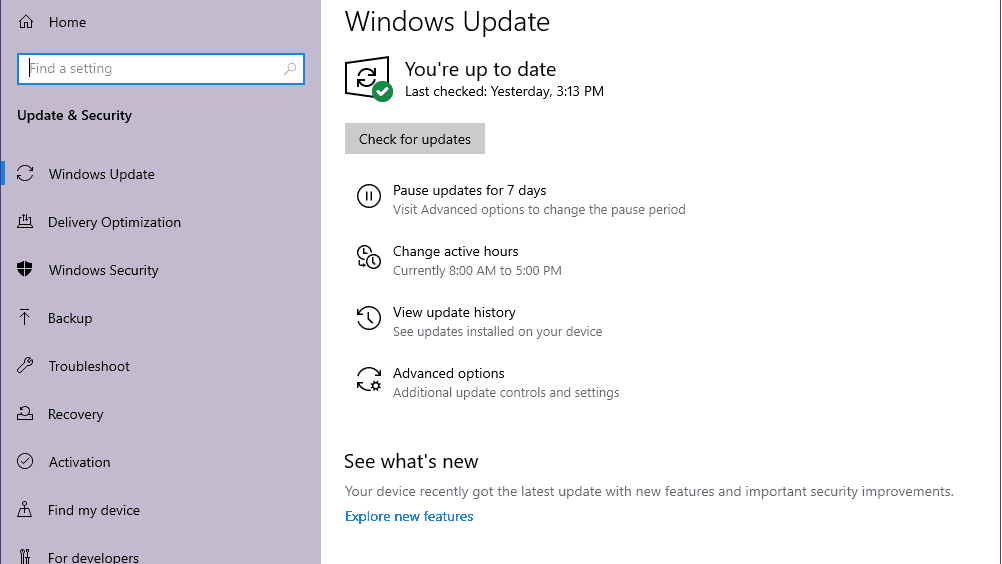
- If there is a feature update available, select Download and install.
- It may take a while to complete the update.
- Make sure to restart your computer to install the update completely.
4. Run the game as an administrator
- Right-click on the Call of Duty: Black Ops Cold War exe shortcut file on your PC.
- Now, select Properties > Click on the Compatibility tab.

- Enable the Run this program as an administrator checkbox.
- Click on Apply and select OK to save changes.
5. Run the game in DirectX 11 version
- Open Battle.net (Blizzard) launcher on the PC.
- Go to Games > Click on Call of Duty: BOCW.
- Select Options > Select Game Settings.
- Click on the Additional command line arguments checkbox from the Black Ops Cold War section to enable it.
- Next, type -d3d11 and forcefully play the Black Ops Cold War game to run in the DirectX 11 mode.
6. Close Other Background Running Tasks
- Press Ctrl + Shift + Esc keys to open up the Task Manager.
- Now, click on the Processes tab > to select tasks unnecessarily running in the background and consuming enough system resources.
- Click on End Task to close them one by one.
- Once done, restart your system, and check for the issue.
7. Scan and Repair Game Files
- Open the Battle.net client > Go to Games.
- Click on the Call of Duty: BOCW title.
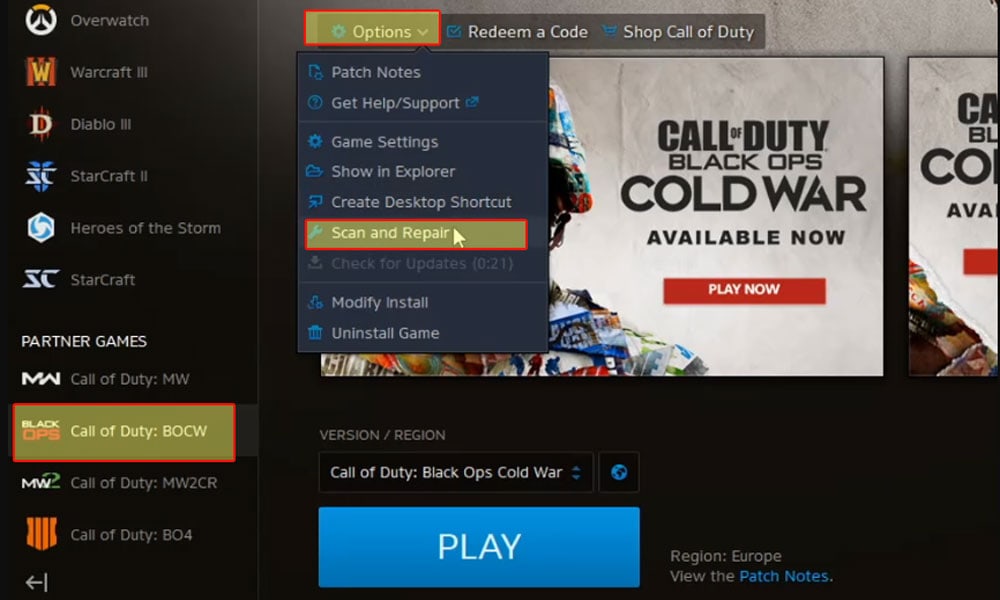
- Click on Options > Select Scan and Repair.
- Once the process is completed, click on Check for Updates.
- Once done, restart the client, and try running the game.
8. Disable Vertical Sync
Vertical Sync (V-Sync) is one of the useful graphics options that synchronizes the frame rate of your game as well as the refresh rate of your monitor to minimize visual lags or jitters. However, if your PC configuration isn’t powerful enough, you should turn it off. To do this:
- Open Battle.net client > Go to Games.
- Open the Call of Duty: BOCW title.
- Now, go to the in-game Settings menu > Click on Graphics.
- Just set Disabled for both the Gameplay V-Sync and Menu V-Sync option.
- Once turned them off, close the game, and re-open it.
9. Try Using Another Region
Sometimes selecting another region may fix multiple issues like crashing or not launching or even connectivity issues with the game servers.
- Open Battle.net client > Go to Games.
- Click on the Call of Duty: BOCW title > Under the Version/Region section, make sure to click on the Earth icon.
- Now, select a different region > Click on Play to check for the issue.
10. Switch to Windowed Display Mode
There are basically three types of gaming display window mode on a computer that users prefer such as Windowed, Borderless, and Fullscreen Borderless. Switching to the Windowed display mode can be helpful to plenty of PC users if they’re experiencing black screen or crashing issues on the PC.
- Once you’re in the game or in the game loading screen, make sure to press the Alt + Enter keys to switch the display mode to Windowed.
- If the problem has been fixed and you’re now able to play the game, press the Alt + Enter keys again to switch between display modes.
11. Set Windows Display Language to English
It’s really important that you’ve manually selected the Windows Display Language to English if it’s your default language. Plenty of affected players have reported that after selecting the display language to English, they have fixed the startup crashing issue on the PC.
- Press Windows + I keys to open Windows Settings.
- Click on Time & Language > Click on Language from the left pane.
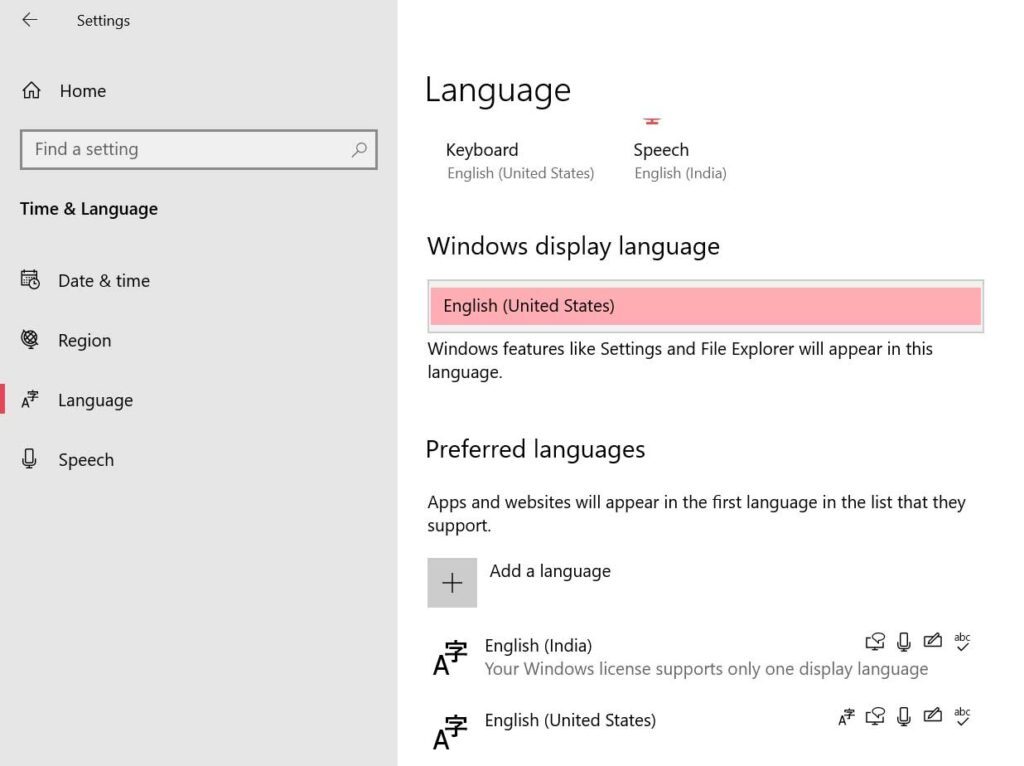
- Now, select English (United States) from the list of languages for Windows display language.
- If in case, you didn’t find your preferred language in the list, make sure to click on Add a language.
- Once selected, restart your computer to apply changes.
- Finally, open the Call of Duty: BOCW game, and it should run properly.
12. Ensure Activision and Blizzard Accounts are Linked
- Head over to the official Activision login screen page.
- Now, log into your existing account > Click on Profile from the top-right corner.
- Go to the Account Linking section > Click on Link With Battle.net Account.
- Select Continue and wait for the linking process to be completed.
- Once done, run the Call of Duty: Black Ops Cold War game and check for the crashing issue.
13. Disable Hardware-Accelerated GPU Scheduling
Although the hardware-accelerated GPU scheduling feature allows the system to run properly and increases performance, some affected players have mentioned that turning it off has helped them a lot. If none of the above methods worked for you, try following the steps below to turn of the hardware-accelerated GPU scheduling mode on your Windows 10.
- Right-click on the blank desktop area > Select Display settings.
- Click on Graphics settings under the Multiple displays section.
- Click on the Change default graphics settings under the Defaults settings.
- Here you can easily turn off the Hardware-accelerated GPU scheduling feature.
14. Disable in-game Ray Tracing
Ray Tracing is a display rendering technology that generates an image by tracing the path of light as pixels in an image into one for better visibility and improved graphics quality than usual. However, it requires a heavy amount of hardware performance and a couple of graphics cards are compatible with this feature.
Some players have reported that disabling this feature in the game settings may fix the crashing issue. To do that:
- Open Call of Duty: Black Ops Cold War > Go to Settings.
- Head over to the Graphics tab > Here, you’ll see the Ray Tracing option.
- Now, disable all three options as below:
- Ray Tracing Sun Shadows – Disabled
- Ray Tracing Local Shadows – Disabled
- Ray Tracing Ambient Occlusion – Disabled
- Once done, restart the Battle.net client, and try running the game again.
That’s it, guys. We assume this guide was helpful to you. For additional queries, let us know in the comment below.

my game still randomly closes help