Motion Twin did release Dead Cells back in 2018 as a roguelike-Metroidvania 2D adventure pixel-graphics video game that has been doing pretty well among the players. It has received overwhelmingly positive reviews on Steam for the PC version but that doesn’t mean it’s free from bugs or errors. It looks like plenty of players are experiencing Dead Cells Failed to Load Library Steam.hdll Error on the PC while trying to launch the game via the Steam client.
Well, DLL means ‘Dynamic Link Library’ that basically goes through a set of instructions to run programs on Windows. DLL files mainly save a lot of disk space that comes default with the applications and gets automatically installed whenever you install a specific program on the PC. But somehow the DLL files get missing or corrupted due to some unexpected reasons. Luckily, we’ve mentioned brief info about this error and its possible reasons below.
Also Read
Fix: Steam Link Not Recognizing Controllers
Fix: Steam Workshop Not Downloading
Fix: Steam Not Opening After Update on Windows 11
Fix: Steam Not Enough Disk Space Error
Steam Content File Locked Error Fix 2023
How to Fix Steam Cloud Error Such as Out of Date, Unable to Sync
How to Fix If Steam Voice Chat Not Working in Windows 10/11 PC
Fix: Steam Failed to Initialize GTA 5 and RDR2
Page Contents
- What does “Steam.hdll” error mean?
- Fix: Dead Cells Failed to Load Library Steam.hdll Error
- 1. Update Dead Cell
- 2. Verify the Integrity of Game Files
- 3. Launch Dead Cells from the Game Folder Directly
- 4. Reinstall Microsoft Visual C++ Runtime
- 5. Try Clearing the Download Cache
- 6. Perform a Clean Boot
- 7. Reinstall DirectX (Latest)
- 8. Force Run the Game in DirectX 12
- 9. Register the steam.hdll file
- 9. Disable Windows Firewall or Antivirus Program
- 10. Run SFC Scan
- 11. Reinstall Dead Cell
What does “Steam.hdll” error mean?
The “steam.hdll” error message can be occurred due to several possible reasons such as corrupted or missing game files, an outdated game version, conflicts with Windows applications, malicious software, Windows registry issues, Visual C++ issues, DirectX issues, conflicts with the startup apps, Steam Beta platform, and more. Talking about the commonly referred steam.hdll errors, it includes some of the following ones for PC users.
- ‘The program can’t start because steam.hdll is missing from your computer’.
- ‘Error loading steam.hdll. The specified module could not be found’.
- ‘There was a problem starting steam.hdll’.
- ‘Steam.hdll could not be located’.
- ‘Cannot register steam.hdll’.
Fix: Dead Cells Failed to Load Library Steam.hdll Error
As mentioned above, unfortunate players are experiencing Steam.hdll error while launching Dead Cells which says “Fatal Error. Failed to load library steam.hdll” on the PC. Now, if you’re also facing the same issue then make sure to follow this troubleshooting guide to fix it. So, without wasting any more time, let’s jump into it.
1. Update Dead Cell
If in case, you haven’t updated the Dead Cells game for a while then make sure to follow the steps below to check for updates and install the latest patch (if available). To do this:
- Open the Steam client > Go to Library.
- Click on Dead Cells from the left pane.
- It’ll automatically search for the available update.
- If any, make sure to click on Update.
- Wait for the update to complete and reboot the PC to apply changes.
2. Verify the Integrity of Game Files
If in case, there is an issue with the game files and somehow it gets corrupted or missing then make sure to perform this method to easily check for the issue.
- Launch Steam > Click on Library.
- Right-click on Dead Cells from the list of installed games.
- Now, click on Properties > Go to Local Files.

- Click on Verify Integrity of Game Files.
- You’ll have to wait for the process until it gets completed.
- Once done, just restart your computer.
3. Launch Dead Cells from the Game Folder Directly
Instead of running the Dead Cell game via the Steam client on your PC, you should try launching the game from the game folder directly. Make sure to head over to the following directory and run the game application file. C:\Program Files\Steam(x86)\SteamApps\Common
4. Reinstall Microsoft Visual C++ Runtime
Ensure to reinstall the Microsoft Visual C++ Runtime on your PC to fix game-launching errors. To do so:
- Press the Windows key to open the Start Menu.
- Type Apps & Features and click on it from the search result.
- Now, locate the Microsoft Visual C++ program(s) in the list.
- Select each program and click on Uninstall.
- Visit the official Microsoft website and download the latest Microsoft Visual C++ Runtime.
- Once done, install it on your computer, and restart the system to change the effects.
5. Try Clearing the Download Cache
Sometimes issues with the game launcher’s cache files may cause game errors. You should try clearing the cache from the client or server. To do so:
- Open the Steam client > Go to the Steam tab from the top left side.
- Click on Settings > Click on the Download tab.
- Now, click on the Clear Download Cache button.
- Once done, log back into your Steam account and relaunch the game.
6. Perform a Clean Boot
Some of the apps and their services may start automatically while booting the system right away. In that case, those apps or services will definitely gonna use a lot of internet connection as well as system resources. If you’re also feeling the same, make sure to perform a clean boot on your computer to check for the issue. To do that:
- Press the Win+R keys to open the Run dialog box.
- Now, type msconfig and hit Enter to open System Configuration.
- Go to the Services tab > Enable the Hide all Microsoft services checkbox.
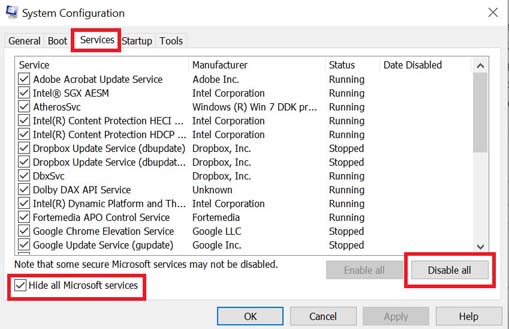
- Click on Disable all > Click on Apply and then OK to save changes.
- Now, go to the Startup tab > Click on Open Task Manager.
- The Task Manager interface will open. Here go to the Startup tab.
- Then click on the particular task which has a higher startup impact.
- Once selected, click on Disable to turn them off from the startup process.
- Do the same steps for each program that has a higher startup impact.
- Once done, make sure to restart your computer to apply changes.
Also Read
7. Reinstall DirectX (Latest)
You should try reinstalling the latest version of DirectX from the official Microsoft website on your PC/Laptop. You need to download and install the DirectX installer package and run it. Remember that you’ll require DirectX 12 or above to run the Dead Cell game properly.
8. Force Run the Game in DirectX 12
It’s also recommended to forcefully run the game in the DirectX 12 version using the command option. If your PC is running on DirectX 11 or lower, then try forcefully running the Dead Cell game. To do so:
- Launch the Steam client > Go to LIBRARY.
- Right-click on the Dead Cell game.
- Click on Properties > Select GENERAL from the left pane menu.
- Type -dx12 under the Launch Options.
- Now, go back and launch the game. If prompted, click on the radio button next to the Play option of Dead Cell.
9. Register the steam.hdll file
The chances are high that somehow the steam.hdll file becomes missing or corrupted on the Windows system. That’s why you’ll need to register the steam.hdll file on the PC to ensure there is no issue with the specific error. You can follow the steps below to do so:
- Press the Win+R keys to open the Run dialog box.
- Type cmd and hit Enter to open Command Prompt.
- If asked, click on Yes to allow admin permissions.
- Now, type regsvr32 steam.hdll in the cmd window and hit Enter to execute.
- Wait for the system to register the steam.hdll file.
- Once done, reboot the PC to apply changes.
9. Disable Windows Firewall or Antivirus Program
The chances are high enough that maybe your default Windows Defender Firewall protection or any third-party antivirus program is preventing the ongoing connections or game files to run properly. So, make sure to temporarily disable or turn off the real-time protection and firewall protection. Then you should try running the game to check if the Dead Cell failed to load library Steam.hdll error appears or not. To do this:
- Click on the Start Menu > Type firewall.
- Select Windows Defender Firewall from the search result.
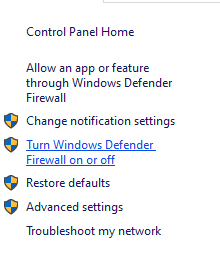
- Now, click on Turn Windows Defender Firewall on or off from the left pane.
- A new page will open > Select the Turn off Windows Defender Firewall (not recommended) option for both the Private & Public Network Settings.
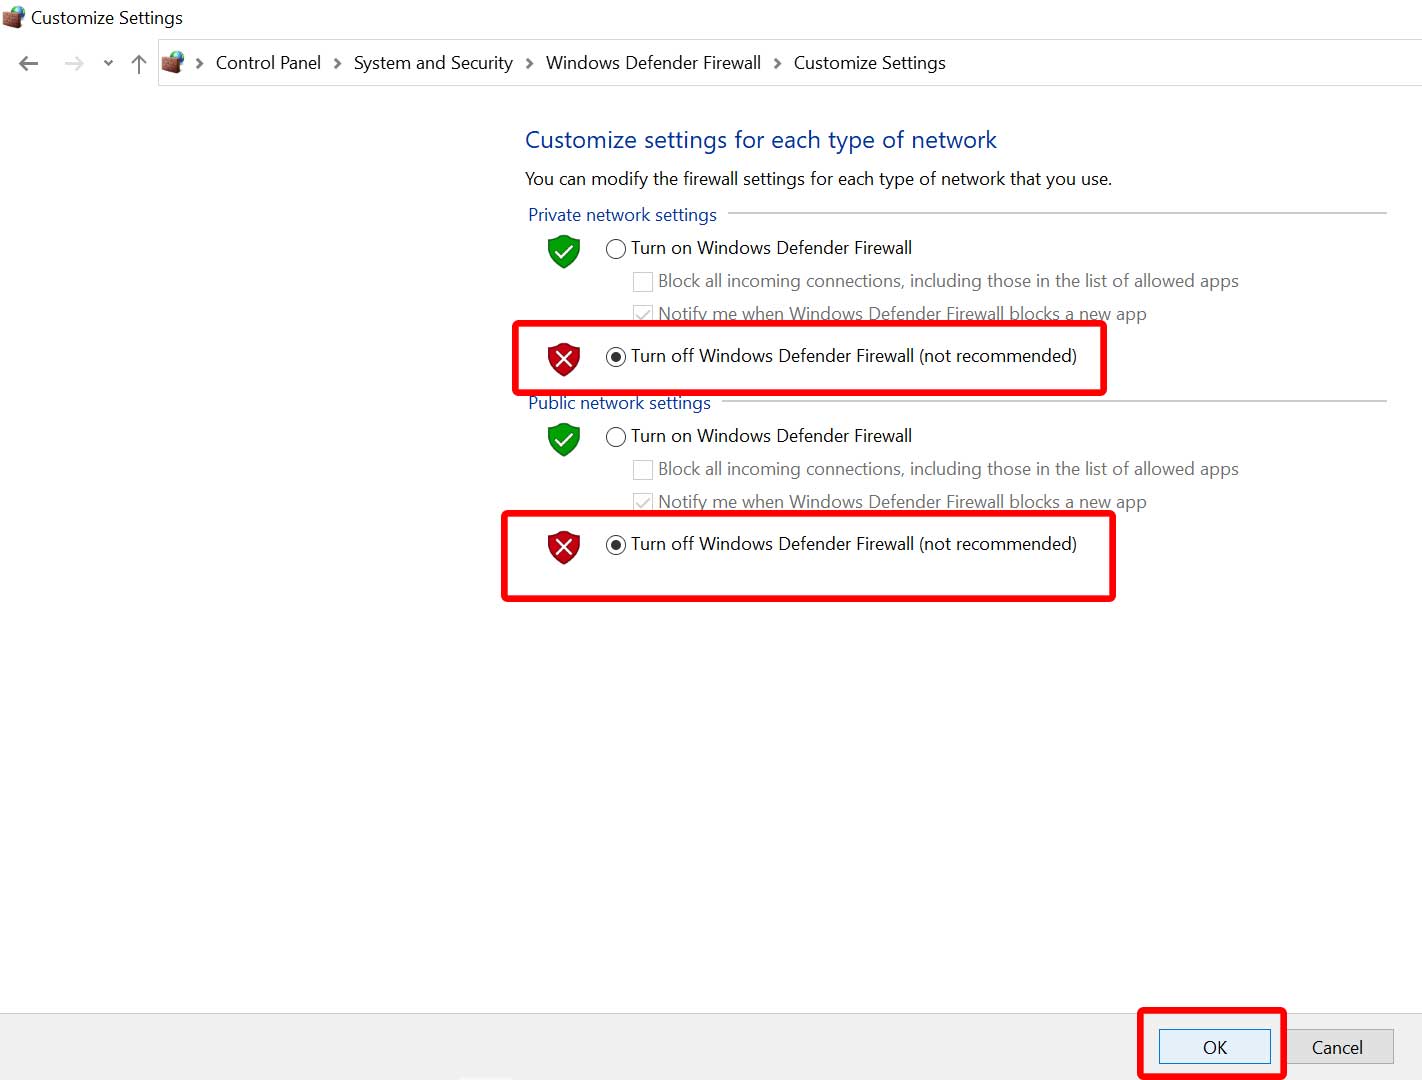
- Once selected, click on OK to save changes.
- Finally, restart your computer.
Similarly, you have to turn off the Windows Security protection too. Just follow the steps below:
- Press the Win+I keys to open Windows Settings.
- Now, click on Update & Security > Click on Windows Security from the left pane.
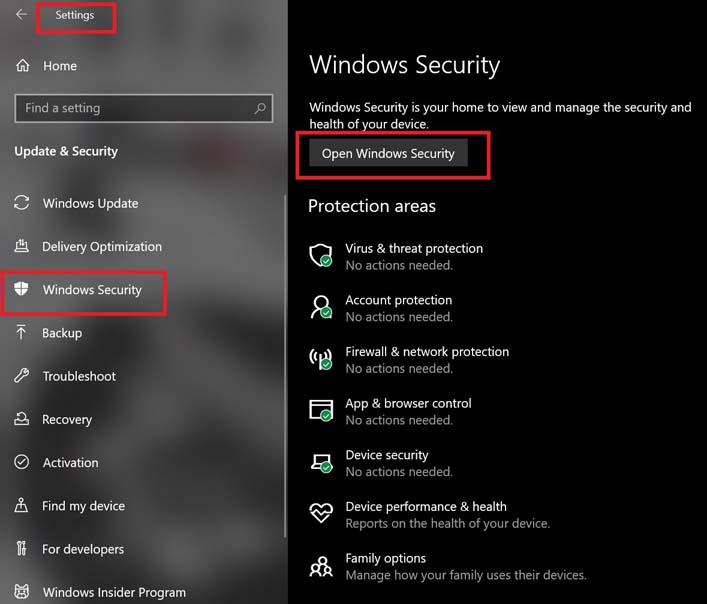
- Click on the Open Windows Security button.
- Go to Virus & threat protection > Click on Manage settings.
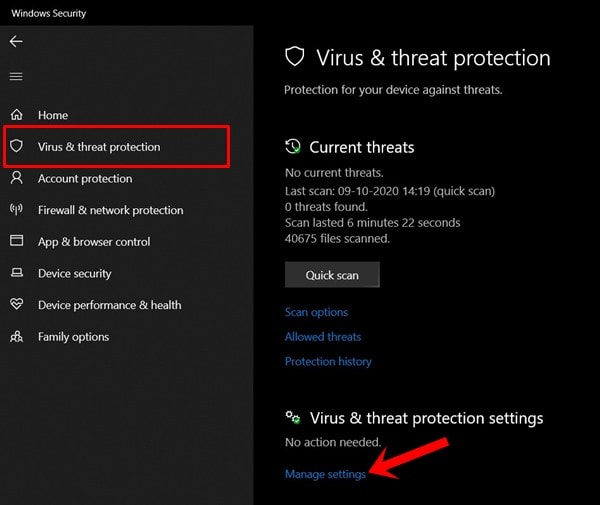
- Just Turn Off the Real-time protection option.
- If prompted, click on Yes to proceed further.
10. Run SFC Scan
System File Checker (SFC) is a utility program on Windows that basically allows users to scan for Windows system files and restore them. If none of the workarounds did find useful, you should run the SFC scan on your PC to cross-check possible issues. To do that:
- Click on the Start Menu and type cmd.
- Now, right-click on Command Prompt from the search result.
- Select Run as administrator > If prompted, click on Yes to give admin privileges.
- CMD window will open now > Type the following command line and hit Enter to run it:
SFC /scannow

- Wait for the process to complete it.
- Once done, just restart your PC to change effects immediately.
11. Reinstall Dead Cell
If none of the methods worked for you then make sure to uninstall and reinstall the game on your PC. Although this method might not be handy for everyone, you should follow the steps below to try fixing it.
- Close the Steam client.
- Search and open Control Panel in the Start menu.
- Now, click on Uninstall a program under Programs.
- Search for the Dead Cell game and select it.
- Select Uninstall and follow the on-screen prompts to complete the uninstallation process.
- Once done, make sure to reboot your PC to apply changes.
- Try re-installing the Dead Cell game again to check for the issue.
That’s it, guys. We assume this guide was helpful to you. For further queries, you can comment below.
