Motorola Moto Z3 (codename: messi) launched in August 2018. The phone came out of the box with Android 8.1 Oreo. This guide outlines the steps to install the DerpFest ROM for Moto Z3 (codenamed: messi) based on Android 10 Q. There are a lot of things that you could do once you jump over the ships to the Android ecosystem. The open-world OS from Google allows for tons of customizations to be carried out. Every day, users take full use of this by installing new launchers, themes, icon packs, etc. whereas others go a step further and install an altogether new OS onto their device. This new OS takes the form of a custom ROM. But why will anyone go for it? Well, the reasons are aplenty.
To begin with, there are tons of new features added in these ROMs, that may not be present in the stock OS shipped by the manufacturer. Apart from that, these ROMs also get updated weekly, bringing new features, stability improvements, and bug fixes to the fore. And if you are a proud owner of Moto Z3, there’s some good news for you. A custom ROM named DerpFest based on Android 10 is available for Moto Z3 devices. In this tutorial, we will talk about the features of this ROM, the steps to install it, and what’s new in Android 10 Q. So without much waiting, let’s start.
Motorola Moto Z3 is powered by a Octa-core (4×2.35 GHz Kryo & 4×1.9 GHz Kryo) with Qualcomm MSM8998 Snapdragon 835 (10 nm) chipset coupled with 4/6GB of RAM and 64/128GB of internal storage. It also supports an external memory card with up to 1 TB microSD. The device came out of the box with Android 8.1 Oreo and backed by a 3000 mAh battery (Non-removable). As far as the camera concerned, the device has a dual-camera setup with 12MP + 12MP primary sensors and a selfie camera with an 8MP lens.
What is DerpFest ROM:
Another of the custom ROM to make its way over to Moto Z3, DerpFest ROM, is the latest addition to the community. It is based on Android 10 and brings tons of goodies with itself. These include themes in the form of new system fonts, new system icon shapes, new background colors, new additions to the status bar, changes to the quick settings panel, ability to modify on-screen keys, mapping hardware keys, tons of modifications the lock screen and notifications and additions of new animations are just some of the new features to be welcomed in this ROM.
[su_spoiler title=”Features of DerpFest ROM”]
Theming:
– Styles Configuration Menu
– 4 System Icon Shapes
– 43 System Fonts
– 7 Primary Colors (Backgrund Colors)
– 6 Lockscreen Clock Styles
– Grid
– Wallpaper Picker
– RGB Accent Picker
– Rounded Corners
Statusbar:
– System Icons
– StatusBar Logo
– Network Traffic Display
– Battery Percent Show/Hide Config
– Show Clock
– Show Date
– Ticker(Beta)
– Carrier Label Settings
Quick Settings:
– Statusbar Pulldown (Left/Right)
– QS Opacity & Color Configs
– QS Backround Image Blur
– Brightness Slider
– Tiles Area
– Footers Area
– Header Area
Buttons:
– NavBar (Enable/Disable)
– Screen Off Power Button Torch
– Volume Settings
– Hardware Keys
– Prevent Accidential Touch
– Enable On-Screen Navbar
– Enable backlight
-Hardware Keys Customisation
Gestures:
– AOSP Gestures
– Back Gesture Height Config
– Toggle To Hide Navbar Pill
– Double Tap To Sleep Status Bar
– Double Tap to Sleep Lockscreen
– Three Finger Swipe To Screenshot
Lockscreen:
– Fingerprint Authentication Vibration Toggle
– Ambient Brightness
– Lock Screen Shortcuts
– Status bar visibility toggle
– Hide LockScreen Icon
– Lockscreen Charging Info
– Show Battery Bar
– Clock/Date/Owner Info Options
– Lock Screen Music Visualizer
– Lock Screen Media Artwork Configs
PowerMenu:
– Disable PowerMenu When Locked
– Power Menu Items
Notifications:
– Notification Light
– Battery Charging Light
– Charging Animations
– Show Gentle Notifications
– Force Expanded Notifications
– Edge Lighting
– Noisy Notifications
– In Call Vibration Options
Animations:
– Animation Duration
– Disable Transition Animations
– ListView Animations
Miscellaneous:
– Wake On Charge
– Brightness Control
– Signature Spoofing Support
– Time In State Monitor
– Doze Settings
[/su_spoiler]
Furthermore, the DerpFest ROM for Moto Z3 (messi) comes in two builds, one with GApps included, and the other is the Vanilla build. The former brings many of the Google Apps to your device. However, if, for some reason, you wish to have a clean, Google free experience, you could go for the Vanilla build. We will be sharing the downloading links and the installation steps for both, but before that, let us check out what’s new in Android 10.
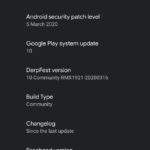
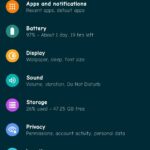
Screenshots
Here are some of the screenshots from the DerpFest ROM for Moto Z3, check out:


Steps to Install DerpFest ROM on Moto Z3
Till now, we have discussed the new features of this ROM and the new features belonging to Android 10. Let’s now check out the steps to install the DerpFest ROM on the Moto Z3 device. Before that, don’t forget to check out the requirements section mentioned below.
Warning!
Prerequisites
- Required Drivers: Download Motorola USB Drivers
- First of all, create a complete backup of your device.
- Next up, make sure the Moto Z3 bootloader is unlocked.
- Download and install the Android SDK and Platform Tools on your PC for executing fastboot commands.
- Make sure you are having the TWRP Recovery or Orange Fox Recovery installed on your device.
- DerpFest ROM for Moto Z3: Download ROM
Instructions for a Fresh Install:
- Boot your device to TWRP Recovery using the hardware key combinations for your device.
- Inside the recovery, tap on Wipe and select System, Vendor, Data, Cache, and Dalvik Cache. Perform a right swipe to confirm the wipe.
- Go back to the home screen, tap on Install, and select the DerpFest ROM for your Moto Z3 device.
- Once done, head back to the home screen, tap on Format Data.
- Now, head over to the Reboot option and tap on Recovery. If you wish to root your device(optional), head to Install, select the Magisk ZIP file and perform a right swipe to flash it.
- Finally, head over to Reboot and tap on System to boot your device to the newly installed OS.
Instructions to Update the ROM:
As and when you receive a new update for the ROM, you could perform a dirty flash as follows:
- Head over to TWRP Recovery and go to Wipe. Select Cache and Dalvik Cache.
- Go back to Install and select the updated DerpFestROM file for your Moto Z3 device. Perform a right swipe to flash it.
- Now, if you wish to root your device as well, head back to Reboot and choose Recovery. Once it reboots to TWRP recovery, go to Install and select the Magisk zip file. Perform a right swipe to flash it onto your device.
- Finally, head back to Reboot and select the System. Your device will now boot to the updated OS.
Conclusion
With that, we conclude this guide on the steps to install the DerpFest ROM based on Android 10 Q on your Moto Z3 (messi) device. We have also discussed in-depth the steps for a clean install and as well as a dirty flash/update. If you still have any queries, do drop in your queries in the comments section below. Just keep this in mind. The first boot after flashing the ROM or updating it usually takes some time, so please be patient during the first boot. With that said, also check out our iPhone Tips and Tricks, PC tips and tricks, and Android Tips and Tricks section.